Quarter Window Replacement
QUARTER WINDOW REPLACEMENT
TOOLS REQUIRED
- J 24402-A Glass Sealant (Cold Knife) Remover
- J 39032 Stationary Glass Removal Tool
- Urethane Adhesive Kit GM P/N 12346392 or Equivalent
- Isopropyl Alcohol or equivalent
- Cartridge-type Caulking Gun
- Commercial-type Utility Knife
- Razor Blade Scraper
- Suction Cups
- Plastic Paddle
REMOVAL PROCEDURE
1. CAUTION: Refer to Cracked Window Caution.
IMPORTANT: Before cutting out a bodyside window, apply a double layer of masking tape around the perimeter of the painted surfaces and the interior trim.
Open the liftgate.
2. Remove the rear quarter panel trim.
3. Disconnect the electrical connectors from the antenna, if equipped.
4. CAUTION: Refer to Defroster Outlet Caution.
Cover the following parts to protect from broken glass:
- Upper dash pad
- Defroster outlets and A/C outlets
- Seats and carpeting

5. CAUTION: Refer to Glass and Sheet Metal Handling Caution.
Using a utility knife, carefully cut the exposed reveal molding (1) from the top and sides edge of the window to access the urethane adhesive bead, if equipped.
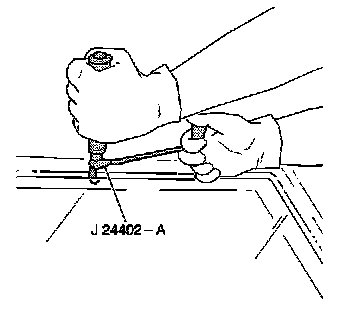
6. IMPORTANT: Keep the cutting edge of the tool against the window.
Remove the window from the urethane adhesive.
- Leave a base of urethane approximately 2 mm (0.078 in) on the pinch-weld flange.
- The only suitable lubrication is clear water.
- Use J 24402-A , J 39032 , or equivalent to remove the window.

7. With the aid of an assistant (2), remove the window (1) from the vehicle.
INSTALLATION PROCEDURE
1. Install the new reveal molding.
2. Install the bodyside window into the opening.
3. Connect the electrical connectors to the antenna, if equipped.
4. Install the rear quarter upper trim panel.
5. Remove the double layer of masking tape around the perimeter of the painted surfaces and the interior trim.
6. Close the liftgate.