Engine Control - Rough Idle/Idle Sag/Cruise Control Inop
NUMBER: 18-026-05GROUP: Vehicle Performance
DATE: May 27, 2005
THE StarSCAN FLASH FILES FOR THIS BULLETIN ARE AVAILABLE VIA THE INTERNET.
THE FLASH FILE WILL BE AVAILABLE ON THE NEXT StarSCAN(R) UPDATE CD RECEIVED AFTER CD 5.04.
SUBJECT:
FLASH: Rough Idle, Idle Sag, Cruise Control Fails To Engage
OVERVIEW:
This bulletin involves selectively erasing and reprogramming the Powertrain Control Module (PCM) with new software.
MODELS:
2005 (LX) Chrysler 300 SRT-8
NOTE:
This bulletin applies to vehicles equipped with a 6.1 L engine (sales code ESF) built between February 3, 2005 (MDH 0203XX) and March 25, 2005 (MDH 0325XX).
SYMPTOM/CONDITION:
The new PCM software corrects the following conditions that the vehicle operator may experience:
^ Rough idle for approximately 30 seconds after start. This condition can happen following a cold start after approximately ten-hour or longer soak time and ambient temperature between 60°F (15.5°C) and 68°F (20°C).
^ Idle sag during a gear engagement. This condition can happen following a cold start after approximately ten-hour or longer soak time and ambient temperature between 60°F (15.5°C) and 68°F (20°C).
^ If a vehicle speed of 140 mph (225 kph) is exceeded and the cruise control switch is not turned on, then any attempts to turn on and set the cruise control below 100 mph (160 kph) will fail. DTC P0503 - Vehicle Speed Sensor / Erratic will also be stored in the PCM. After a key cycle the cruise control will operate normally. The cruise control maximum set speed is 100 mph (160 kph).
DIAGNOSIS:
Using a Scan Tool (StarSCAN) with TeChCONNECT and the appropriate Diagnostic Procedures, verify all engine systems are functioning as designed. If DTCs are present, other then the one listed above, record them on the repair order and repair as necessary before proceeding further with this service bulletin.
If the vehicle operator experiences the Symptom/Condition perform the Repair Procedure.
NOTE:
There are two methods to download flash files to StarSCAN. The first method (preferred) is to download the flash files to the StarSCAN from the internet.
The second method is to download the flash files from the StarSCAN Software Update CD.

PARTS REQUIRED
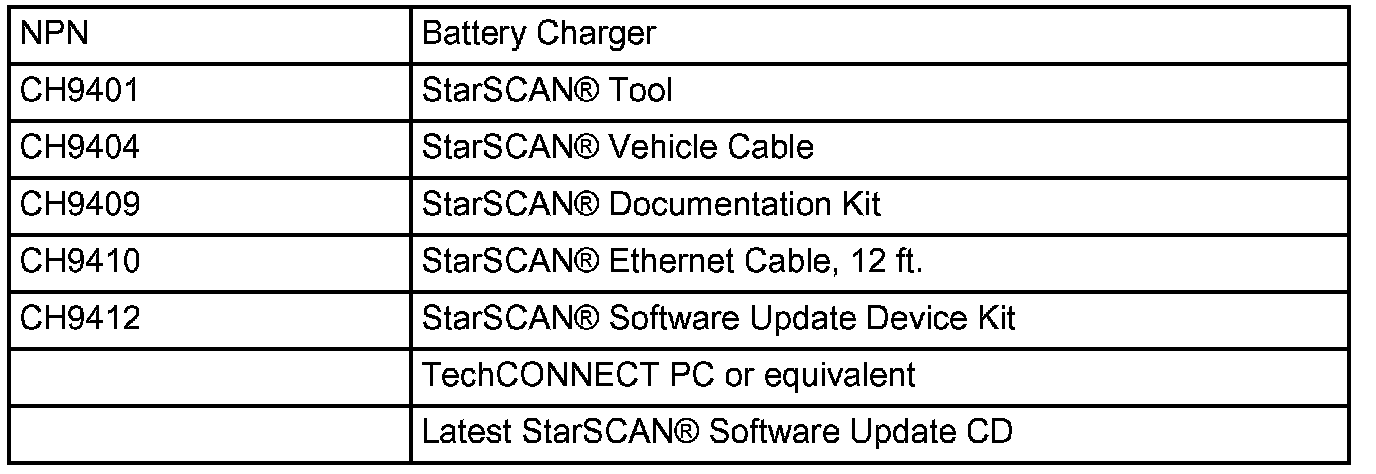
SPECIAL TOOLS/EQUIPMENT REQUIRED
REPAIR PROCEDURE - USING THE INTERNET TO RETRIEVE THE FLASH FILE:
NOTE:
The StarSCAN(R) must be at version 5.02 or higher before the "Using The Internet To Retrieve The Flash File" repair procedure can be performed.
NOTE:
The StarSCAN(R) diagnostic scan tool fully supports Internet connectivity. However, in order to take advantage of this feature you must first configure the StarSCAN� for your dealership's network. For instruction on setting up your StarSCAN(R) for the dealer's network; refer to the StarSCAN(R) Quick Start Networking Guide available on the www.dcctools.com website under the "download center".
NOTE:
Make sure the StarSCAN(R) is configured to the dealership's network before proceeding.
NOTE:
If this flash process is interrupted/aborted, the flash should be restarted.
1. Open the hood, install a battery charger and verify that the charging rate provides approximately 13.5 volts.
2. Connect the CH9410 StarSCAN(R) ethernet cable to the StarSCAN(R) and the dealer's network drop.
3. Connect the CH9404 StarSCAN(R) vehicle cable to the StarSCAN(R) and the vehicle.
4. Power ON the StarSCAN(R).
5. Retrieve the old ECU part number. Using the StarSCAN(R) at the "Home" screen:
a. Select "ECU View"
b. Touch the screen to highlight the appropriate ECU in the list of modules.
c. Record the "Part Number", displayed on the "ECU Overview" screen, for later reference.
6. Connect the CH9410 StarSCAN(R) ethernet cable to the StarSCAN(R) and the dealer's network drop (if not already connected).
7. Download the flash file from the internet to the StarSCAN(R). Using the StarSCAN(R) at the "ECU Overview" screen:
a. Select "More Options"
b. Select "ECU Flash".
c. Select "Browse for New File". Follow the on screen instructions.
d. Select "Download to Scantool".
e. Select "Close" after the download is complete, then select "Back".
f. Highlight the listed calibration.
g. Select "Update Controller".
h. When the update is complete, select "OK".
8. Connect the CH9404 StarSCAN(R) vehicle cable to the StarSCAN(R) and the vehicle (if not already connected).
9. Download the file from StarSCAN(R) to the vehicle. Using StarSCAN(R) at the "Home" screen:
a. Select "ECU View".
b. Browse the list of ECUs using the scroll arrows. Highlight the appropriate ECU.
c. Select "More Options".
d. Select "ECU Flash".
e. Highlight the appropriate ECU "Calibration" from the list.
f. Select "Update Controller".
g. When update is completed, select "OK".
NOTE:
Due to the ECU programming procedure, a DTC may be set in other modules (TCM, BCM, MIC, SKREEM, etc.) within the vehicle, if so equipped. Some DTC's may cause the MIL to illuminate. From the "Home" screen select "System View". Then select "All DTCs". Press "Clear All Stored DTCs" if there are any DTCs shown on the list.
NOTE:
The following step is required by law when reprogramming a PCM and/or TCM.
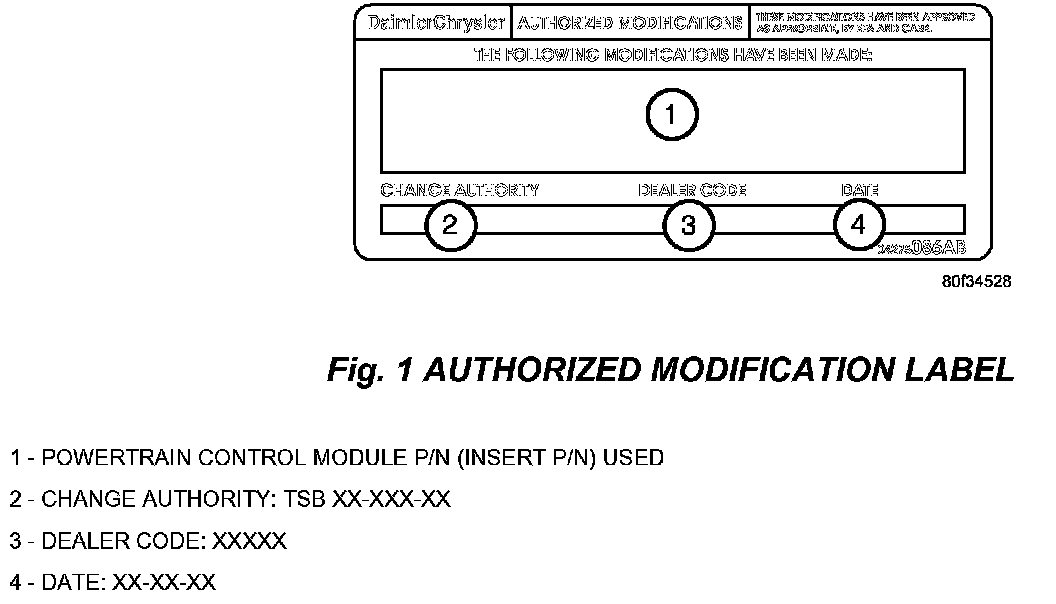
10. Type the necessary information on the "Authorized Modification Label" p/n 04275086AB and attach near the VECI label (Fig. 1).
REPAIR PROCEDURE - USING SOFTWARE UPDATE CD TO RETRIEVE THE FLASH FILE:
NOTE:
Before flashing this module, make sure the StarSCAN(R) is operating at 5.02 or later.
NOTE:
If this flash process is interrupted/aborted, the flash should be restarted.
NOTE:
For detailed information on the operation of the StarSCAN(R), refer to the Quick Reference documentation provided in the StarSCAN(R) documentation kit. In addition, more recent information may also be available at the www.dcctools.com website. Look under "Training Aids" and also under "Download Center > Frequently Asked Questions" for more help.
1. Retrieve the old PCM part number. Using the StarSCAN at the '~Home" screen:
a. Select "ECU View".
b. Touch the screen to highlight the PCM in the list of modules.
c. Record the "Part Number", displayed on the "ECU Overview" screen, for later reference.
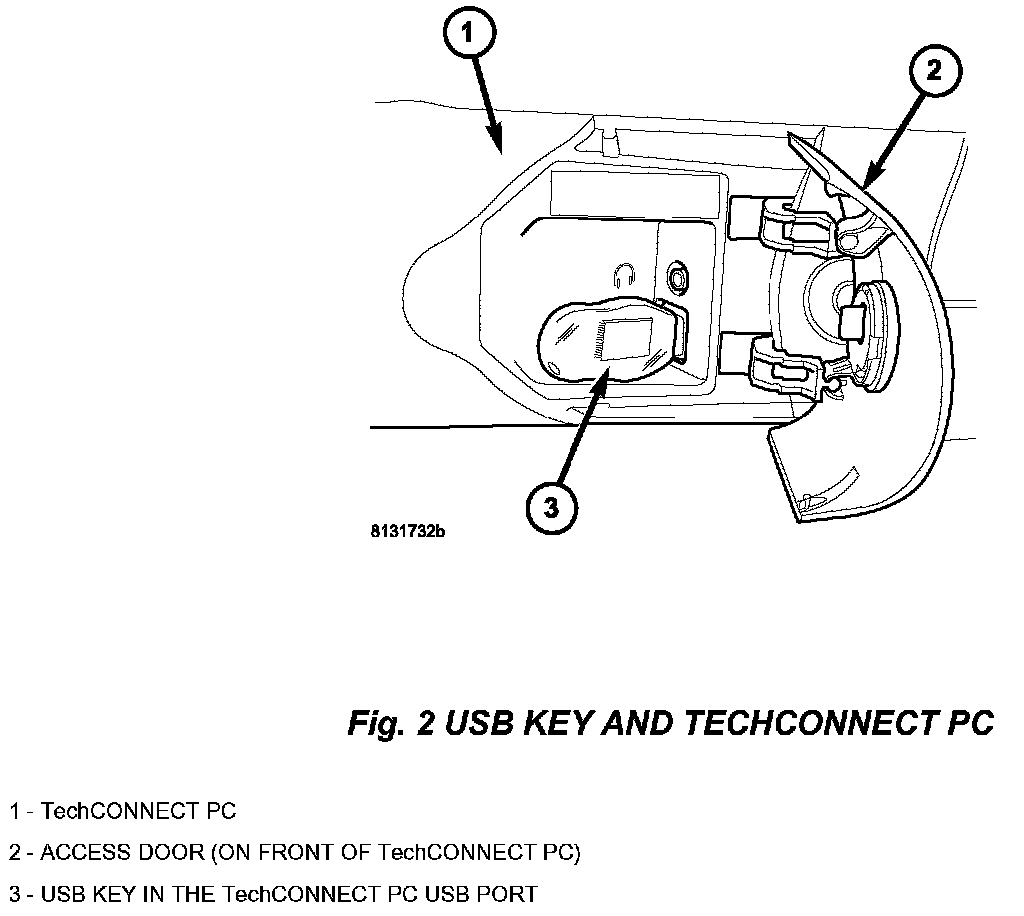
2. Insert the USB Key, into the USB port on the TechCONNECT or equivalent PC (Fig. 2).
3. Insert the StarSCAN Software Update CD into the TeChCONNECT or equivalent PC. The StarSCAN Software Update CD will start automatically.
a. Select "Controller Flash".
b. Follow the on screen instructions.
4. At the "Select the type of information you wish to enter." screen:
a. If the old "Part Number" was recorded in Step # 1, proceed to Step # 5.
b. If the old "Part Number" is not known, proceed to Step # 6.
5. Select "Enter part number".
a. Follow the on screen instructions. Enter the "Part Number" (use capital letters) recorded in Step # 1 when prompted to do so. Follow the on screen instructions. Select "Next" after each step. Select "Finish" after completing the last step.
b. Proceed to Step # 7.
6. Select "Enter YME Information".
a. Follow the on screen instructions. Select "Next" after each step. Select "Finish" after completing the last step.
b. Proceed to Step # 7.
7. Using the mouse highlight the appropriate "Calibration".
a. Select "Save to USB".
b. Follow the on screen instructions. Select "Next" # after each step. Select "Finish" after completing the last step.
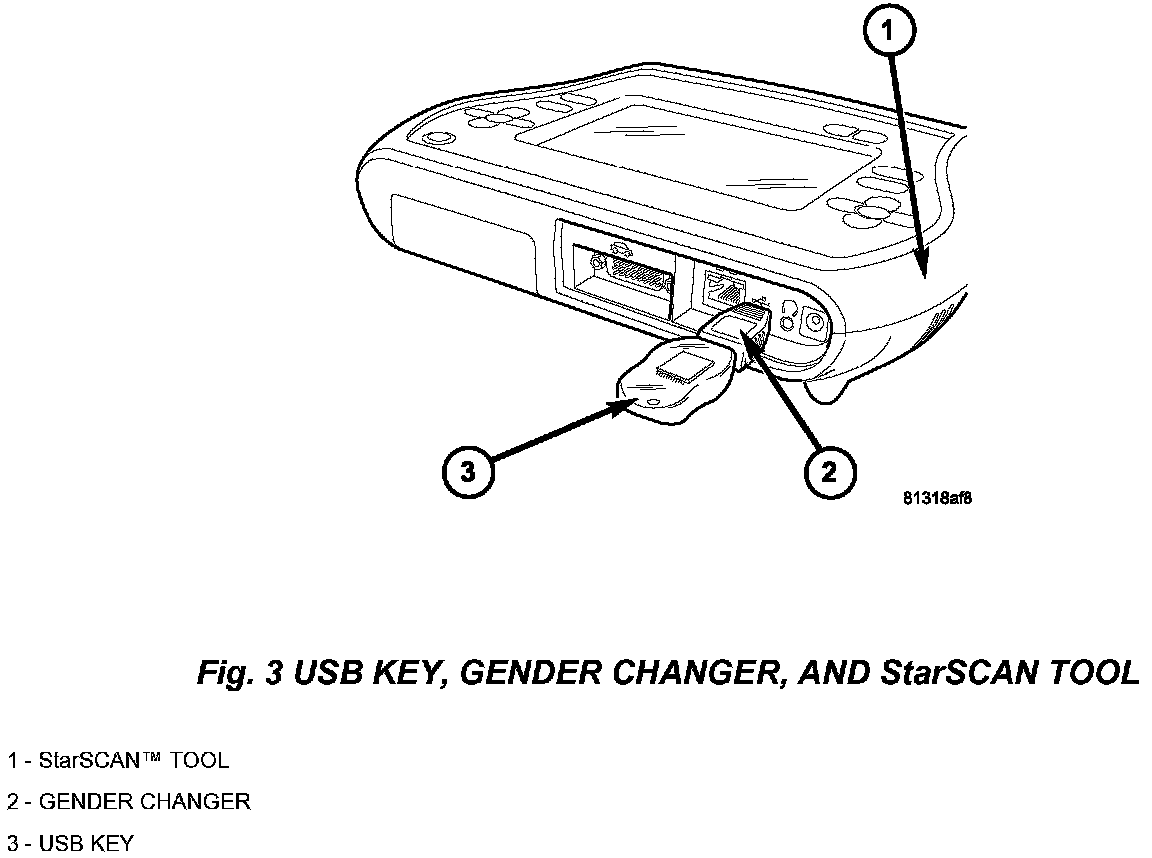
8. With the StarSCAN powered OFF, connect the USB Key and Gender Changer to the StarSCAN USB port (Fig. 3).
9. Open the hood, install a battery charger and verify that the charging rate provides approximately 13.5 volts.
10. Connect the StarSCAN to the vehicle.
11. Power ON the StarSCAN.
12. Reprogram the PCM by downloading the file from the USB key to the StarSCAN. Using the StarSCAN at the "Home" screen:
a. Select "Flash Download".
b. Select "Use USB device".
c. Follow the on screen instructions. Select "Next" # after each step. Select "Finish" after completing the last step.
d. At the "Flash File List" screen, highlight the appropriate PCM "Calibration".
e. Select "Download to Scantool".
f. When the download is complete, select "Close".
13. Download the file from the StarSCAN to the vehicle. Using the StarSCAN at the "Home" screen:
a. Select "ECU View".
b. Browse the list of controllers using the scroll arrows. Highlight the PCM.
c. Select "More Options".
d. Select "ECU Flash".
e. Highlight the appropriate PCM "Calibration" from the list.
f. Select "Update Controller".
g. When update is completed, select "OK".
14. Verify that the PCM part number has updated. Using the StarSCAN at the "Home" screen:
a. Select "ECU View".
b. Touch the screen to highlight the PCM in the list of modules.
c. Select "More Options".
d. Select "ECU Flash".
e. Verify that the "Part Number", displayed on the "Flash PCM" screen, has changed to the updated part number.
NOTE:
Due to the ECU programming procedure, a DTC may be set in other modules (TCM, BCM, MIC, SKREEM, etc.) within the vehicle, if so equipped. Some DTC's may cause the MIL to illuminate. From the "Home" screen select "System View". Then select "All DTCs". Press "Clear All Stored DTCs" if there are any DTCs shown on the list.
NOTE:
The following step is required by law.
15. Type the necessary information on the "Authorized Modification Label" p/n 04275086AB and attach near the VECI label (Fig. 1).
POLICY:
Reimbursable within the provisions of the warranty.

TIME ALLOWANCE

FAILURE CODE
Disclaimer
This bulletin is supplied as technical information only and is not an authorization for repair.