Caliper
DISC BRAKE CALIPER FRONTREMOVAL
1) Disconnect and isolate battery negative cable from battery post.
Fig. 15 Brake Pedal Holding Tool:
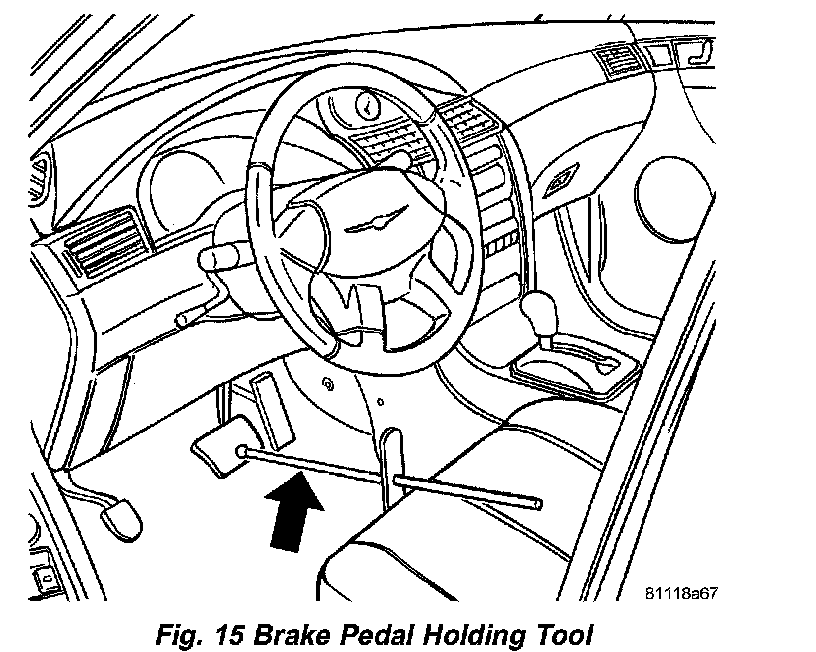
2) Using a brake pedal holding tool as shown (Fig. 15), depress brake pedal past its first inch of travel and hold it in this position. Holding pedal in this position will isolate master cylinder from hydraulic brake system and will not allow brake fluid to drain out of brake fluid reservoir while brake lines are open.
3) Raise and support vehicle.
4) Remove tire and wheel assembly.
Fig. 16 Brake Hose And Wheel Speed Sensor Connections:
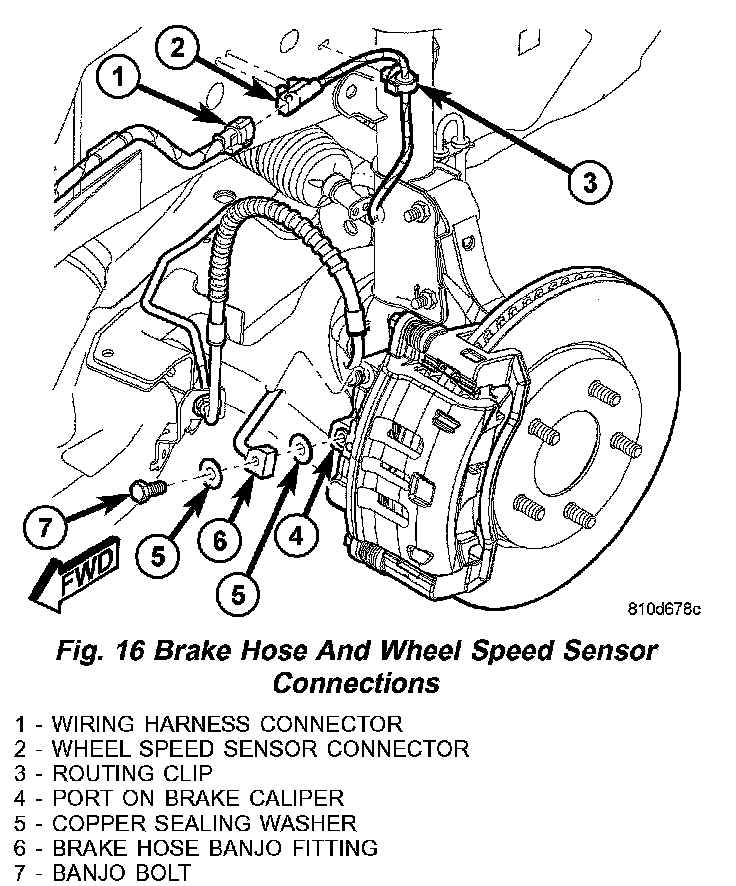
5) Remove banjo bolt connecting brake hose to caliper (Fig. 16). There are two sealing washers (one each side of hose fitting) that will come off when bolt is removed. Discard these washers; install new washers on installation.
6) Place an appropriately sized C-Clamp over brake caliper as shown (Fig. 5), placing screw-drive head against outboard shoe and hook against rear of caliper. Slowly tighten screw-drive retracting caliper pistons into bores and breaking outboard brake shoe free from caliper fingers. Do not overtighten C-Clamp. Remove C-Clamp.
7) Once outboard shoe is free from caliper fingers, slide caliper inboard on guides providing clearance between the rotor and inboard brake shoe.
8) Slide an appropriate prying tool though center opening in top of caliper behind inboard brake shoe between two caliper pistons. Use care not to come in contact with pistons or dust boots potentially damaging them. Pry against rear of inboard brake shoe breaking it free from caliper pistons.
9) Remove two brake caliper guide pin bolts (Fig. 6).
10) Slide disc brake caliper off pads and remove from brake caliper adapter.
DISASSEMBLY
NOTE: Before disassembling the brake caliper, clean and inspect it.
WARNING: UNDER NO CONDITION SHOULD HIGH PRESSURE AIR EVER BE USED TO REMOVE A PISTON FROM A CALIPER BORE. PERSONAL INJURY COULD RESULT FROM SUCH PRACTICE.
1) Drain brake fluid from caliper.
CAUTION: Do not use excessive force when clamping caliper in vise. Excessive vise pressure will cause bore distortion.
2) Mount caliper in vise equipped with protective jaws.
Fig. 17 C-Clamp One Piston:
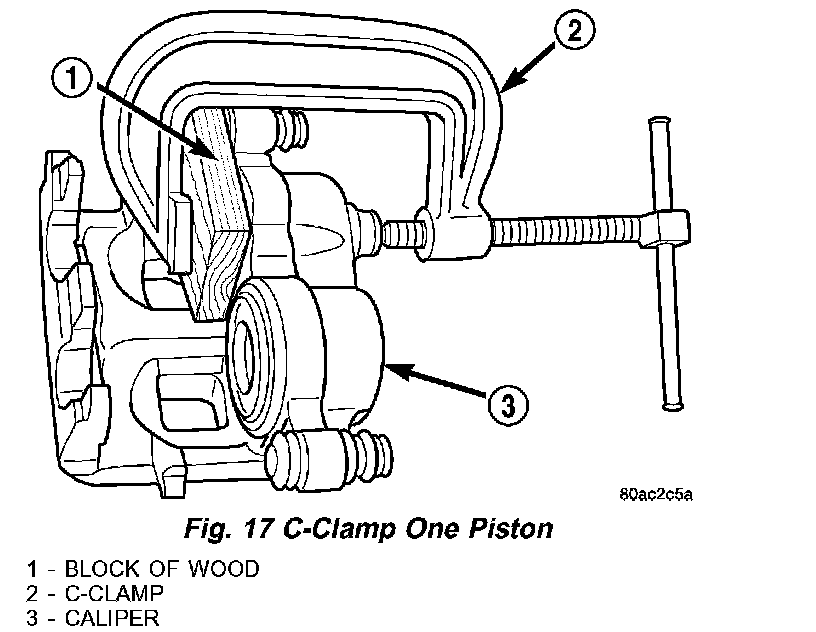
3) C-clamp a block of wood over one piston (Fig. 17).
Fig. 18 Protect Caliper Piston:
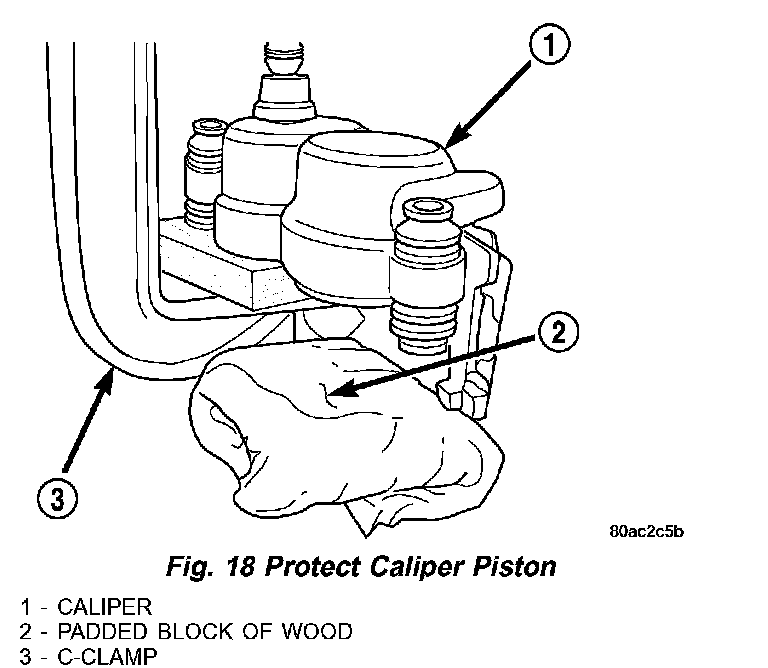
4) Take another piece of wood and pad it with one-inch thickness of shop towels. Place this piece in outboard shoe side of caliper in front of other piston. This will cushion and protect caliper piston during removal (Fig. 18).
WARNING: DO NOT PLACE FACE OR HANDS NEAR CALIPER AND PISTON IF USING COMPRESSED AIR TO REMOVE PISTON. DO NOT USE HIGH PRESSURE.
WARNING: NEVER ATTEMPT TO CATCH PISTON AS IT LEAVES BORE. THIS COULD RESULT IN PERSONAL INJURY.
CAUTION: Do not blow piston out of bore with sustained air pressure. This could result in a cracked piston. Use only short spurts of air.
5) Apply short spurts of low pressure air with a rubber tipped blow gun through caliper brake hose port. Use only enough air pressure to ease piston out.
6) Remove C-clamp and block of wood from caliper and clamp it over dust boot of first piston removed. This will seal empty piston bore.
7) Move padded piece of wood in front of piston yet to be removed.
8) Remove second piston using same procedure with short spurts of low pressure air.
9) Remove C-clamp and block of wood from caliper.
Fig. 19 Piston Dust Boot Removal:
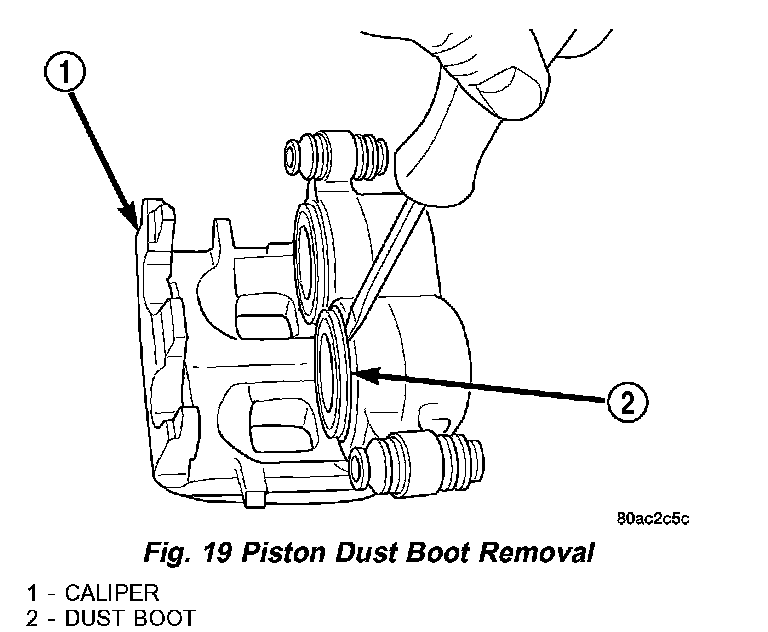
10) Remove piston dust boots with an appropriate pry tool (Fig. 19).
CAUTION: Use an appropriate tool to remove piston seals to avoid scratching piston bore. Do not use a screwdriver or other metal tool to remove seals.
Fig. 20 Piston Seal:
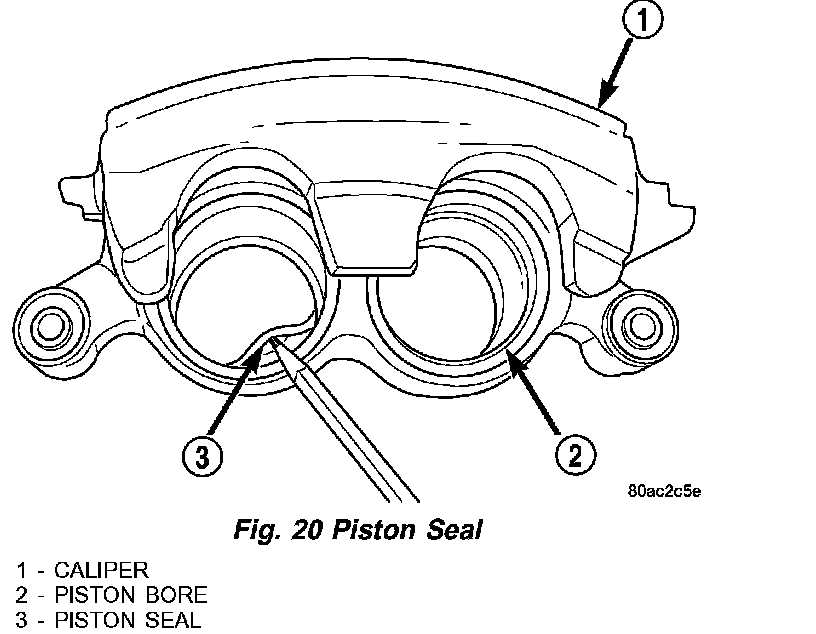
11) Remove piston seals from caliper (Fig. 20).
12) Remove caliper bleeder screw.
13) Clean piston bore and drilled passage ways with alcohol or a suitable solvent. Wipe it dry using only a lint-free cloth.
14) Inspect both piston and bore for scoring or pitting. Bores that show light scratches or corrosion can usually be cleared of light scratches or corrosion using crocus cloth.
CLEANING
WARNING: DUST AND DIRT ACCUMULATING ON BRAKE PARTS DURING NORMAL USE MAY CONTAIN ASBESTOS FIBERS FROM PRODUCTION OR AFTERMARKET BRAKE LININGS. BREATHING EXCESSIVE CONCENTRATIONS OF ASBESTOS FIBERS CAN CAUSE SERIOUS BODILY HARM. EXERCISE CARE WHEN SERVICING BRAKE PARTS. DO NOT SAND OR GRIND BRAKE LINING UNLESS EQUIPMENT USED IS DESIGNED TO CONTAIN THE DUST RESIDUE. DO NOT CLEAN BRAKE PARTS WITH COMPRESSED AIR OR BY DRY BRUSHING. CLEANING SHOULD BE DONE BY DAMPENING THE BRAKE COMPONENTS WITH A FINE MIST OF WATER, THEN WIPING THE BRAKE COMPONENTS CLEAN WITH A DAMPENED CLOTH. DISPOSE OF CLOTH AND ALL RESIDUE CONTAINING ASBESTOS FIBERS IN AN IMPERMEABLE CONTAINER WITH THE APPROPRIATE LABEL. FOLLOW PRACTICES PRESCRIBED BY THE OCCUPATIONAL SAFETY AND HEALTH ADMINISTRATION (OSHA) AND THE ENVIRONMENTAL PROTECTION AGENCY (EPA) FOR THE HANDLING, PROCESSING, AND DISPOSING OF DUST OR DEBRIS THAT MAY CONTAIN ASBESTOS FIBERS.
To clean or flush the internal passages of the brake caliper, use fresh brake fluid or Mopar Non-Chlorinated Brake Parts Cleaner. Never use gasoline, kerosene, alcohol, oil, transmission fluid or any fluid containing mineral oil to clean the caliper. These fluids will damage rubber cups and seals.
INSPECTION
Inspect the disc brake caliper for the following:
- Brake fluid leaks in and around piston boot area
- Ruptures, brittleness or damage to the piston dust boot
If caliper fails inspection, disassemble and recondition caliper, replacing the seals and dust boots.
ASSEMBLY
CAUTION: Dirt, oil, and solvents can damage caliper seals. Ensure assembly area is clean and dry.
NOTE: Always use new, clean Mopar DOT 3 Motor Vehicle Brake Fluid when assembling brake caliper.
NOTE: Never use old piston seals or boots.
1) Lubricate caliper pistons, piston seals and piston bores with clean, fresh brake fluid.
Fig. 21 Piston Seal Installation:

2) Install NEW piston seals into caliper piston bores (Fig. 21).
NOTE: Verify seal is fully seated and not twisted.
3) Install NEW boot on each piston and work boot lip into groove at top of piston. Stretch boot rearward straightening boot folds, then move boot forward as necessary until folds snap into place.
Fig. 22 Caliper Piston Installation:
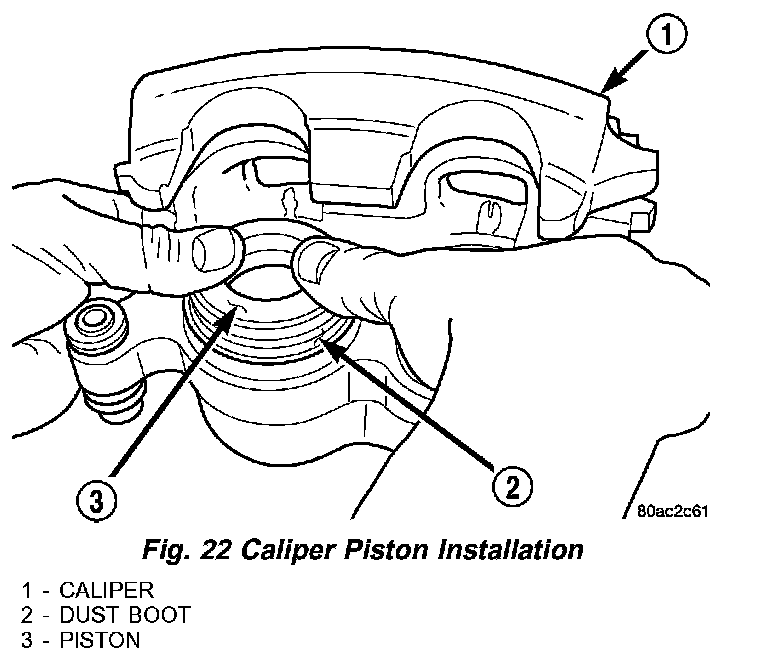
4) Install first piston into caliper piston bore, pressing piston down to bottom of bore using hand pressure (Fig. 22). Using a piece of wood or wooden hammer handle may also suffice as long as piston and boot damage is avoided.
Fig. 23 Seating Dust Boot:
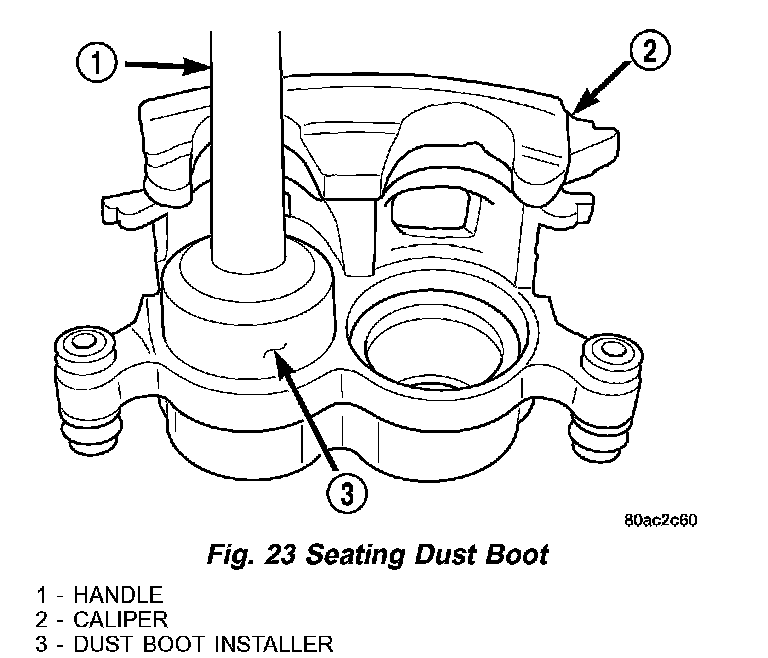
5) Seat dust boot in caliper counterbore using Installer, Special Tool L-4410, with Handle, Special Tool C-4171. Install dust boot until it bottoms (Fig. 23). Do not over-seat dust boot.
6) Install second piston and dust boot using same procedure as first.
7) Install caliper bleeder screw.
8) Install caliper on vehicle.
INSTALLATION
CAUTION: If adhesive is missing from noise suppression gasket on rear of either inner and outer brake shoes or if gasket is damaged, replace brake shoes.
CAUTION: Use care when installing caliper onto disc brake adapter to avoid damaging boots on caliper guide pins.
1) Install disc brake caliper over brake shoes on brake caliper adapter.
CAUTION: To avoid possible noise or roughness concerns, it is crucial that upper caliper guide pin bolt (closest to bleeder screw) be tighten to specifications first before tightening lower guide pin bolt.
2) Align caliper guide pin bolt holes with guide pins, then install caliper guide pin bolts (Fig. 6). Tighten upper (closest to bleeder screw) bolt to 43 Nm (32 ft. lbs.) torque, then tighten lower bolt to 43 Nm (32 ft. lbs.).
3) Install banjo bolt attaching brake hose to caliper (Fig. 16). Install NEW washers on each side of hose fitting as banjo bolt is placed through fitting. Thread banjo bolt into caliper and tighten to 47 Nm (35 ft. lbs.).
4) Install tire and wheel assembly. Tighten wheel mounting nuts to 135 Nm (100 ft. lbs.).
5) Lower vehicle.
6) Remove brake pedal holding tool.
7) Connect battery negative cable to battery post.
8) Bleed base brake hydraulic system as necessary.
9) Road test vehicle making several stops to wear off any foreign material on brakes and to seat brake shoes.