Rear
DISC BRAKE CALIPER - REARREMOVAL
1) Disconnect and isolate battery negative cable from battery post.
2) Using a brake pedal holding tool as shown (Fig. 15), depress brake pedal past its first inch of travel and hold it in this position. Holding pedal in this position will isolate master cylinder from hydraulic brake system and will not allow brake fluid to drain out of brake fluid reservoir while brake lines are open.
3) Raise and support vehicle.
4) Remove wheel and tire assembly.
Fig. 24 Rear Brake Caliper Mounting:
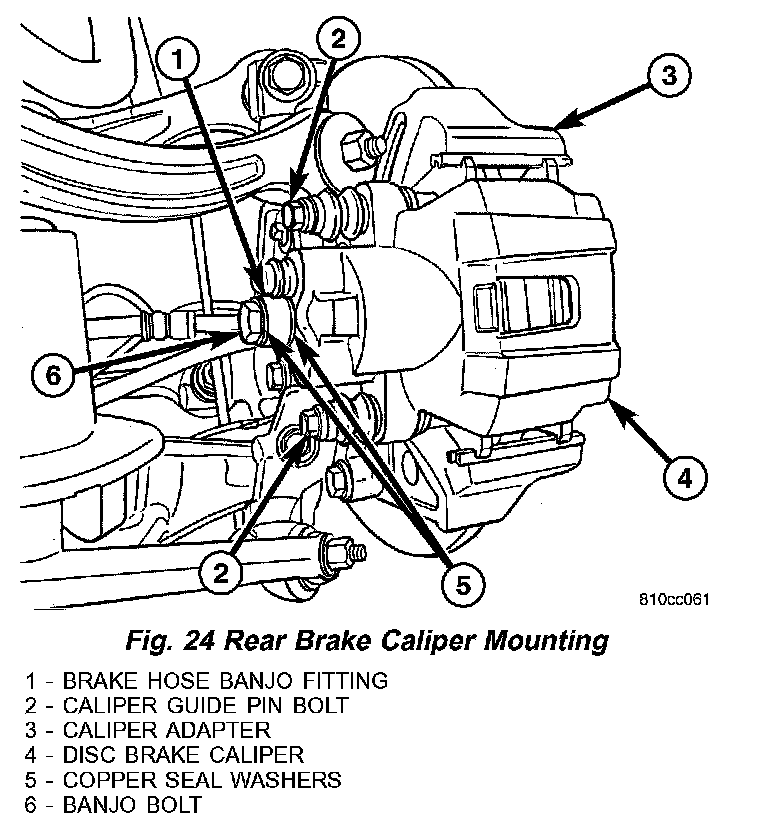
5) Remove banjo bolt connecting brake hose to caliper (Fig. 24). There are two sealing washers (one each side of hose fitting) that will come off when bolt is removed. Discard these washers; install new washers on installation.
6) Remove disc brake caliper guide pin bolts (Fig. 24).
Fig. 25 Rear Caliper Removal:
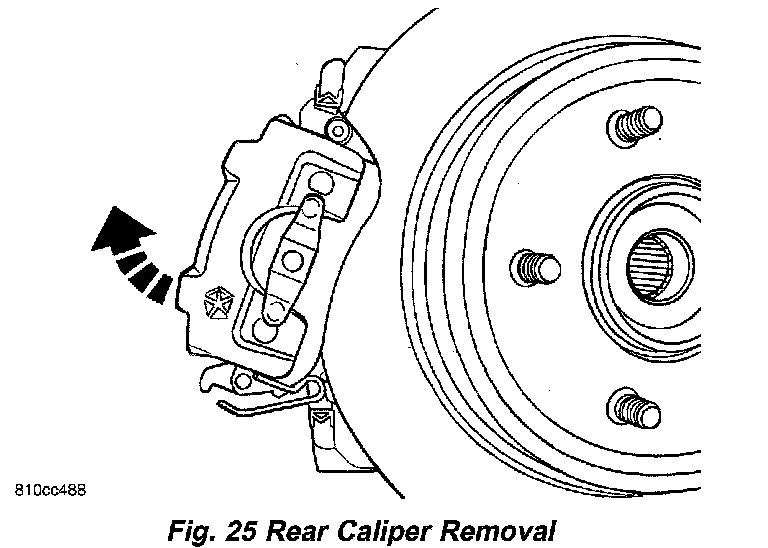
7) Remove caliper assembly from brake adapter by first rotating bottom of caliper away from rotor, then lifting caliper (with shoes) away from upper adapter abutment (Fig. 25).
Fig. 26 Outboard Shoe Removal:
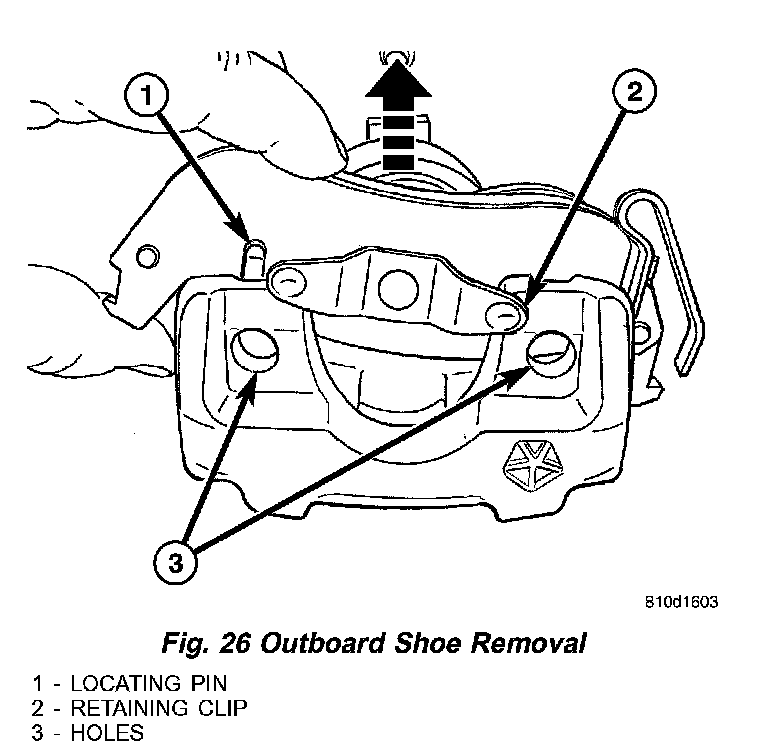
8) Remove outboard brake shoe by pushing shoe away from caliper fingers, dislocating locating pins built into shoe backing plate from holes in caliper fingers, then sliding brake shoe down and off of brake caliper (Fig. 26).
9) Pull inboard brake shoe away from caliper piston, dislocating retaining clip from cavity in piston. Remove inboard shoe.
DISASSEMBLY
CALIPER GUIDE PIN BUSHINGS
NOTE: Before disassembling brake caliper, clean and inspect it.
Fig. 27 Removing Sleeve From Bushing:
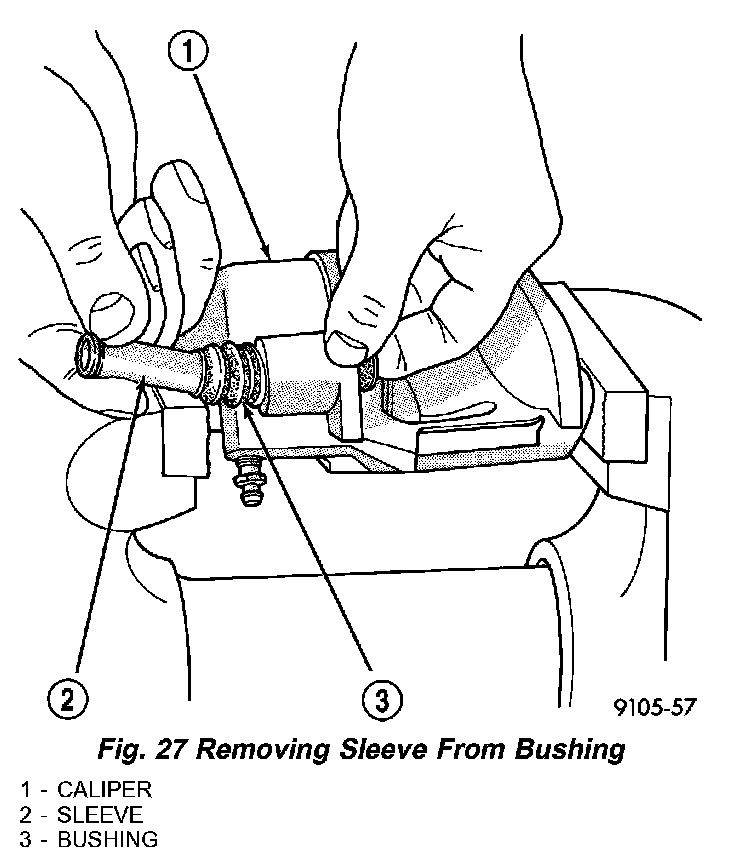
1) With one hand, push guide pin bushing sleeve towards rear of caliper, and at same time, pull sleeve out rear of caliper and bushing (Fig. 27).
Fig. 28 Removing Bushing From Caliper:
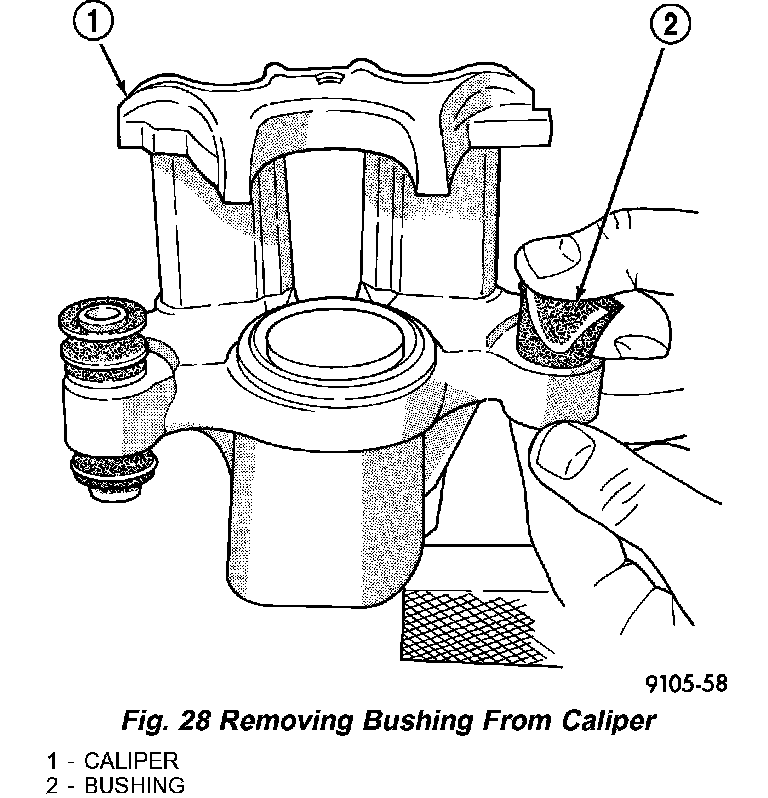
2) Using fingers, collapse one side of rubber guide pin bushing. Pull guide pin bushing out other side of brake caliper mounting boss (Fig. 28).
CALIPER PISTON AND SEAL
NOTE: Before disassembling brake caliper, clean and inspect it.
WARNING: UNDER NO CONDITION SHOULD HIGH PRESSURE AIR EVER BE USED TO REMOVE A PISTON FROM A CALIPER BORE. PERSONAL INJURY COULD RESULT FROM SUCH A PRACTICE.
CAUTION: Do not use excessive force when clamping caliper in vise. Excessive vise pressure will cause bore distortion.
1) Mount caliper in a vise equipped with protective jaws.
Fig. 29 Piston Removal Using Air Pressure:
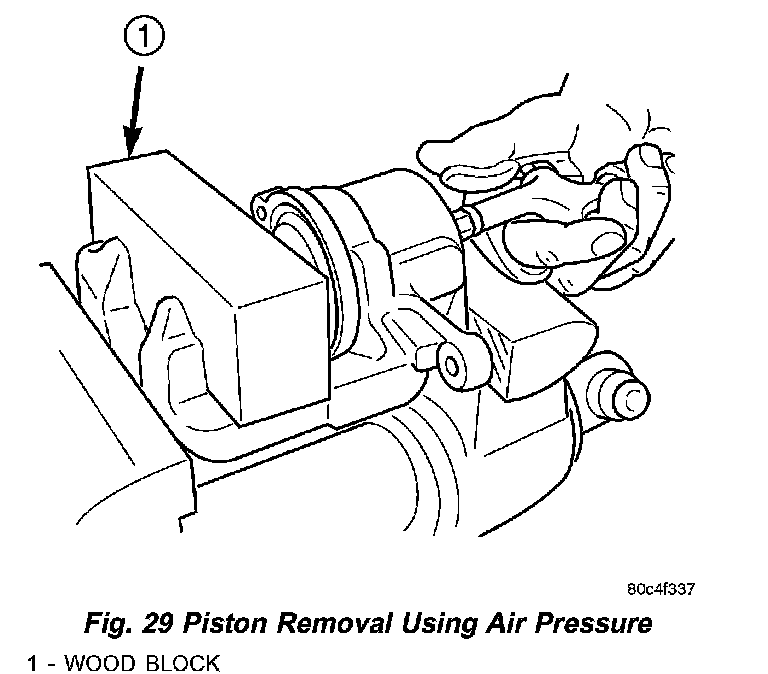
2) Place a wooden block in caliper as shown (Fig. 29). Block should be sized to allow piston to push out of bore far enough to be removed by hand after being loosened by air pressure, yet large enough keep piston from coming completely out utilizing air pressure.
WARNING: DO NOT PLACE FACE OR HANDS NEAR CALIPER AND PISTON IF USING COMPRESSED AIR PRESSURE TO REMOVE PISTON. DO NOT USE HIGH PRESSURE.
3) Apply low pressure compressed air to caliper fluid inlet in short spurts to ease piston out of bore.
4) Remove piston from caliper.
Fig. 30 Removing Caliper/Piston Dust Boot:
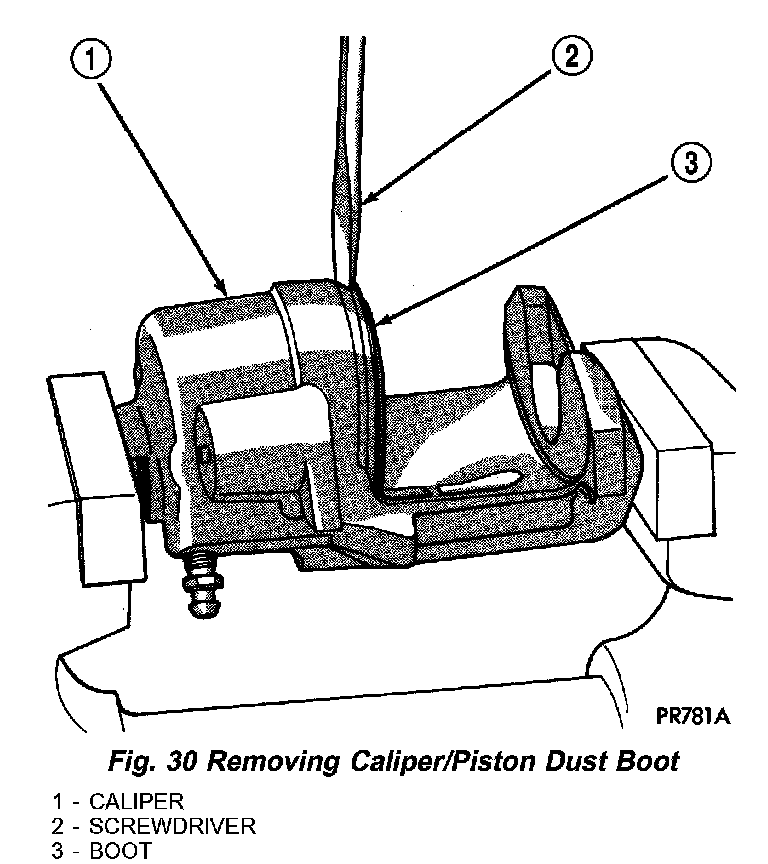
5) Remove dust boot and discard it (Fig. 30).
CAUTION: Do not use a screw driver or other metal tool for seal removal. Using such tools can scratch bore or leave burrs on seal groove edges.
Fig. 31 Piston Seal Removal:
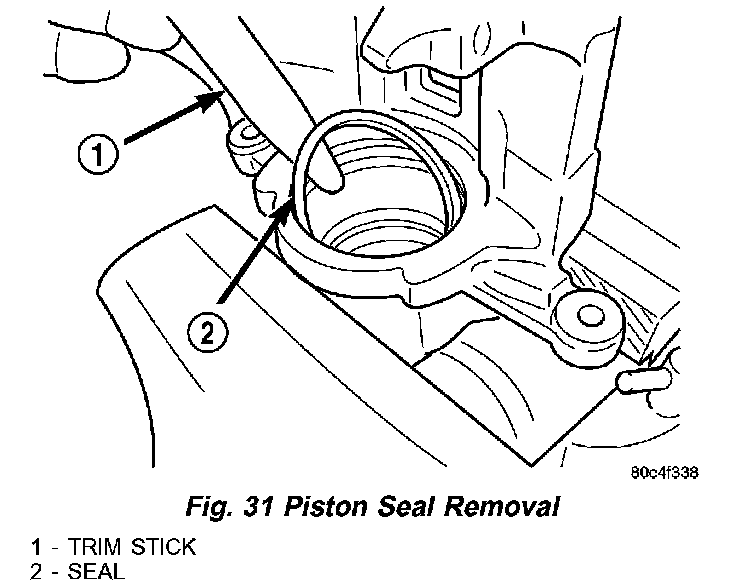
6) Using a soft tool such as a plastic trim stick, work piston seal out of its groove in caliper piston bore (Fig. 31). Discard old seal.
7) Remove caliper bleeder screw.
8) Clean piston bore and drilled passage ways with alcohol or a suitable solvent. Wipe it dry using only a lint-free cloth.
9) Inspect both piston and bore for scoring or pitting. Bores that show light scratches or corrosion can usually be cleared of light scratches or corrosion using crocus cloth.
CLEANING
WARNING: DUST AND DIRT ACCUMULATING ON BRAKE PARTS DURING NORMAL USE MAY CONTAIN ASBESTOS FIBERS FROM PRODUCTION OR AFTERMARKET BRAKE LININGS. BREATHING EXCESSIVE CONCENTRATIONS OF ASBESTOS FIBERS CAN CAUSE SERIOUS BODILY HARM. EXERCISE CARE WHEN SERVICING BRAKE PARTS. DO NOT SAND OR GRIND BRAKE LINING UNLESS EQUIPMENT USED IS DESIGNED TO CONTAIN THE DUST RESIDUE. DO NOT CLEAN BRAKE PARTS WITH COMPRESSED AIR OR BY DRY BRUSHING. CLEANING SHOULD BE DONE BY DAMPENING THE BRAKE COMPONENTS WITH A FINE MIST OF WATER, THEN WIPING THE BRAKE COMPONENTS CLEAN WITH A DAMPENED CLOTH. DISPOSE OF CLOTH AND ALL RESIDUE CONTAINING ASBESTOS FIBERS IN AN IMPERMEABLE CONTAINER WITH THE APPROPRIATE LABEL. FOLLOW PRACTICES PRESCRIBED BY THE OCCUPATIONAL SAFETY AND HEALTH ADMINISTRATION (OSHA) AND THE ENVIRONMENTAL PROTECTION AGENCY (EPA) FOR THE HANDLING, PROCESSING, AND DISPOSING OF DUST OR DEBRIS THAT MAY CONTAIN ASBESTOS FIBERS.
To clean or flush the internal passages of the brake caliper, use fresh brake fluid or Mopar Non-Chlorinated Brake Parts Cleaner. Never use gasoline, kerosene, alcohol, oil, transmission fluid or any fluid containing mineral oil to clean the caliper. These fluids will damage rubber cups and seals.
INSPECTION
Inspect the disc brake caliper for the following:
- Brake fluid leaks in and around boot area and inboard lining
- Ruptures, brittleness or damage to the piston dust boot
- Damaged, dry or brittle guide pin dust boots
If caliper fails inspection, disassemble and recondition caliper, replacing the seals and dust boots.
ASSEMBLY
CALIPER GUIDE PIN BUSHINGS
Fig. 32 Folded Caliper Guide Pin Bushing:
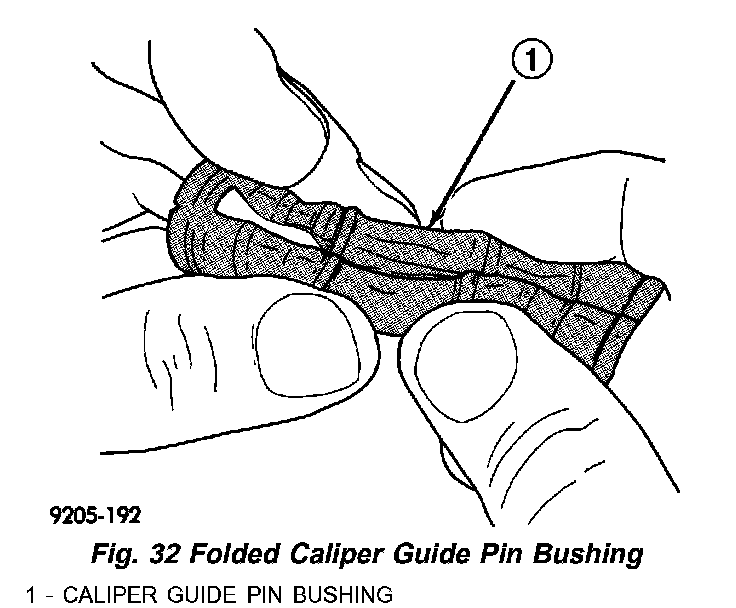
1) Fold guide pin bushing in half lengthwise at solid middle section (Fig. 32).
NOTE: To avoid damage to bushing, do not use a sharp object to install guide pin bushing.
Fig. 33 Installing Caliper Guide Pin Bushing:

2) Insert folded bushing into caliper mounting boss using fingers (Fig. 33).
Fig. 34 Bushing Correctly Installed In Caliper:
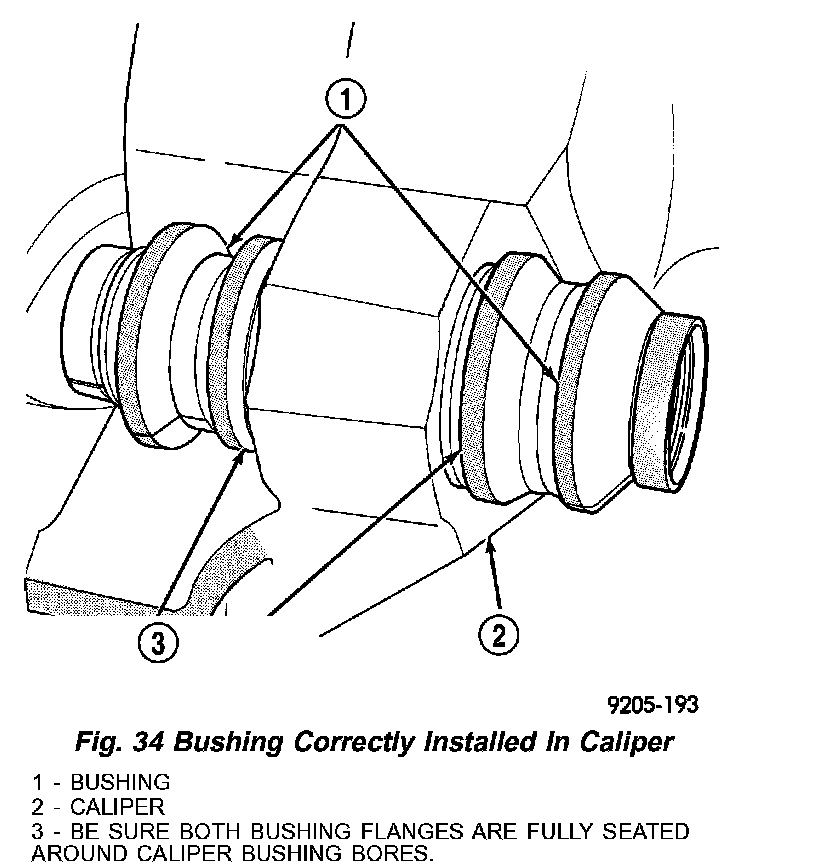
3) Unfold bushing using fingers or a wooden dowel until bushing is fully seated into caliper housing. Bushing flanges should be seated evenly on both sides of bushing hole (Fig. 34).
4) Lubricate inside surfaces of bushing using Mopar Dielectric Grease or an equivalent.
Fig. 35 Installing Sleeve In Bushing:
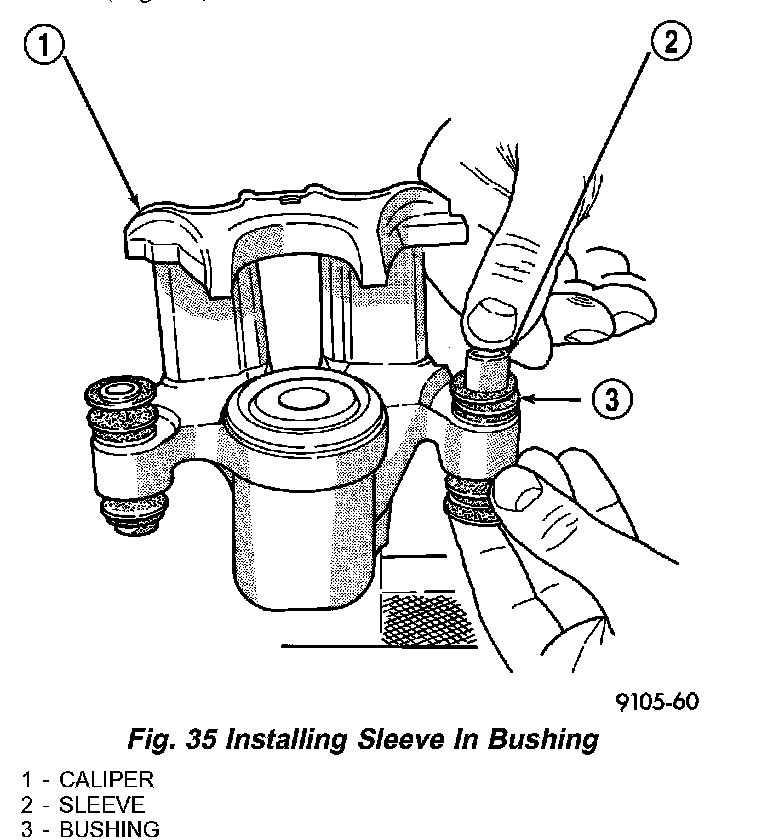
5) Install guide pin sleeve into one end of bushing until seal area of bushing is past seal groove in sleeve (Fig. 35).
6) While holding convoluted boot on opposite end of bushing, push steel sleeve through bushing until bushing boot is fully seated into seal groove on that end of sleeve (Fig. 35). Install other end bushing boot into groove on that end of bushing sleeve.
Fig. 36 Correctly Installed Guide Pin Sleeve And Bushing:
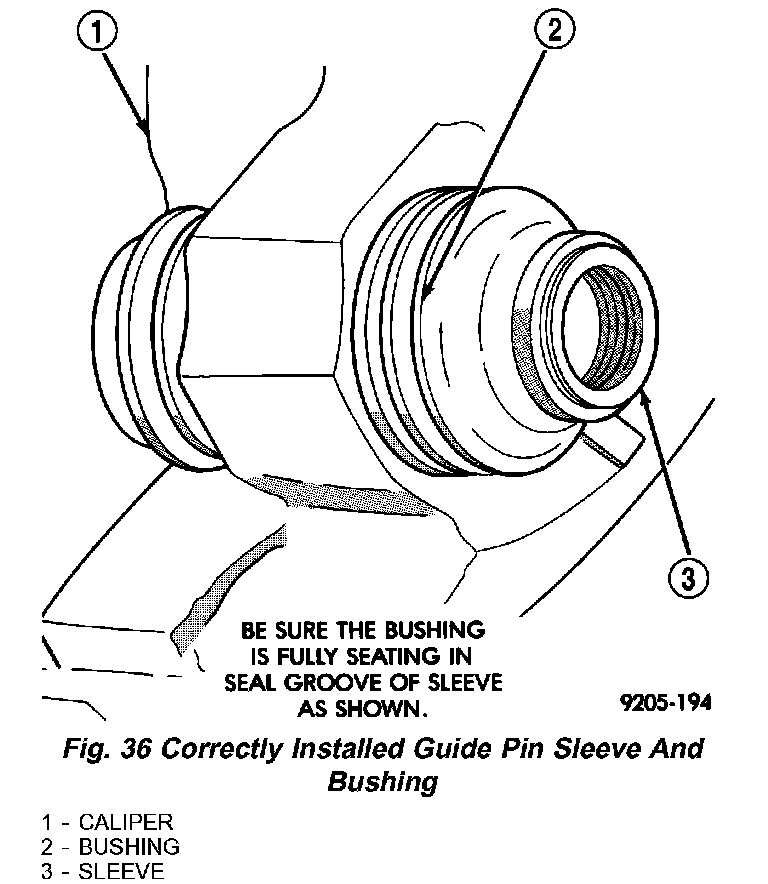
7) Verify both ends of bushing are seated in sleeve grooves (Fig. 36). When sleeve is seated properly into bushing, sleeve/bushing can be held between fingers and easily slid back and forth without bushing unseating from sleeve groove.
CALIPER PISTON AND SEAL
CAUTION: Dirt, oil, and solvents can damage caliper seals. Ensure assembly area is clean and dry.
NOTE: Always use new, clean Mopar DOT 3 Motor Vehicle Brake Fluid when assembling brake caliper.
NOTE: Never use old piston seals or boots.
1) Lubricate caliper pistons, piston seals and piston bores with clean, fresh brake fluid.
Fig. 37 New Piston Seal Installation:
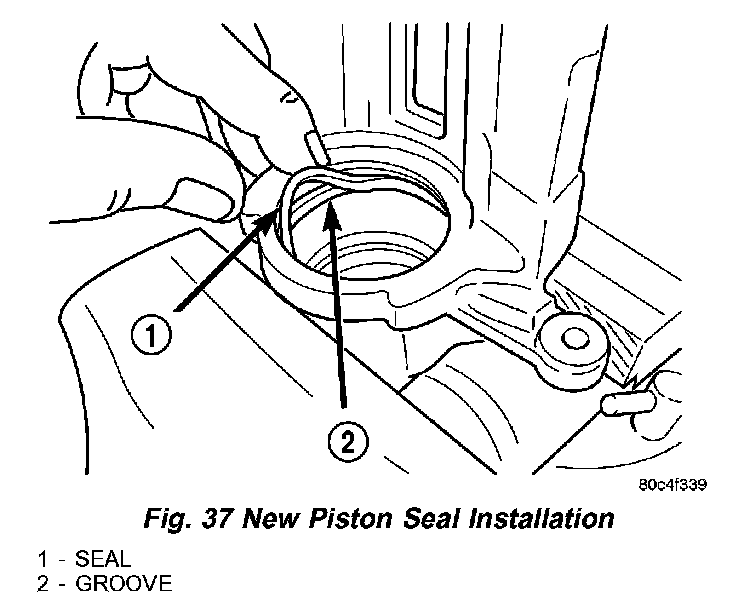
2) Install piston seal in groove of caliper bore. Seal should be started at one area of groove and gently worked around and into the groove using only your clean fingers to seat it (Fig. 37).
3) Install NEW boot on piston and work boot lip into groove at top of piston. Stretch boot rearward straightening boot folds, then move boot forward as necessary until folds snap into place.
4) Install piston into caliper piston bore, pressing piston down to bottom of bore using hand-pressure. Using a piece of wood or wooden hammer handle may also suffice as long as piston and boot damage is avoided.
Fig. 38 Installing Dust Boot In Caliper Counterbore:
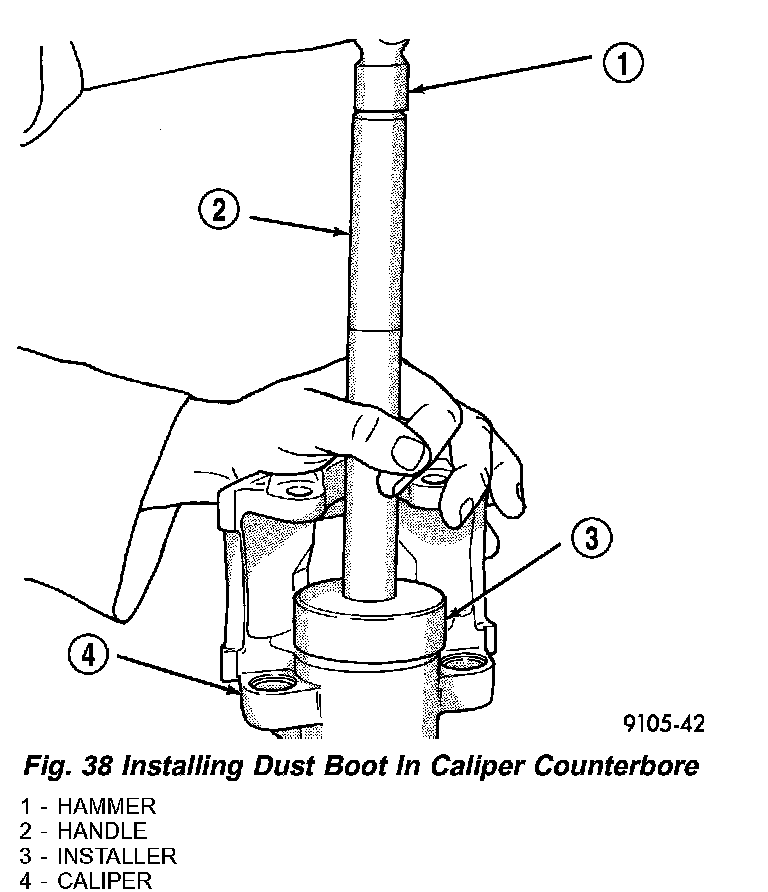
5) Seat dust boot in caliper counterbore using Installer, Special Tool 9089, with Handle, Special Tool C-4171 (Fig. 38). Install dust boot until it bottoms. Do not over-seat dust boot or damage will occur.
6) Install bleeder screw.
7) Install caliper on vehicle.
INSTALLATION
1) Completely retract caliper piston back into bore of caliper. Use hand pressure or a C-clamp may be used to retract piston, first placing a wood block over piston before installing C-clamp to avoid damaging piston.
Fig. 39 Inboard Shoe Installation:
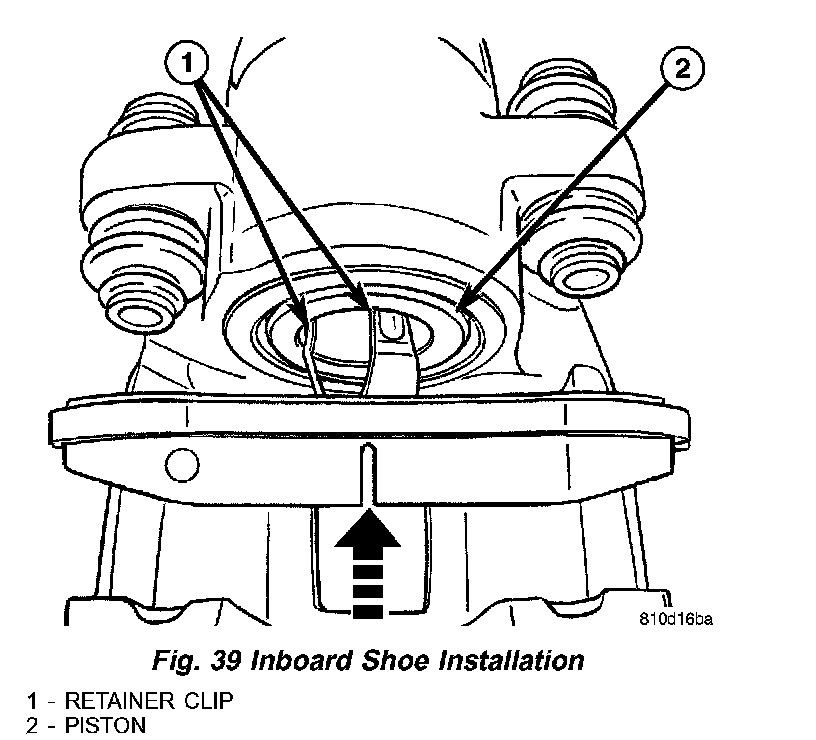
2) Position inboard shoe retainer clip against piston cavity (Fig. 39). Firmly press against shoe lining by hand until retainer clip seats itself in piston cavity groove. Be sure inboard brake shoe backing plate is flush against caliper piston.
CAUTION: Outboard brake shoes are side oriented. Make sure spring clip on each shoe is installed so it is positioned downward once caliper is installed.
Fig. 40 Outboard Shoe Installation:
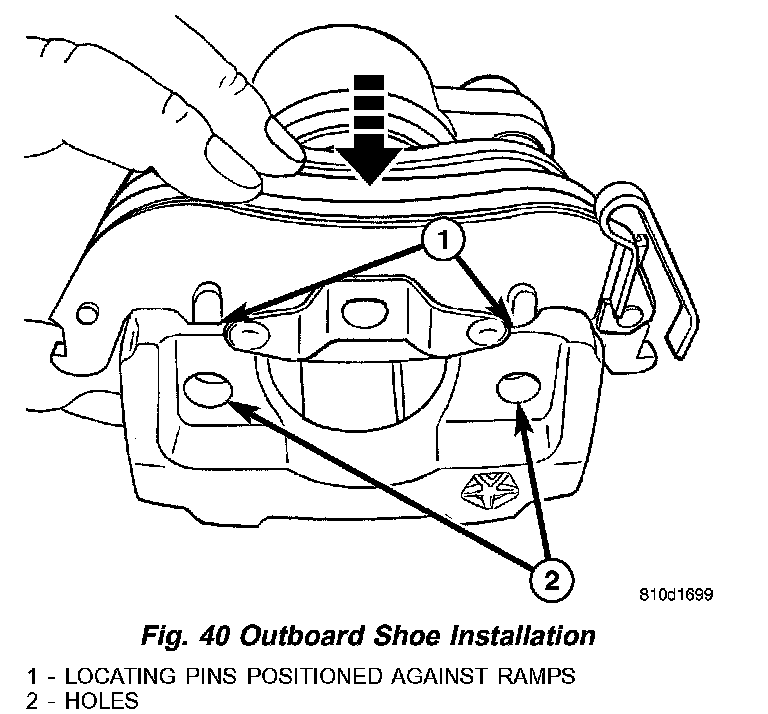
3) Position outboard brake shoe locating pins against ramps built into caliper fingers (Fig. 40). Slide shoe onto caliper. Be sure locating pins on rear of shoe are squarely seated into holes in caliper and shoe is flat against caliper fingers.
4) Make sure abutment shims are in place on both slide abutments of caliper adapter.
CAUTION: Use care when installing caliper onto disc brake adapter to avoid damaging boots on caliper guide pins.
5) Retract caliper guide pins to clear mounting bosses on caliper adapter when installing caliper.
6) Install brake caliper in opposite way it was removed. Starting with upper end, carefully position caliper and brake shoes over brake rotor and align outboard shoe's upper edge with caliper slide. Rotate lower end of caliper into mounting position on adapter.
CAUTION: Extreme caution should be taken not to crossthread caliper guide pin bolts when they are installed.
7) Carefully install caliper guide pin bolts (Fig. 24). Tighten bolts to 23 Nm (17 ft. lbs.).
8) Install banjo bolt attaching brake hose to caliper (Fig. 24). Install NEW washers on each side of hose fitting as banjo bolt is placed through fitting. Thread banjo bolt into caliper and tighten to 47 Nm (35 ft. lbs.).
9) Install tire and wheel assembly. Tighten wheel mounting nuts to 135 Nm (100 ft. lbs.).
10) Lower vehicle.
11) Remove brake pedal holding tool.
12) Connect battery negative cable to battery post.
13) Bleed base brake hydraulic system as necessary.
14) Road test vehicle making several stops to wear off any foreign material on brakes and to seat brake shoes.