Bell Crank
BELL CRANK

CAUTION: Although both ends of the bell crank appear to be the same, they are not. When installing the watts links or bell crank, make sure the bell crank is properly positioned. When mounted properly, the words "BACK UP" (1) should be able to be read from the rear over the top of the axle. If the words cannot be read at this position, the bell crank must be removed and reinstalled so that the words "BACK UP" can be read on the upper rear of the bell crank once installed.
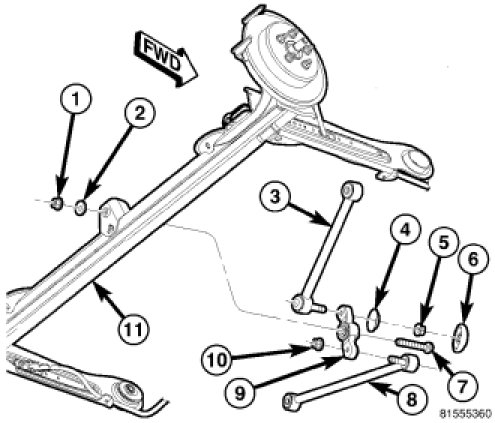
1. Install the pivot bolt (7) through the front of the watts link bell crank (9). Make sure the words "BACK UP" are towards the rear (Refer to preceding Caution).
2. Start the pivot bolt with the bell crank attached into the front of the axle (11) center mounting hole.
3. Position the words "BACK UP" on the bell crank so that they can be read from the rear over the top of the axle (Refer to preceding Caution).
CAUTION: When installing and tightening the watts link ball joint nut in the following step, DO NOT allow the stud to rotate. If the stud spins in its socket, damage to the joint can occur.
4. Attach the lower link (8) to the bell crank (9). Install the nut (10) on the ball joint stud. While holding the ball joint stud from turning, tighten the nut to 14 Nm (10 ft. lbs.) plus an additional 180° turn after torque is met.
5. Slide the bell crank pivot bolt (7) all the way through the axle.
6. Place the washer (2) and nut (1) on the end of the pivot bolt and tighten it to 149 Nm (110 ft. lbs.).
CAUTION: When installing and tightening the watts link ball joint nut in the following step, DO NOT allow the stud to rotate. If the stud spins in its socket, damage to the joint can occur.
7. Attach the upper link (3) to the bell crank (9). Install the cap (4), and nut (5) on the ball joint stud. While holding the ball joint stud from turning, tighten the nut to 14 Nm (10 ft. lbs.) plus an additional 180° turn after torque is met.
8. Install the cap (6) on the ball joint nut (5).
9. Lower the vehicle.