Floor Distribution Duct - Installation
INSTALLATION
NOTE: LHD model shown in illustrations. RHD model similar.
RIGHT FLOOR DISTRIBUTION DUCT
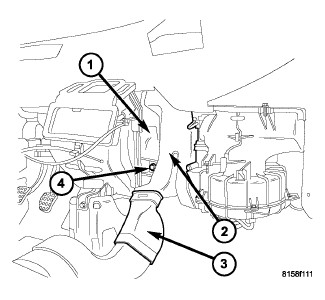
NOTE: Illustration shown with front floor carpet removed for clarity.
1. Position the right floor distribution duct (2) into the vehicle.
2. Engage the right floor distribution duct to the right rear intermediate floor duct (3) and the outlet located at the top of the HVAC housing (1).
3. Install the screw (4) that secures the right floor distribution duct to the right side of the HVAC housing. Tighten the screw to 2 Nm (17 in. lbs.).
4. Install the instrument panel Instrument Panel - Installation.
LEFT FLOOR DISTRIBUTION DUCT
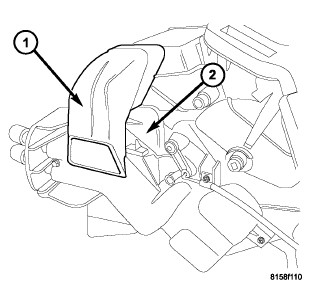
1. Position the left floor distribution duct (1) onto the left side of the HVAC housing (2) and engage the duct to the outlet located at the top of the HVAC housing.
2. Install the steering column opening cover Steering Column Opening Cover - Installation.
RIGHT REAR FLOOR DUCT
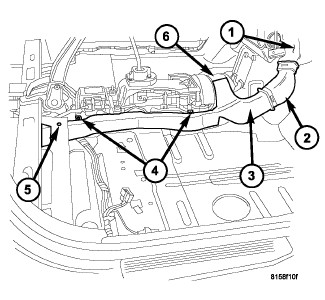
NOTE: Illustration shown with front floor carpet removed for clarity.
1. If removed, position the right rear intermediate floor duct (2) into the vehicle and engage it to the right floor distribution duct (1).
2. Position the right rear floor duct (3) onto the vehicle and install the rear of the duct into the opening in the rear carpet.
3. Engage the right rear floor duct to the right rear intermediate floor duct and to the left rear floor duct (6).
4. Install the two screws (4) that secure the right rear floor duct to the floor panel. Tighten the screws to 2 Nm (17 in. lbs.).
5. Install the push-pin retainer (5) that secures the rear carpet to the right rear floor duct.
6. Install the center floor console Center Console - Installation.
LEFT REAR FLOOR DUCT
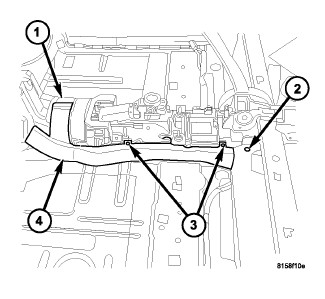
NOTE: Illustration shown with front floor carpet removed for clarity.
1. Position the left rear floor duct (4) onto the vehicle and install the rear of the duct into the opening in the rear carpet.
2. Engage the left rear floor duct to the right rear floor duct (1).
3. Install the two screws (3) that secure the left rear floor duct to the floor panel. Tighten the screws to 2 Nm (17 in. lbs.).
4. Install the push-pin retainer (2) that secures the rear carpet to the left rear floor duct.
5. Install the center floor console Center Console - Installation.