Air Duct: Service and Repair
REMOVAL AND INSTALLATION
WARNING: ON VEHICLES EQUIPPED WITH AIRBAGS, Refer to: "Restraint Systems : Air Bag Systems" Service Precautions
FAILURE TO TAKE THE PROPER PRECAUTIONS COULD RESULT IN ACCIDENTAL AIRBAG DEPLOYMENT AND POSSIBLE PERSONAL INJURY.
Panel And Defroster Ducts
The panel and defroster duets are integral to the instrument panel assembly. The defroster outlets are integral to the instrument panel top cover.
Outlet Barrels
In addition to the panel outlet barrels in the instrument panel, models equipped with the bucket seat option have two outlet barrels for the rear seat passengers located near the top of upper rear panel of the center floor console. The service procedures for all of these outlet barrels is the same. Models with the optional rear overhead A/C unit also have four outlet barrels located in the outlet bezel on the headliner, but these outlet barrels are only serviced as a unit with the rear overhead A/C outlet bezel.
Outlet Barrels:
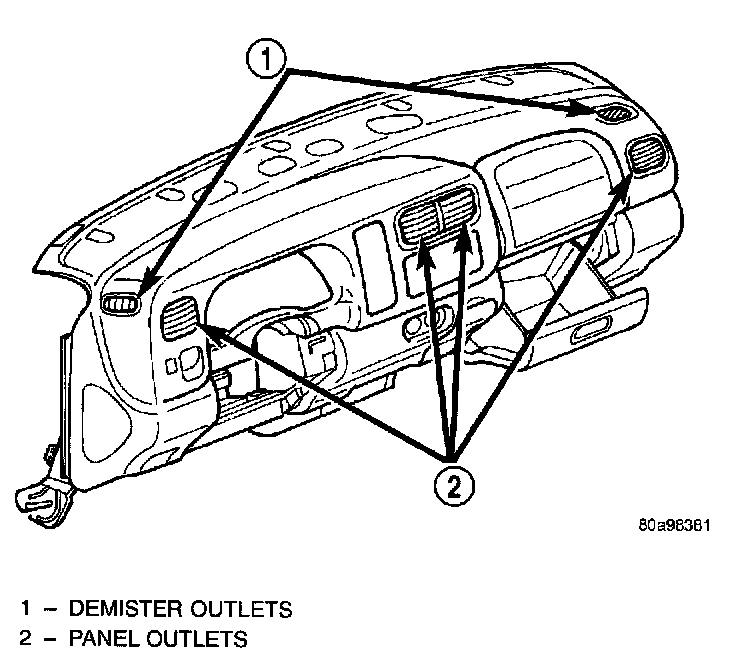
1. Using a trim stick or another suitable wide- bladed flat tool, gently pry at the sides of the outlet barrels to release the snap-fit pivots on the barrel from the pivot pins in the outlet housing of the instrument panel top cover, the instrument cluster bezel or the center floor console.
2. To install the outlet barrel, position the barrel in the outlet housing and press inwards firmly and evenly until the barrel snaps into place.
Front Seat Floor Duct
Front Seat Floor Duct Remove/Install (Typical):
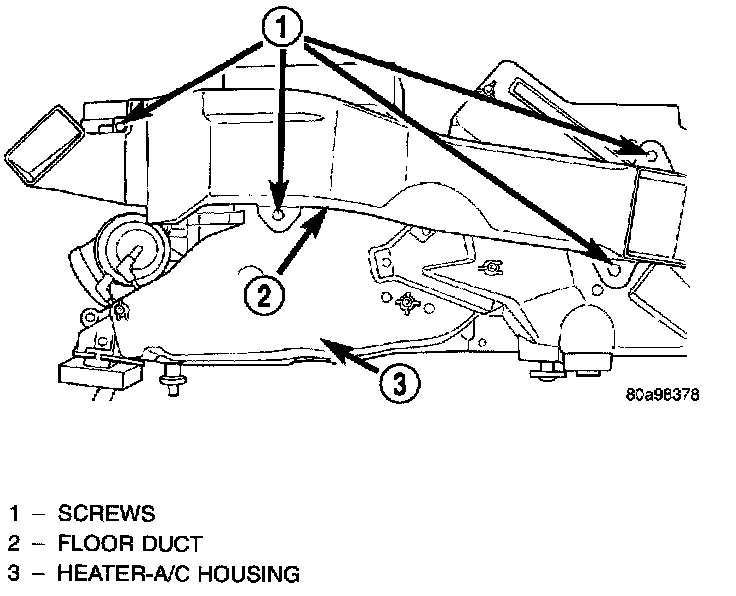
1. Remove the three screws that secure the floor duct to the bottom of the heater-A/C housing.
2. Remove the floor duct from the heater-A/C housing.
3. Reverse the removal procedures to install. Tighten the mounting screws to 2.2 Nm (20 in. lbs.).
Rear Seat Floor Duct Control - Split Bench Seat
Rear Seat Floor Duct Control - Split Bench Seat:
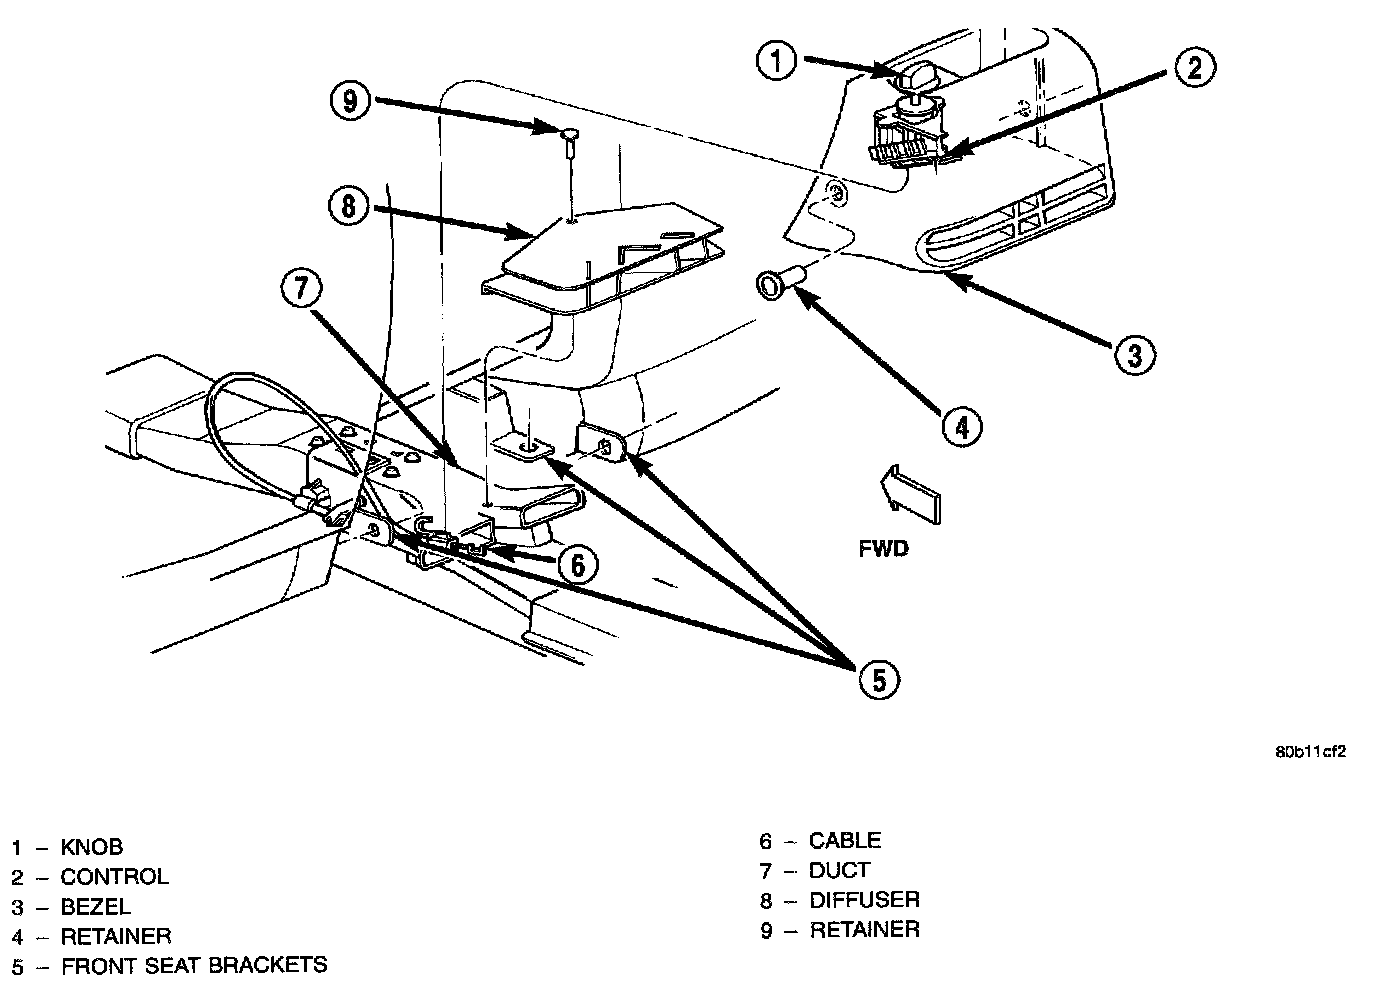
1. Remove the three retainers that secure the HVAC rear bezel to the brackets near the back of the front seat center.
2. Pull the bezel away from the back of the front seat far enough to access and disengage the control cable retainer and cable end from the control.
3. Reverse the removal procedures to install.
Rear Seat Floor Duct Control - Bucket Seat
The rear floor duct control and linkage are only serviced as a unit with the console duct assembly.
Rear Seat Floor Duct Control - Bucket Seat:
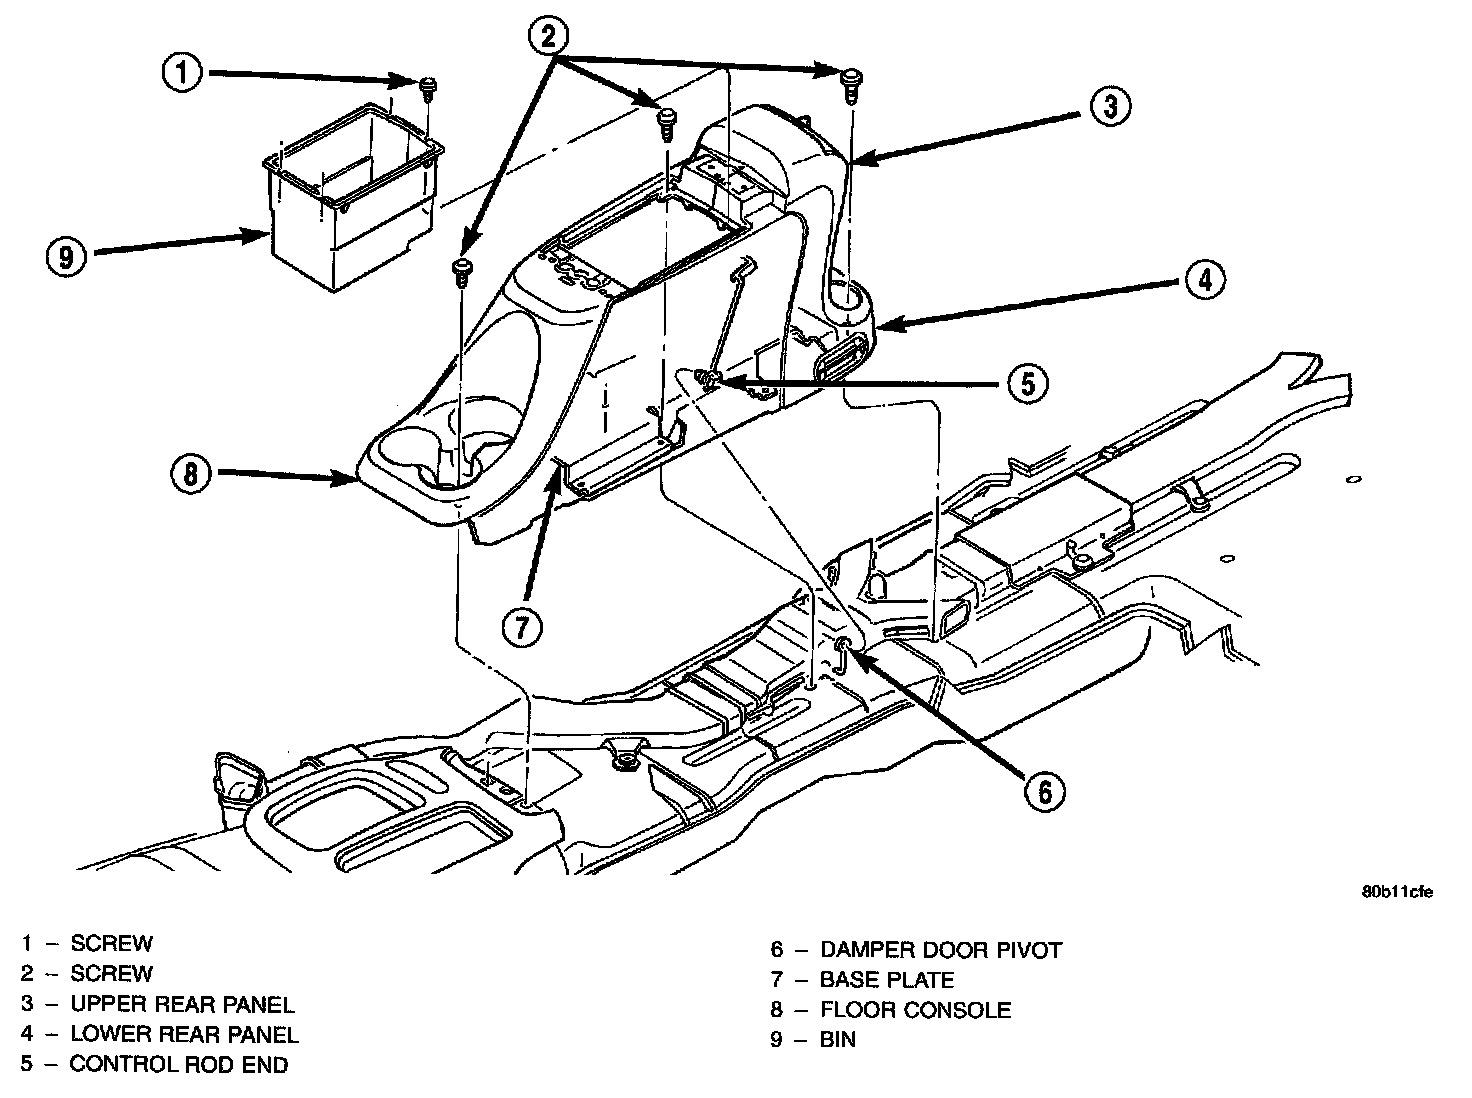
1. Remove the four screws that secure the console bin and remove the bin from the floor console.
2. Reach through the top of the console to disengage the control rod end from the floor duct damper door pivot.
3. Remove the floor console from the vehicle and disassemble as required to remove the console duct and control assembly from the console as a unit.
4. Reverse the removal procedures to install.
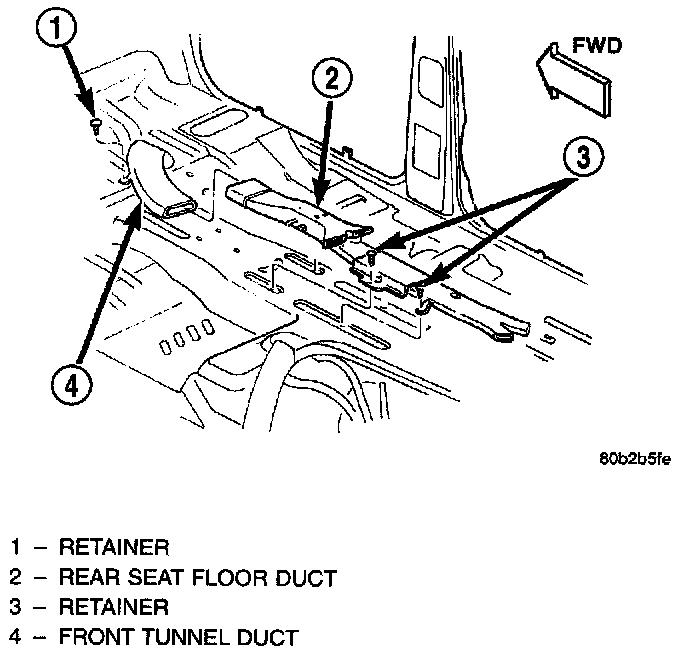
Rear Seat Floor Duct
The rear seat floor duct damper door is only serviced as part of the rear seat floor duct on bench seat models, or the center seat floor duct on bucket seat models.
1. Remove the carpeting from the floor panel transmission tunnel.
Rear Seat Floor Duct Remove/Install - Split Bench Seat:
Rear Seat Floor Duct Control - Bucket Seat:
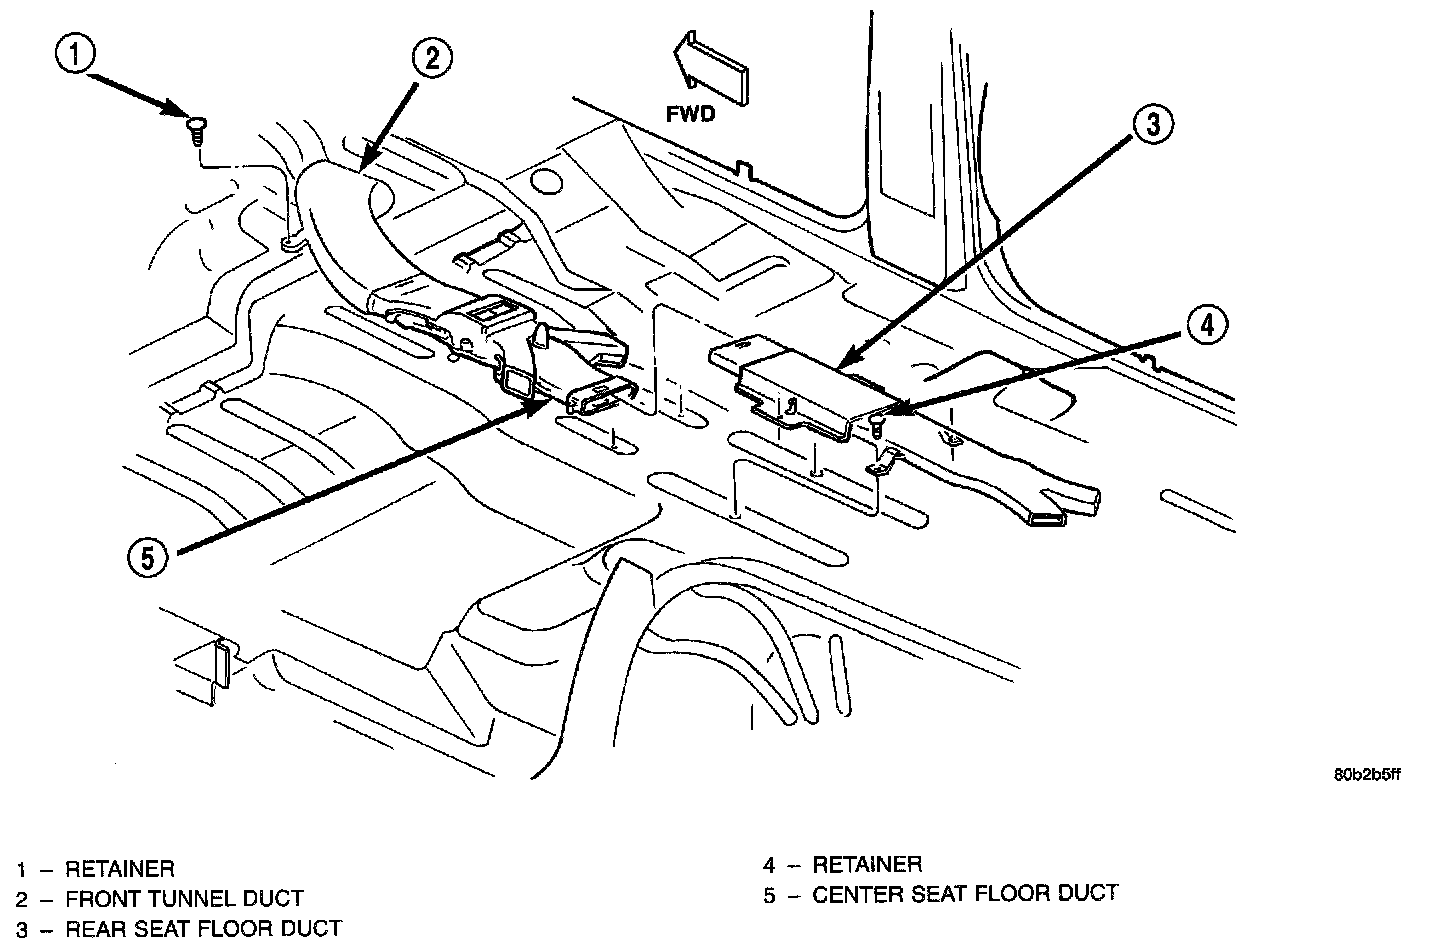
2. Remove the retainers that secure the ducts to the floor panel transmission tunnel.
3. Remove the duct(s) from the floor panel as required.
4. Reverse the removal procedures to install.
Demister Duct Adapter
1. Roll the instrument panel assembly down, but do not remove it from the vehicle.
2. Disconnect the flexible demister duct hose from the demister duct adapter on the top of the heater A/C housing.
Rear Seat Floor Duct Remove/Install - Split Bench Seat:
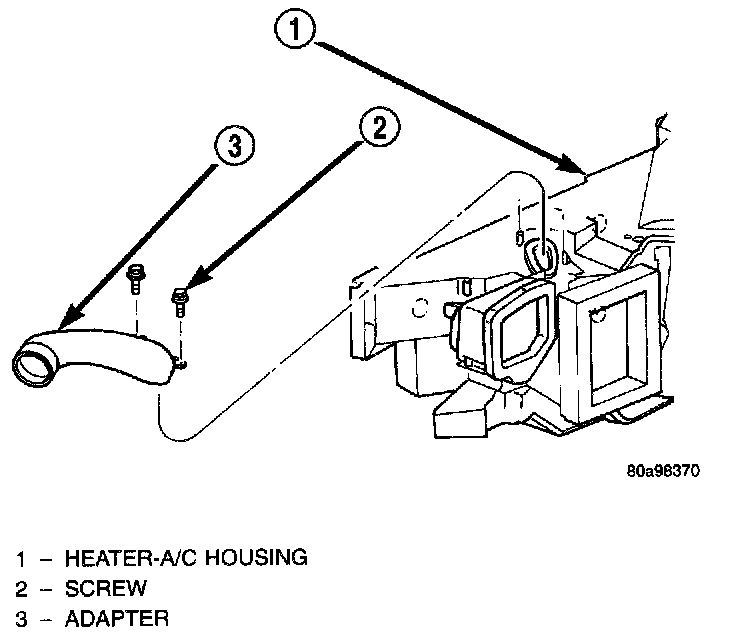
3. Remove the two screws that secure the demister duct adapter to the top of the heater-A/C housing.
4. Remove the demister duct adapter from the heater-A/C housing.
5. Reverse the removal procedures to install. Tighten the mounting screws to 2.2 Nm (20 in. lbs.).
Demister Hose
1. Remove the heater-A/C control from the instrument panel.
2. Reach through the heater-A/C control opening in the instrument panel to access and remove the screw that secures the flexible demister duct hose to the demister duct tee.
3. Roll the instrument panel assembly down, but do not remove it from the vehicle.
4. Disconnect the flexible demister duct hose from the demister duct adapter on the top of the heater- A/C housing.
5. Remove the demister duct hose from the demister duct tee near the underside of the instrument panel top cover.
6. Reverse the removal procedures to install. Tighten the hose mounting screw to 2.2 Nm (20 in. lbs.).
Demister Ducts And Outlets
1. Remove the instrument panel top cover from the instrument panel. Refer to; Body and Frame, Interior Trim, Dashboard/Instrument Panel, Service and Repair, Instrument Panel Service Procedures, Instrument Panel Top Cover Replacement, Instrument Panel Top Cover
Demister Ducts Remove/Install:
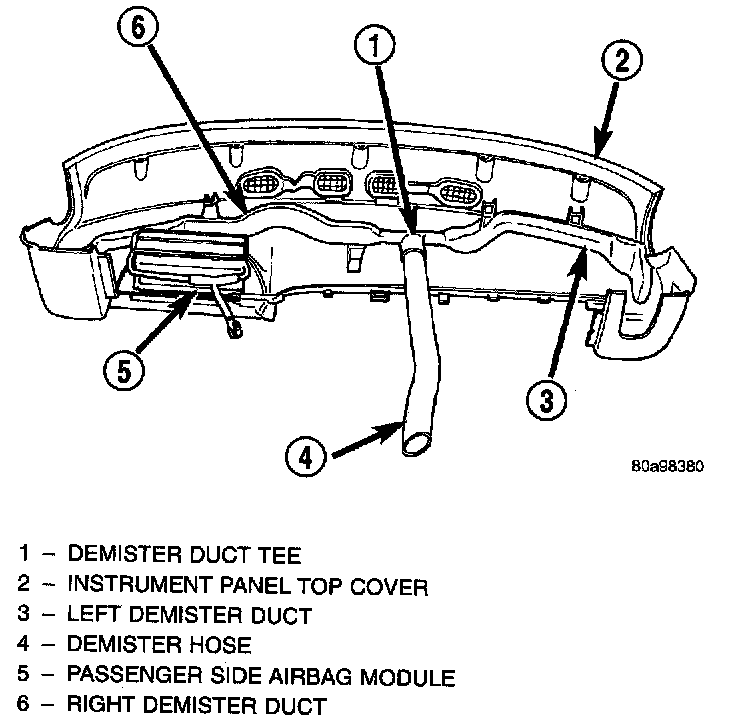
2. Remove the screws (two - left side, three - right side) that secure the demister ducts to the instrument panel top cover.
3. Using a trim stick or another suitable wide flat-bladed tool, gently pry between the end of the demister duct and the demister outlet flange to release the duct from the outlet.
4. Remove the demister ducts and the tee from the instrument panel top cover.
5. Squeeze the demister outlet flange from the underside of the instrument panel top cover and push it out through the top.
6. Using a trim stick or another suitable wide flat-bladed tool, gently pry between the end of the demister duct and the demister outlet flange to release the duct from the outlet.
7. Remove the demister ducts and the tee from the instrument panel top cover.
8. Squeeze the demister outlet flange from the underside of the instrument panel top cover and push it out through the top.
9. Reverse the removal procedures to install. Tighten the mounting screws to 2.2 Nm (20 in. lbs.).
Heater-A/C Housing Plenum Adapter
1. Remove the heater-A/C housing from the vehicle. Refer to: Heating and Air Conditioning, Housing Assembly HVAC, Service and Repair, Front, Front HVAC Unit Removal and Installation, Front HVAC Housing Removal and Installation
Heater-A/C Housing Plenum Adapter Remove/Install:
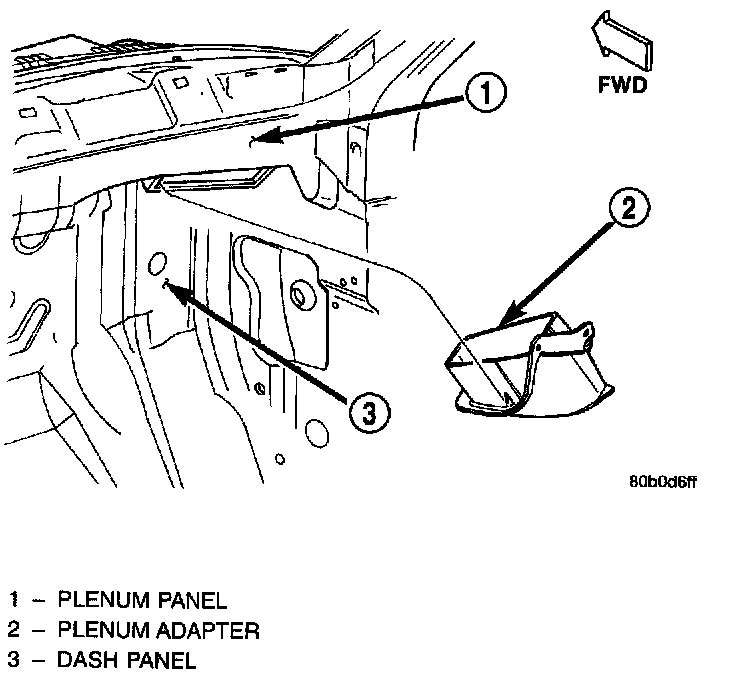
2. Slide the heater-A/C housing plenum adapter all the way to one side of the plenum opening.
3. Pull downwards sharply and firmly on the opposite side of the plenum adapter to disengage the snap feature from the plenum opening.
4. Remove the plenum adapter from the plenum panel.
5. When reinstalling the heater-A/C housing plenum adapter to the plenum panel opening, be certain that the snap features on each side of the adapter are fully engaged with the sides of the plenum panel opening. This must be a water tight connection to prevent leaks.
6. Reverse the remaining removal procedures to complete the installation.
Rear Overhead A/C Outlet Bezel
The rear overhead A/C outlet bezel is used only on models with the optional rear overhead A/C unit. The outlet barrels located in the bezel are only serviced as a unit with the rear overhead A/C outlet bezel.
Rear Overhead A/C Outlet Bezel Remove/Install:
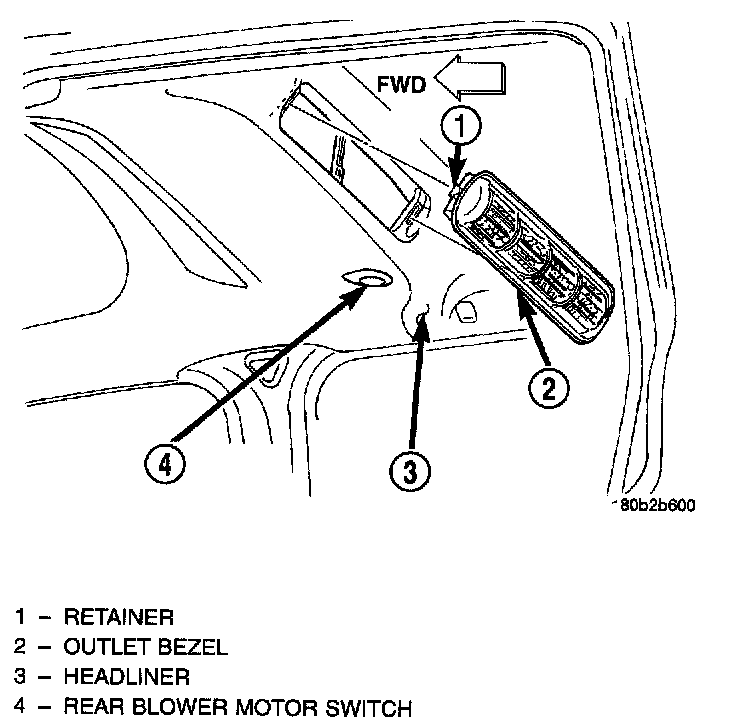
1. Using a trim stick or another suitable wide flat-bladed tool, gently pry between both ends of the rear overhead A/C outlet bezel and the headliner to release the two snap clip retainers that secure the bezel to the rear overhead A/C unit housing.
2. Remove the rear overhead A/C outlet bezel from the headliner mounting hole.
3. Reverse the removal procedures to install.