Coolant Temperature Sensor/Switch (For Computer): Service and Repair
ENGINE COOLANT TEMPERATURE SENSORREMOVAL
3.7L
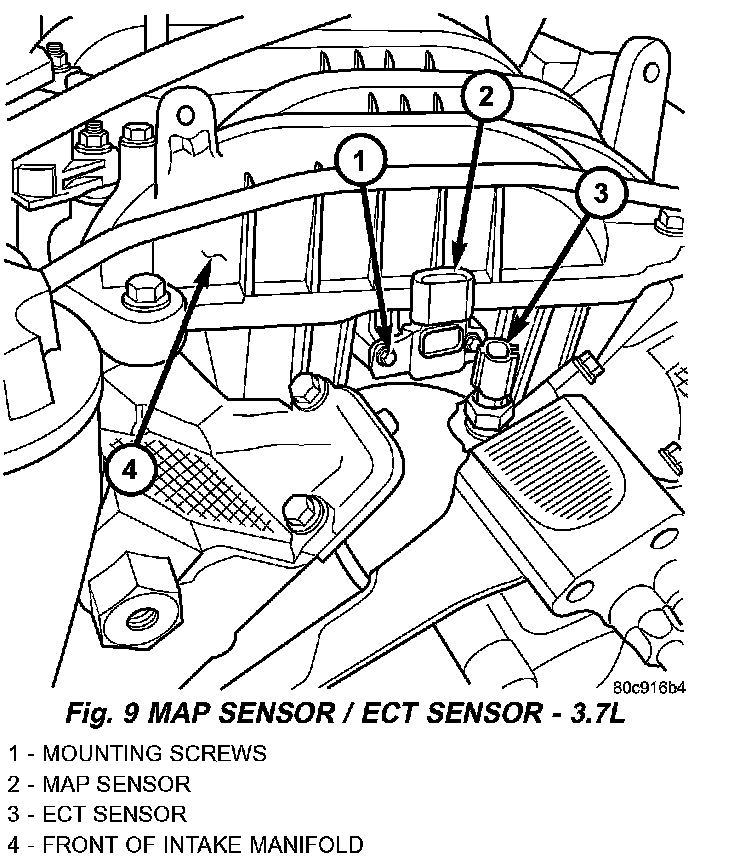
The Engine Coolant Temperature (ECT) sensor is installed into a water jacket at front of intake manifold near rear of generator.
WARNING: HOT, PRESSURIZED COOLANT CAN CAUSE INJURY BY SCALDING. COOLING SYSTEM MUST BE PARTIALLY DRAINED BEFORE REMOVING THE COOLANT TEMPERATURE SENSOR.
1. Partially drain the cooling system.
2. Disconnect the electrical connector from the sensor.
3. Remove the sensor from the intake manifold.
4.7L
WARNING: HOT, PRESSURIZED COOLANT CAN CAUSE INJURY BY SCALDING. COOLING SYSTEM MUST BE PARTIALLY DRAINED BEFORE REMOVING THE ENGINE COOLANT TEMPERATURE (ECT) SENSOR.
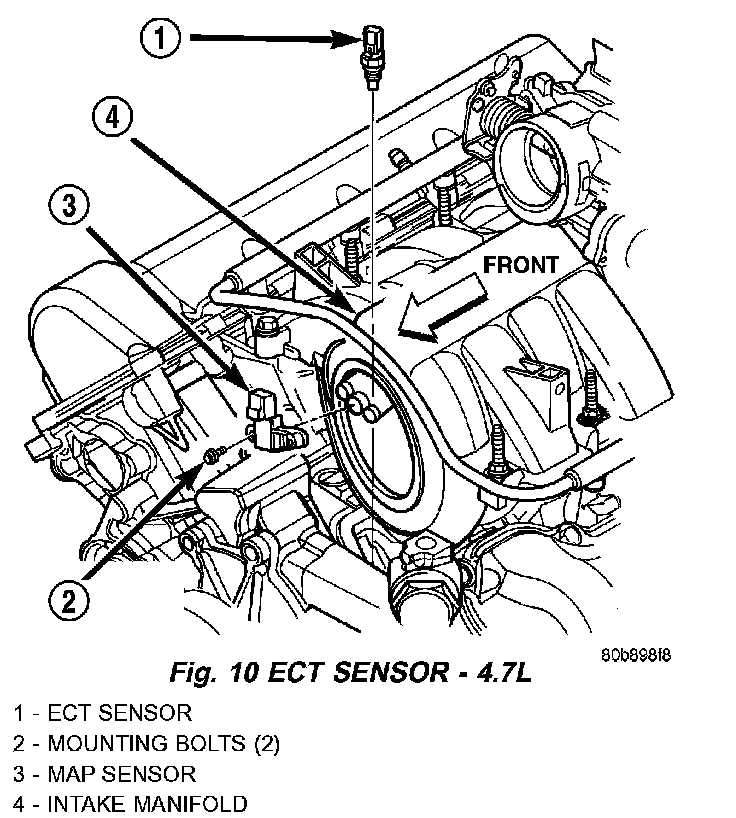
The Engine Coolant Temperature (ECT) sensor is located near the front of the intake manifold.
1. Partially drain the cooling system.
2. Disconnect the electrical connector from the ECT sensor.
3. Remove the sensor from the intake manifold.
5.9L
WARNING: HOT, PRESSURIZED COOLANT CAN CAUSE INJURY BY SCALDING. COOLING SYSTEM MUST BE PARTIALLY DRAINED BEFORE REMOVING THE COOLANT TEMPERATURE SENSOR.
1. Partially drain the cooling system.
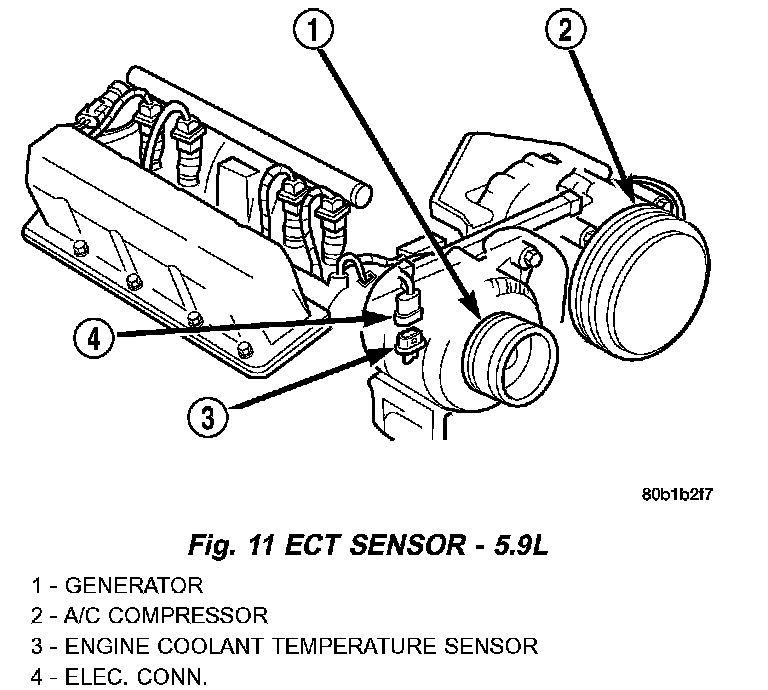
2. Disconnect the electrical connector from the sensor.
3. Engines with air conditioning: When removing the connector from the sensor, do not pull directly on the wiring harness. The connector is snapped onto the sensor. It is not equipped with a lock type tab.
4. Remove the sensor from the intake manifold.
INSTALLATION
3.7L
1. Apply thread sealant to the sensor threads.
2. Install the sensor to the engine.
3. Tighten the sensor to 11 Nm (8 ft. lbs.) torque.
4. Connect the electrical connector to the sensor.
5. Replace any lost engine coolant.
4.7L
1. Apply thread sealant to the sensor threads.
2. Install the sensor to the engine.
3. Tighten the sensor to 11 Nm (8 ft. lbs.) torque.
4. Connect the electrical connector to the sensor.
5. Replace any lost engine coolant.
5.9L
1. Apply thread sealant to the sensor threads.
2. Install the sensor to the engine.
3. Tighten the sensor to 6 - 8 Nm (55 - 75 inch lbs.) torque.
4. Connect the electrical connector to the sensor. The sensor connector is symmetrical (not indexed). It can be connected to the sensor in either direction.
5. Refill the cooling system.