Compressor HVAC: Service and Repair
REMOVALWARNING: REVIEW THE WARNINGS AND CAUTIONS IN THE FRONT BEFORE PERFORMING THE FOLLOWING OPERATION.
NOTE: The A/C compressor may be removed and repositioned without disconnecting the refrigerant lines or discharging the refrigerant system. Discharging is not necessary if servicing the compressor clutch, clutch coil, engine, engine cylinder head or the generator.
1. Recover the refrigerant from the refrigerant system.
2. Disconnect and isolate the negative battery cable.
3. Remove the serpentine drive belt.
4. Disconnect the A/C compressor clutch coil wire harness connector.
5. Remove the nuts that secure the suction and discharge line fittings to the A/C compressor.
6. Disconnect the suction and discharge line fittings from the A/C compressor.
7. Remove the O-ring seals from the suction and discharge line fittings and discard.
8. Install plugs in, or tape over all of the opened refrigerant line fittings and the compressor ports.
NOTE: Some models are equipped with an A/C support bracket that secures the front of the A/C compressor to the engine front cover.
A/C Compressor - Typical:
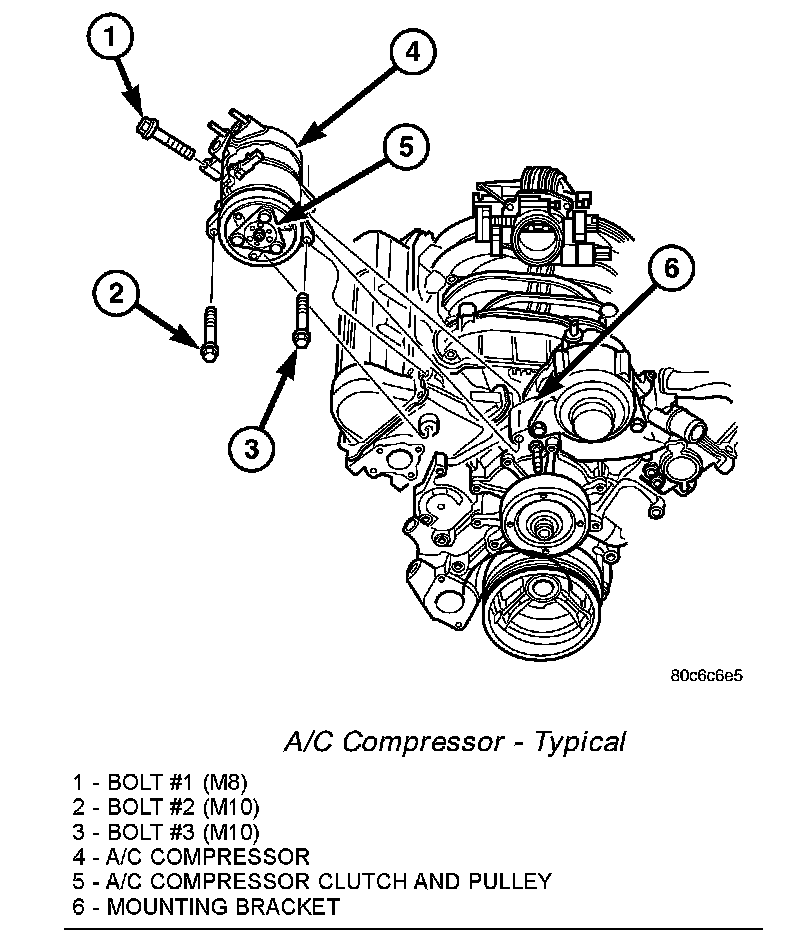
9. Remove the bolts that secure the A/C compressor to the mounting and support brackets.
10. Remove the A/C compressor from the engine compartment.
INSTALLATION
NOTE:
- If a replacement A/C compressor is being installed, be certain to check the refrigerant oil level. See Refrigerant Oil Level for the procedures. Use only refrigerant oil of the type recommended for the A/C compressor in the vehicle.
- Some models are equipped with an A/C support bracket that secures the front of the A/C compressor to the engine front cover.
1. Install the A/C compressor onto the mounting and support brackets.
A/C Compressor - Typical:
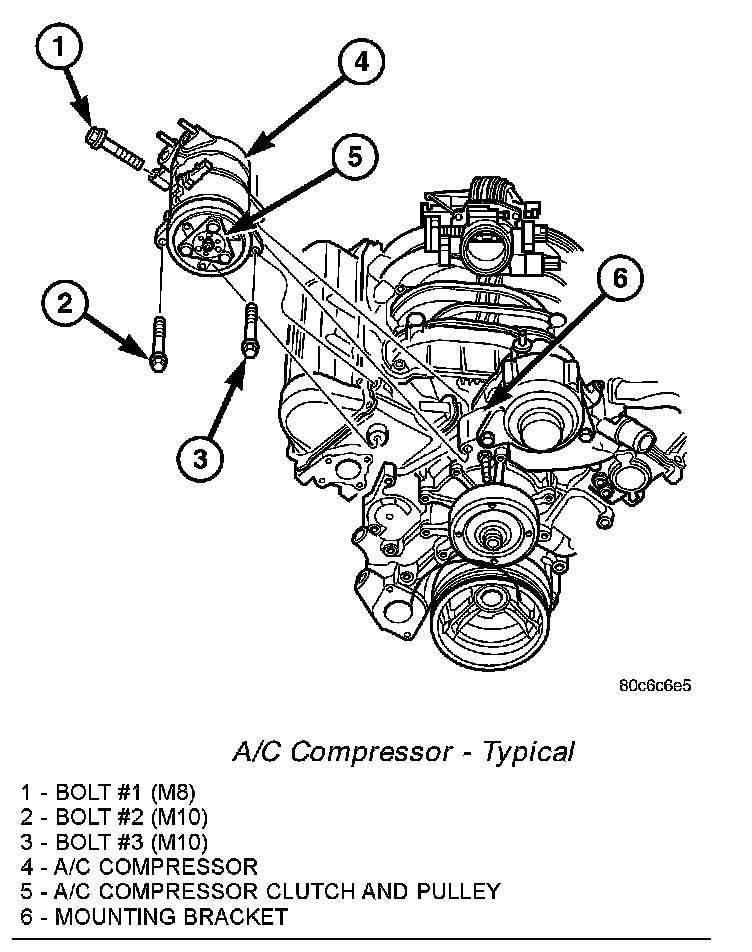
2. Install and tighten the bolts in the following sequence:
a. If removed, install the bolt (M10) that secures the compressor support bracket to the engine front cover and hand tightened.
b. Install the inner front bolt #3 (M10) and hand tightened.
c. Install the outer front bolt #2 (M10) and hand tightened.
d. Install the rear bolt #1 (M8) and hand tightened.
e. Tightened the inner front bolt #3 (M10) to 54 Nm (40 ft. lbs.).
f. Tightened the outer front bolt #2 (M10) to 54 Nm (40 ft. lbs.).
g. Tightened the rear bolt #1 (M8) to 40.5 Nm (30 ft. lbs.).
h. If removed, tighten the compressor support bracket bolt (M10) to the engine front cover to 54 Nm (40 ft. lbs.).
3. Remove the tape or plugs from the opened refrigerant line fittings and compressor ports.
4. Lubricate new rubber O-ring seals with clean refrigerant oil and install them on the suction and discharge line fittings. Use only the specified O-rings as they are made of a special material for the R-134a system. Use only refrigerant oil of the type recommended for the A/C compressor in the vehicle.
5. Install the suction and discharge line fittings onto the compressor.
6. Install the nuts that secure the suction and discharge line fittings to the compressor. Tighten the nuts to 28 Nm (20 ft. lbs.).
7. Connect the wire harness connector to the compressor clutch coil.
8. Install the serpentine drive belt.
9. Reconnect the negative battery cable.
10. Evacuate the refrigerant system.
11. Charge the refrigerant system.