A/C Condenser - Removal
REMOVAL
WARNING: On vehicles equipped with the high voltage system, you must thoroughly read and follow all High Voltage Safety procedures. In addition, before performing any diagnostic or service procedure near a high voltage component, you must perform the High Voltage Power Down. Failure to follow these instructions may result in possible serious or fatal injury
WARNING: Refer to the applicable warnings and cautions for this system before performing the following operation Warning and Caution . Failure to follow the warnings and cautions may result in possible serious or fatal injury.
CAUTION: Polyalkylene Glycol (PAG) oil can contaminate the refrigerant system of a Hybrid Electric Vehicle (HEV) and lead to A/C system damage and failure. If the refrigerant recovery/recycling and charging equipment was last used on a non-HEV model, flush the hoses of the equipment with a solvent approved by the equipment manufacturer before using the equipment on an HEV model, or use refrigerant recovery/recycling and charging equipment designated only for HEV models by your service facility. See the operating instructions supplied by the equipment manufacturer for proper use and care of the refrigerant recovery/recycling and charging equipment.

1. On HEV models, disconnect the battery system using the service disconnect at the battery pack .
2. On gasoline only engine models, disconnect and isolate the negative battery cable.
3. Recover the refrigerant from the refrigerant system Refrigerant System Recovery.
4. Remove the push-pin retainers (1) and the upper condenser/radiator seal (2).
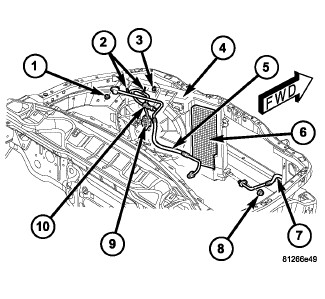
5. Disconnect the wire harness connectors from the condenser cooling fan motor (9) and the A/C pressure transducer (10).
6. Remove the two wire harness retainers (2) from the condenser fan shroud (4) and position the wire harness out of the way.
7. Remove the nuts (1 and 8) that secure the A/C discharge line (5) and A/C liquid line (7) to the A/C condenser (6).
8. Disconnect the A/C discharge and liquid lines from the A/C condenser and remove and discard the O-ring seals and gaskets.
9. Remove the A/C discharge line from the retainer (3) located on the condenser fan shroud (4).
10. Install plugs in, or tape over the opened discharge and liquid line fitting and condenser ports.
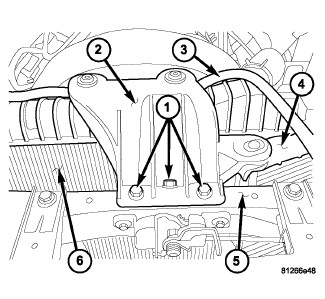
11. Remove the three bolts (1) that secure the upper radiator support (2) to the upper front crossmember (5).
12. Remove the upper radiator support and position the radiator overflow hose (3) out of the way.
13. Remove the bolt that secures the condenser/cooling fan assembly (4) to the upper left fender rail.
14. Carefully push back the radiator (6) for clearance and remove the condenser/cooling fan assembly from the engine compartment.
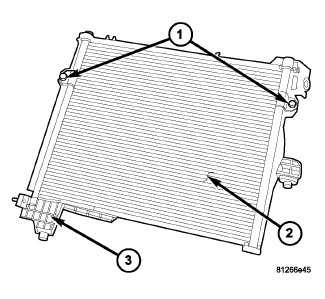
15. Place the condenser/cooling fan assembly on a workbench and remove the two screws (1) that secure the A/C condenser (2) to the condenser fan shroud (3).
16. Remove the A/C condenser from the condenser fan shroud.