Differential Case Runout Check
Differential Case Runout CheckPart 1 Of 3:

Part 2 Of 3:

Part 3 Of 3:

Special Tool(s)
1. Remove the front drive axle assembly.
2. Remove the axle shafts from the differential assembly.

3. CAUTION: Do not damage the aluminum differential housing while carrying out these procedures.
Using the special tools, mount the differential housing to a work bench.
1 Attach the special tools to the differential housing with four bolts that retain the differential housing cover to the differential housing.
2 Attach the special tools together with two 3/8 inch x 1-1/2 inch bolts.

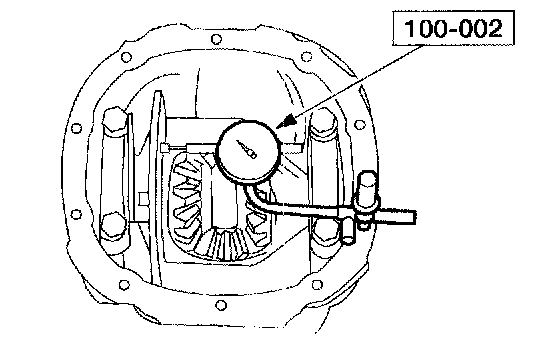
4. Install the special tools, measure and record the differential ring gear backlash between teeth in four opposing places.
^ If the backlash between teeth exceeds the specification of 0.254 - 0.305 mm (0.010 - 0.012 inch), the cause may be a warped ring gear, differential bearings, or a damaged differential case. To determine the cause of the excessive backlash, remove the dial indicator and proceed as follows:

5. Install the special tool by placing the spreader pins in the hole in the Differential Housing (Plate) Spreader.

6. Assemble the special tool.
1 Install the special tool.
2 Attach the special tool and position the tip in the Differential Housing (Plate) Spreader hole.

7. CAUTION: Overspreading can damage the differential housing.
NOTE: Tighten and loosen the Differential Carrier Spreader screw several times to normalize the Differential Housing (Plate) Spreader Adapters prior to taking the final Dial Indicator reading.
Spread the differential housing to specifications.
1 Adjust the Dial Indicator with Holding Fixture to zero.
2 Tighten the screw until the differential housing is spread to specification.
3 Remove the Dial Indicator with Holding Fixture and the Clutch Housing Gauge.

8. CAUTION: Mark the position and location of the differential bearing caps as the arrows may not be visible.
Remove the bearing caps.
1 Remove the bolts.
2 Remove the bearing caps.

9. CAUTION: Use wood blocks to avoid damaging the differential housing.
Remove the differential assembly.
1 Position the wood blocks at the top and bottom of the differential case.
2 Pry the differential assembly with the bearing cups and shims out of the differential housing.
3 Remove the special tool.
10. Separate the bearing shims and cones from the differential assembly and tag them left and right for assembly.

11. Remove the ring gear.
^ Remove the ten bolts.
^ Use a drift punch to separate the ring gear from the differential case.

12. NOTE: Visually inspect the differential bearing cups and cones for discoloration indicating bearing overheating or failure.
NOTE: It may be necessary to use the Differential Carrier Spreader to carry out this step.
Install the differential case with the bearing cups and all the shims in the housing.
1 Position the differential case with the bearing cups and shims in their original location.
2 Install the bearing caps.
3 Install the bolts.
4 Rotate the differential case to make sure the bearings have seated correctly.
13. Install the special tool.

14. Rotate the differential case and check the differential case runout.
^ If the runout does not exceed the specification, install a new ring gear and pinion.
^ If runout exceeds the specification, the ring gear is true and the condition is due to differential case/differential bearing damage.
- Inspect the differential bearings and the differential case. Always install new differential bearings when installing a new differential case, or if a bearing condition is questionable.
15. Remove the bearing caps, and the differential case with the bearing cups and shims from the housing.

16. If necessary, using the special tools, remove the differential bearings.

17. CAUTION: Press against the differential bearing inner cone only.
Install the new differential bearings.
1 Position the appropriate differential bearing (RH or LH).
2 Using a suitable press and the special tool, install the differential bearing.
^ Repeat the steps for the other differential bearing.

18. NOTE: It may be necessary to use the Differential Carrier Spreader to carry out this step.
NOTE: Recheck the flange runout.
Install the differential case with the bearing cups and the shims in the housing.
1 Position the differential case with the bearing cups and shims in their original location.
2 Install the bearing caps.
3 Install the bolts.
4 Rotate the differential case to make sure the bearings have seated correctly.

19. Install the special tool.

20. NOTE: If the runout is still excessive, install a new differential case.
Check the runout with the new differential bearings. If the runout does not exceed the specification, use the new differential bearings for assembly.

21. Remove the bolts.

22. Remove the differential case with the bearing cups and the shims from the housing.
1 Remove the bearing caps.
2 Remove the differential case with the bearing cups and the shims from the housing.
23. Install the ring gear and the differential assembly.
24. Install the axle shafts in the differential assembly.
25. Install the front drive axle assembly.