Service Procedure - Repair
REAR END OIL LEAK - PROCEDURE A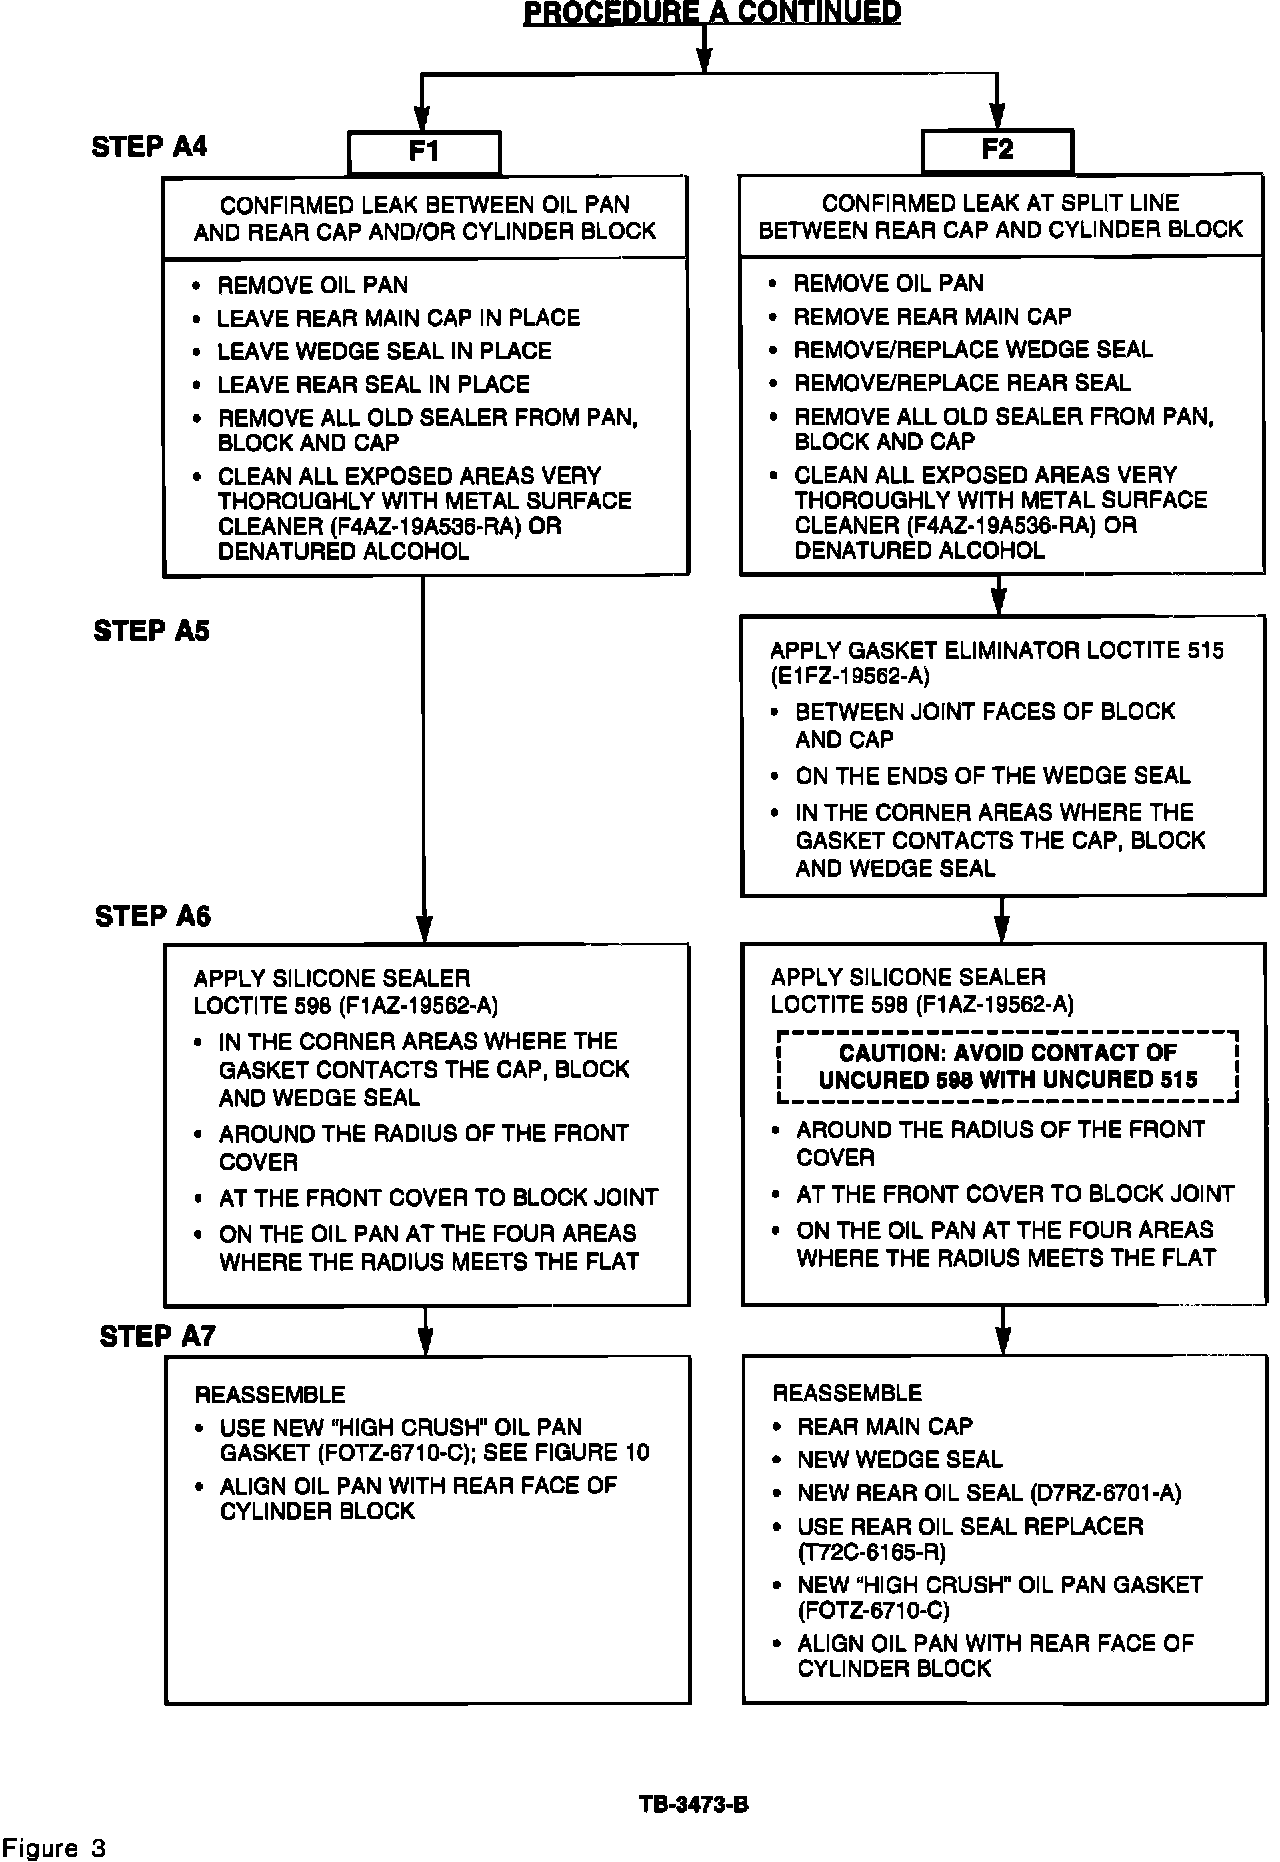
1. Repair procedure for a leak at oil pan gasket between the oil pan and cylinder block, or between the oil pan and the rear main cap. See block diagram Procedure A, Step A4/F1, Figures 3 and 4.
a. Remove the oil pan from the engine and remove the old gasket from the oil pan. Do not remove the rear main cap or wedge seal from the engine.
b. Clean ALL the oil and old sealer from the oil pan, taking special care to remove ALL the old sealer from the oil pan gasket groove in the oil pan. Thoroughly wash the oil pan.
c. Clean ALL the oil and old sealer from the oil pan sealing area on the cylinder block and rear main cap. Take special care to scrape/scratch all the old sealer from the exposed areas of the rear cap, wedge seal and cylinder block. This is a critical sealing area.
CAUTION:
PREVENT CYLINDER BLOCK CONTAMINATION. ALWAYS USE NECESSARY PRECAUTIONS TO PREVENT OLD SEALER OR GASKET MATERIAL FROM FALLING INTO THE CYLINDER BLOCK.
d. After all the parts have been cleaned, they must be wiped down with a cleaner that leaves no residue or film such as Metal Surface Cleaner (F4AZ-19A536-RA) or denatured alcohol.
CAUTION:
NEVER USE CARBURETOR CLEANER OR OTHER PETROLEUM PRODUCTS ON AREAS TO BE SEALED. THEY LEAVE A HYDROCARBON RESIDUE THAT RESISTS THE ADHESIVE ACTION OF SEALANTS. AVOID THE USE OF SOAP AND WATER AS CLEANERS. SOAP FILM RESISTS THE SEALANTS ADHESIVE ACTION.
e. Clean the transmission "BELLHOUSING" area, the rear of the cylinder block and the rear engine plate of ALL oil residue.
f. Place a bead of Ford Silicone Sealer (F1AZ-19562-A) in the oil pan gasket groove at the corner of the radius areas at the front and rear of the oil pan.
g. Place the oil pan gasket (FOTZ-6710-C) in place in the groove in the oil pan.
h. Place a bead of Ford Silicone Sealer (F1AZ-19562-A) in the corners where the rear main cap meets the cylinder block, at the corner areas of the radius area on the front cover and the front cover to cylinder block joint.
i. Set the oil pan in place and snug the four (4) pan nuts.
j. Align the rear face of the oil pan with the rear face of the cylinder block.
NOTE:
IF THE REAR FACE OF THE OIL PAN CANNOT BE ALIGNED WITHIN .0100" (.254 mm) OF THE REAR FACE OF THE CYLINDER BLOCK, THE APPROPRIATE SHIMS MUST BE USED.
k. Install the remaining oil pan bolts and torque to 5-7 lb.ft. (7-10 N-m).
2. Repair procedure for a leak between the rear main cap and the cylinder block. See block diagram Procedure A, Step A4/F2.
a. Remove the oil pan, windage tray, oil pump and rear main cap from the engine.
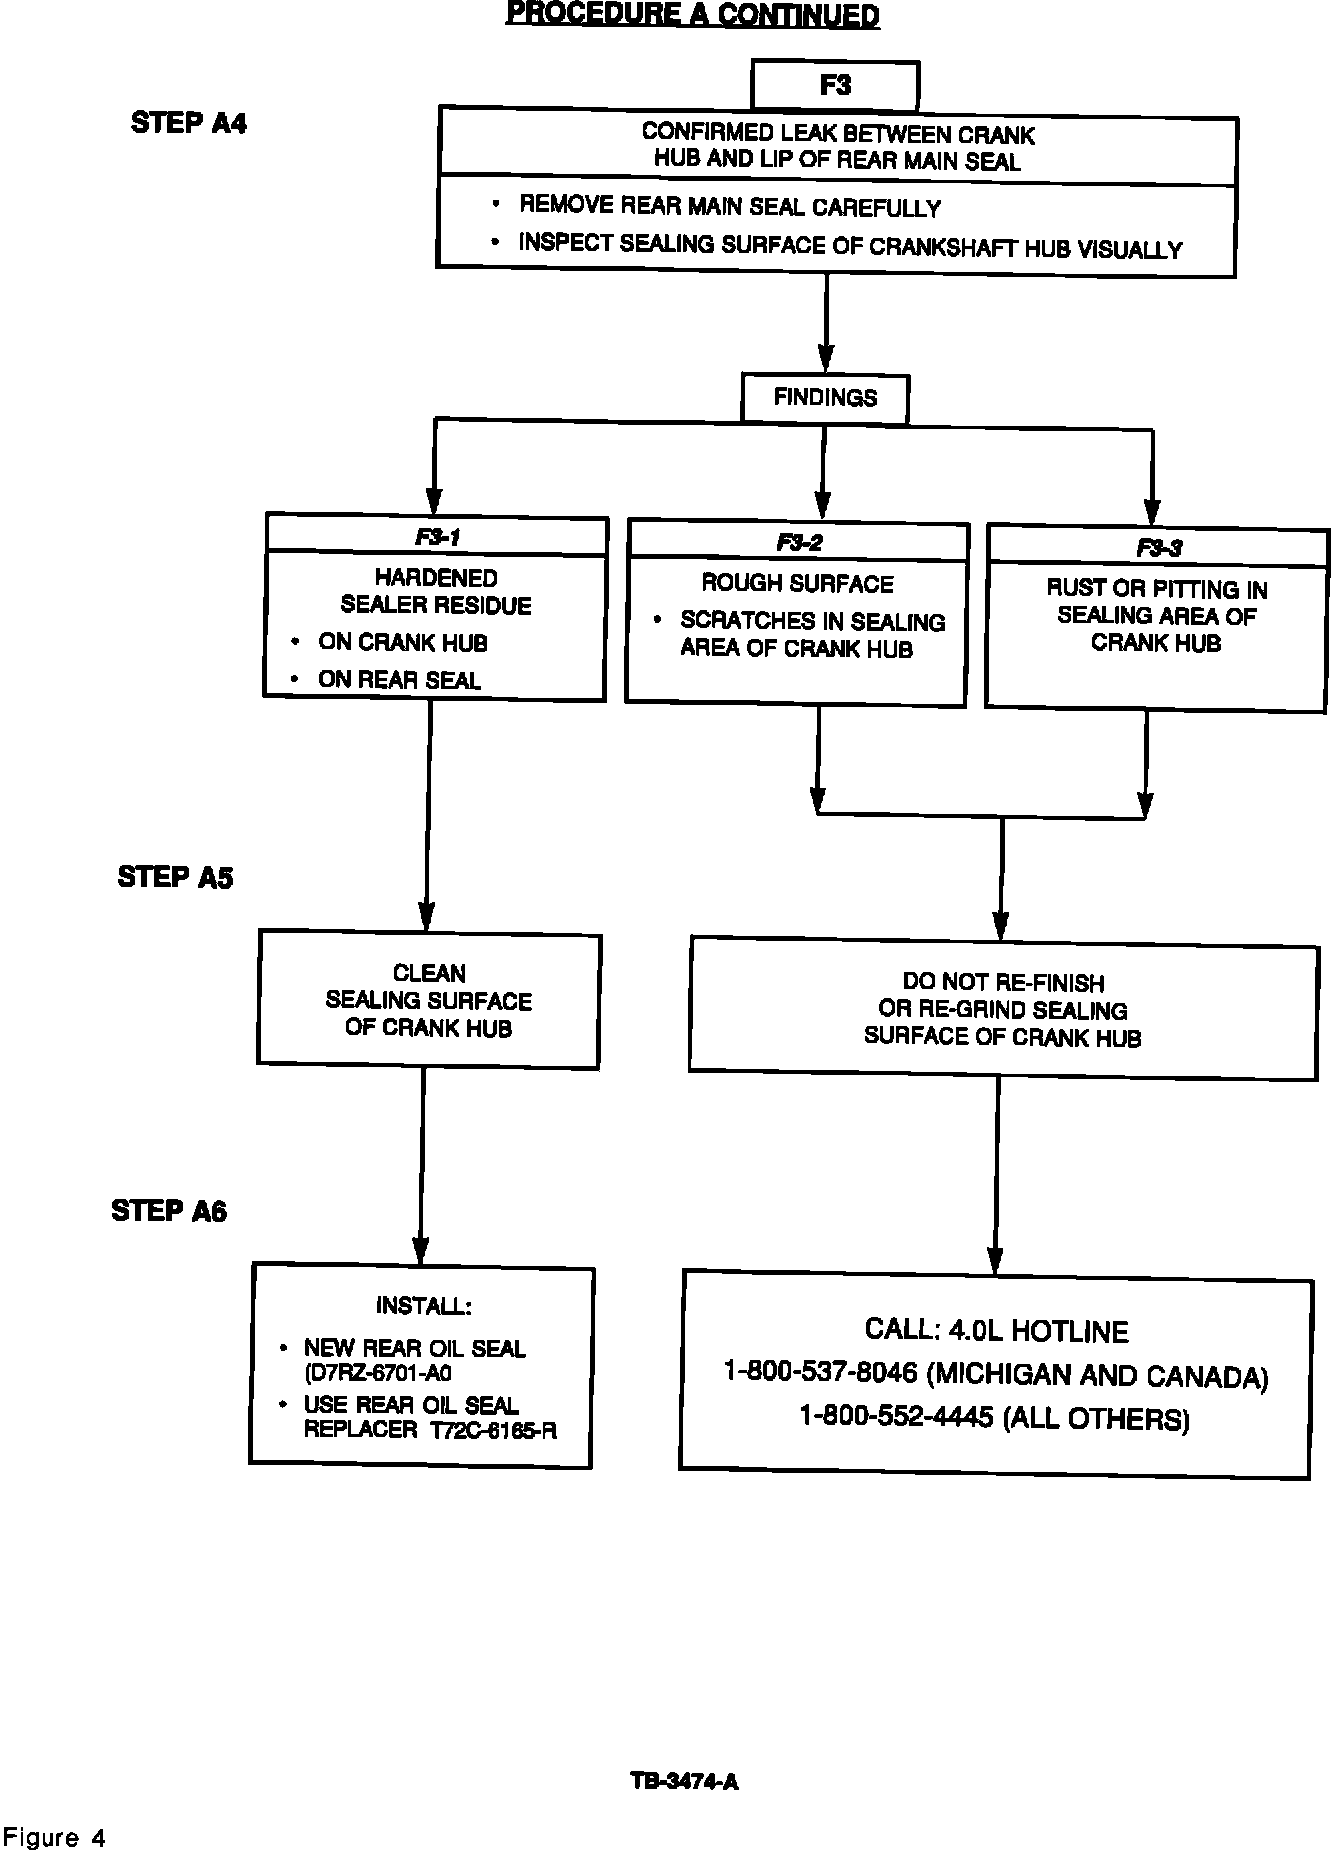
b. Remove the rear main oil seal from the crankshaft and thoroughly inspect the main seal journal of the crankshaft for signs of rust, pitting, nicks or porosity.
c. Clean ALL the oil and old sealer from the oil pan, taking special care to remove ALL the old sealer from the oil pan gasket groove in the oil pan. Thoroughly wash the oil pan.
d. Clean ALL the old sealer from the rear main bearing cap USING A SCRAPER AND WIRE WHEEL. The original Loctite sealer used during production assembly becomes extremely hard after it has cured. It is extremely important that ALL the old sealer be removed from the joint faces and grooves.
e. Clean ALL the oil and old sealer from the oil pan sealing area on the cylinder block and rear main cap joint area.
CAUTION:
PREVENT CYLINDER BLOCK CONTAMINATION. ALWAYS USE NECESSARY PRECAUTIONS TO PREVENT OLD SEALER OR GASKET MATERIAL FROM FALLING INTO THE CYLINDER BLOCK.
f. Clean ALL the oil and old sealer from the "WEDGE SEAL" that fits around the rear main bearing cap in the oil pan gasket groove. Preferably use a new "WEDGE SEAL".
g. After all the parts have been cleaned, they must be wiped down with a cleaner that leaves no residue or film such as Metal Surface Cleaner (F4AZ-19A536-RA) or denatured alcohol.
CAUTION:
NEVER USE CARBURETOR CLEANER OR OTHER PETROLEUM PRODUCTS ON AREAS TO BE SEALED. THEY LEAVE A HYDROCARBON RESIDUE THAT RESISTS THE ADHESIVE ACTION OF SEALANTS. AVOID THE USE OF SOAP AND WATER AS CLEANERS. SOAP FILM RESISTS THE SEALANTS ADHESIVE ACTION.
h. Clean the transmission "BELLHOUSING AREA", the rear of the cylinder block and the rear engine plate of ALL oil residue.
i. Place a bead of Ford Gasket Eliminator (E1FZ-19562-A) on the cylinder block along the corners of the rear main bearing cap joint area and on the joint face, approximately 1/2 inch (12.7 mm) from the rear of the block.
j. Verify that the lower rear main bearing insert is in place. Install the rear main bearing cap and snug the bolts.
k. Align the rear main bearing cap to cylinder block by moving the bearing fore or aft (approx. 1/2 inch (12.7 mm) inward in the rear oil seal bore) so that the rear seal stop of the block and cap line up. This will assure that the rear main oil seal will seat squarely when installed in the bore.
l. Torque the rear main cap bolts to 66-77 lb.ft. (90-104 N-m).
m. Fill the cavities for the "WEDGE SEAL" on both sides of the rear main cap with Ford Gasket Eliminator (E1FZ-19562-A).
n. Place "WEDGE SEAL" in place and use a flat bladed screwdriver to fully seat the "WEDGE SEAL", forcing the excessive sealer out.
o. Place a bead of Ford Gasket Eliminator (E1FZ-19562-A) in the corners of the oil pan gasket groove of the rear main cap where the cap meets the cylinder block.
p. Place a bead of Ford Silicone Sealer (F1AZ-19562-A) at the corner areas of the radius area on the front cover and at the front cover to cylinder block joint.
q. Reinstall the oil pump and windage tray. Torque to 13-15 lb.ft. (17-21 N-m).
r. Place a bead of Ford Silicone Sealer (F1AZ-19562-A) in the oil pan gasket groove at the corners of the radius areas at the front and rear of the oil pan.
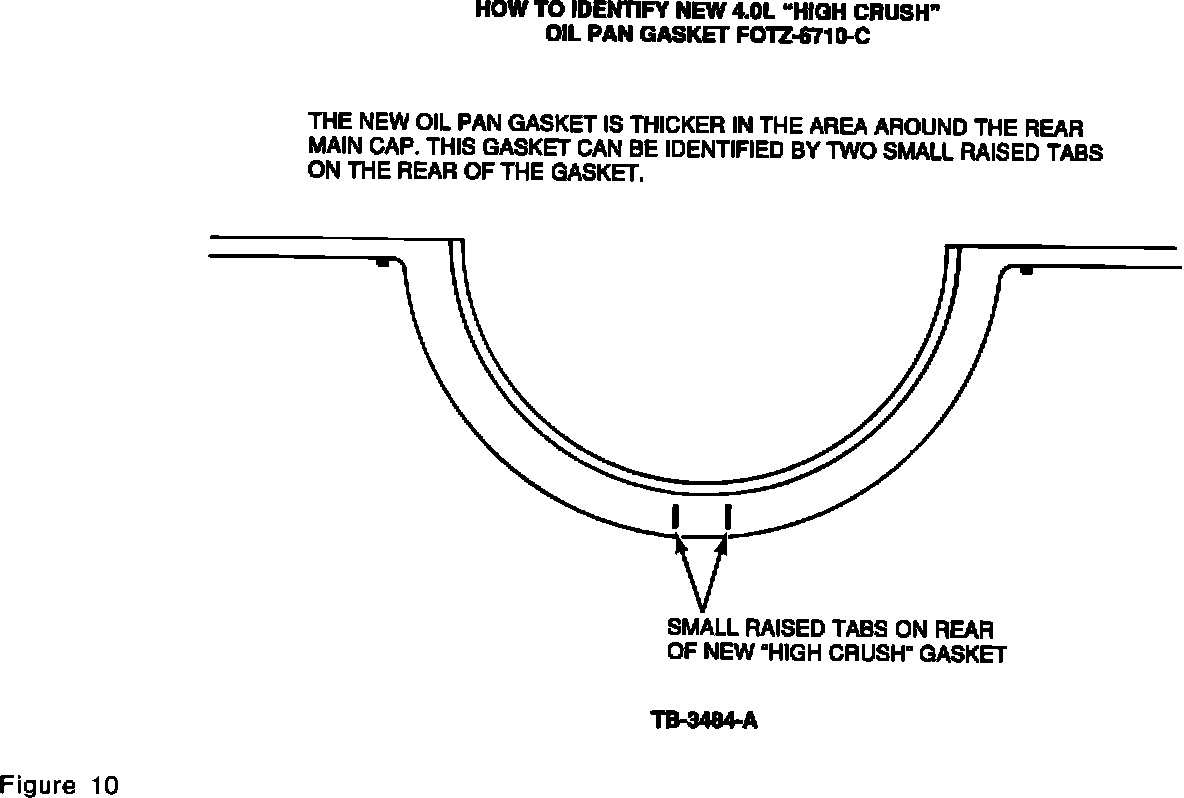
s. Place the oil pan gasket (FOTZ-6710-C), Figure 10, in place in the groove in the oil pan.
t. Set the oil pan in place and snug the four (4) oil pan bolts.
u. Align the rear face of the oil pan with the rear face of the cylinder block.
NOTE:
IF THE REAR FACE OF THE OIL PAN CANNOT BE ALIGNED WITHIN .01000 (.254 mm) OF THE REAR FACE OF THE CYLINDER BLOCK, THE APPROPRIATE SHIMS MUST BE USED.
v. Install the remaining oil pan bolts and torque to 5-7 lb.ft. (7-10 N-m).
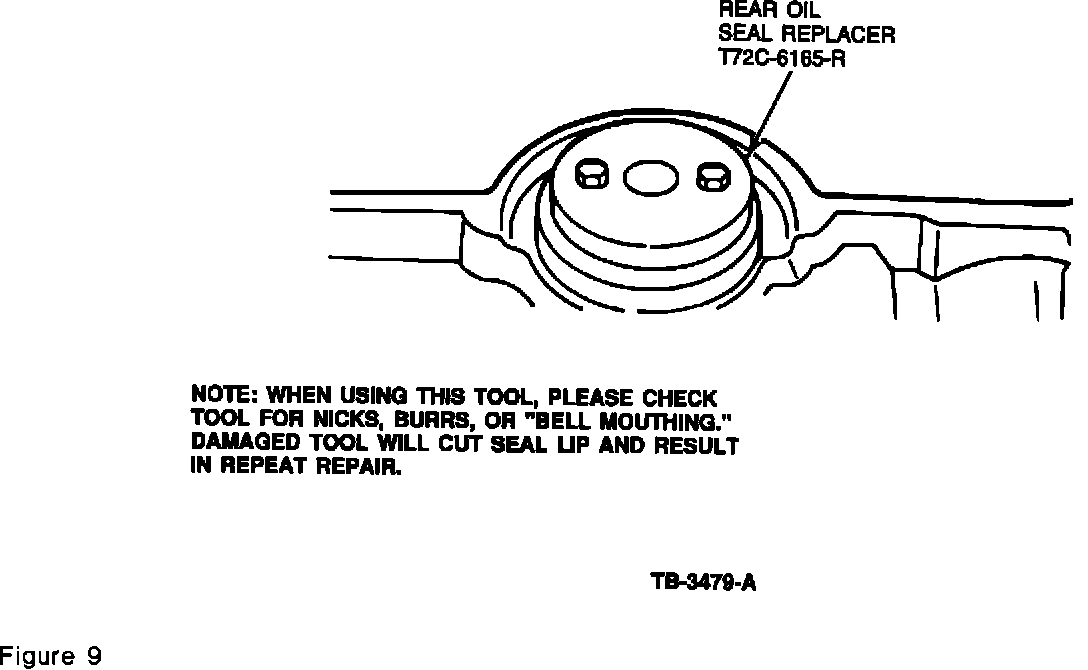
w. Coat the rear main oil seal (D7RZ-6701-A) with oil. Install the rear seal in the seal bore using Rear Oil Seal Replacer T72C-6165-R. This tool uses two flywheel bolts to draw the seal into position. Refer to Figure 9.
CAUTION:
DO NOT USE THE OLD STYLE HAMMER OPERATED TOOL.
3. Repair procedure for a leak between the rear main seal and the crankshaft. See block diagram, Procedure A, Step A4/F3.
a. Any presence of rust on the rear seal journal will cause a leak.
b. Any presence of pitting, porosity or nicks on the rear seal journal will cause a leak.
NOTE:
IF A LEAK IS PRESENT BETWEEN THE REAR MAIN SEAL AND CRANKSHAFT, PLEASE NOTIFY THE 4.0L "HOTLINE" AT (800) 537-8046 OR (800) 552-4445 PRIOR TO ANY ATTEMPT TO REPAIR THIS CONDITION.