Rear Drive Halfshafts
Constant Velocity (CV) Joint Boot


Disassembly
1. Remove the halfshaft assembly. For additional information, refer to Halfshaft Rear Drive Halfshafts.
2. Remove and discard the inboard CV joint boot clamps.

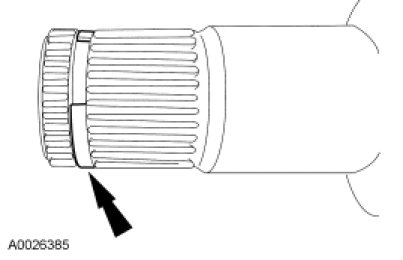
3. With the inboard CV joint boot removed from the housing, remove the retaining ring.

4. Remove the 8 balls and outer race.

5. Remove the CV joint housing snap ring.

6. Remove and discard the boot.
7. NOTE: The outboard CV joint is not removable from the halfshaft. The boot must be removed or installed from the inboard CV joint side of the shaft.
For the outboard CV joint boot, carry out the following:
1. Remove and discard the boot clamps.
2. Remove and discard the boot.

Assembly
1. For the outboard CV joint, carry out the following:
1. Slide the boot on the interconnecting shaft.
2. Pack the outboard CV joint with 80 g (2.82 oz) of grease supplied in the boot kit.
3. Spread any remaining grease evenly inside the boot.
4. Install the boot by seating it in the groove in the CV joint housing.

2. Using the Constant Velocity Joint Boot Clamp Installer, install the 79.6 mm (3.13 in) boot clamps on the large end of the boot.

3. Install the small clamp on the small end of the boot.
4. NOTICE: Install a new circlip every time the halfshaft is removed from the axle or damage to the component may occur.
NOTICE: Start one end of the circlip in the groove and work the circlip over the halfshaft and into the groove to prevent the circlip from overexpanding or damage to the clamp may occur.
Install a new retainer circlip.
5. Position the small clamp on the interconnecting shaft before installing the boot.
6. Position the boot on the interconnecting shaft.
7. Install the inner race and the retainer snap ring.
8. Install the outer race with 8 balls.
9. Insert the assembly in the housing.
10. Install the retaining ring.
11. For the inboard CV joint, carry out the following steps in sequence:
1. Pack the inboard CV joint housing with 108 g (3.80 oz) of grease supplied in the boot kit.
2. Spread any remaining grease evenly inside the boot and CV joint.
3. Install the inboard CV joint housing, seating the boot in the groove in the housing.
12. Set the halfshaft assembled length to specifications. For additional information, refer to Specifications.
1. Measure the entire assembly length.
2. Push in or pull out on the inner joint as necessary to adjust the halfshaft assembled length.
3. Hold the inner joint to prevent the assembled length from changing and insert a soft, flat tool between the boot and the joint to equalize the pressure.

13. Using the Constant Velocity Joint Boot Clamp Installer, install the 77.5 mm (3.05 in) boot clamps on the large end of the boot.

14. Install the smaller boot clamp.
15. Install the halfshaft assembly. For additional information, refer to Halfshaft Rear Drive Halfshafts.