Campaign - Rear Window Defogger
Model Applicable To File Under Bulletin No.
Accord All '82 85-036
Hatchback '83 up to VIN ELECTRICAL Issue Date
SZ...114261
AUG 23, '85
Product Update: Accord Hatchback Rear Window Defogger (Supersedes Bulletin 84-028 dated OCT 1, '84)
Problem
Deterioration of the defogger buss bar causes hot spots on the hatchback glass which may result in the glass breaking.
CORRECTIVE ACTION
Install a new buss bar on each side of the rear window glass as shown on pages 2 and 3. If the window has been replaced, inspect the buss bars to make sure the window is the updated type: When viewed from the outside, the buss bars of the old style window are covered by the window weatherstripping; on the updated window, the buss bars are inboard of the weatherstripping and are completely visible.
CUSTOMER NOTIFICATION
All owners of affected cars which have not yet been updated will be notified by mail. Owners will again be asked to contact their nearest Honda dealer for installation of the new buss bars.
PARTS INFORMATION
Use the following information only for ordering; do not enter it on the warranty claim.
10-car Buss Bar Kit: H/C2244002 P/N74220-SA5-335
Buss bar kits are now available only in packs of 10, enough to update 10 cars.
Each 10-car kit contains ^ Ten pairs of copper strips and plastic masks
^ One 20-gram bottle of conductive paint
^ One 100-gram tube of special silicone adhesive.
WARRANTY CLAIM INFORMATION
Do not use the control number on the customer letter as your warranty claim number.
Enter the following information in the "PARTS USED . . . " section of the warranty claim; do not use it for ordering: H/C 2246544. QTY: 1, DEALER NET: $7.19, DESCRIPTION: 1/10 of 10-car kit.
Operation # Flat Rate Time Defect Code Contention Code
Kit Installation 832210 0.7 hour for both sides
480 E02
Window Inspection 832211 0.2 hour
INSTALLATION INSTRUCTIONS
Buss Bar Installation:
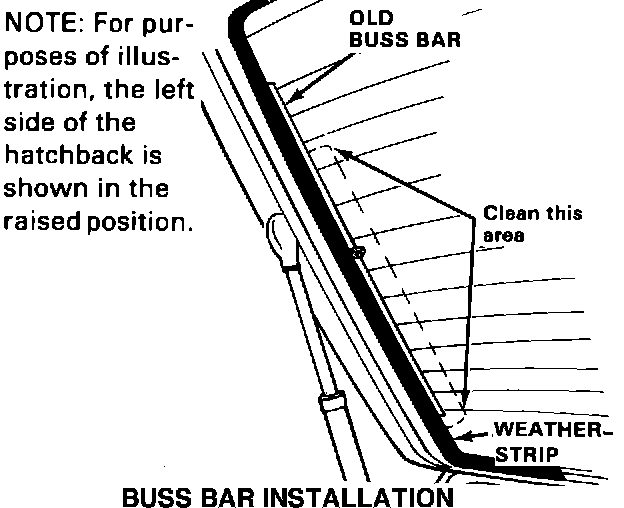
1. Remove the plastic retainer holding the defogger wires, then disconnect the wire's connectors from the glass.
2. Use the abrasive pad to clean any black residue from the buss bar. Apply light pressure to the pad, scrubbing the buss bar gently until it turns a silver/gray color. Remove only enough material to assure a reasonably clean surface.
CAUTION: Take care to avoid breaking the grid lines next to the buss bar.
Buss Bar Installation Procedure:
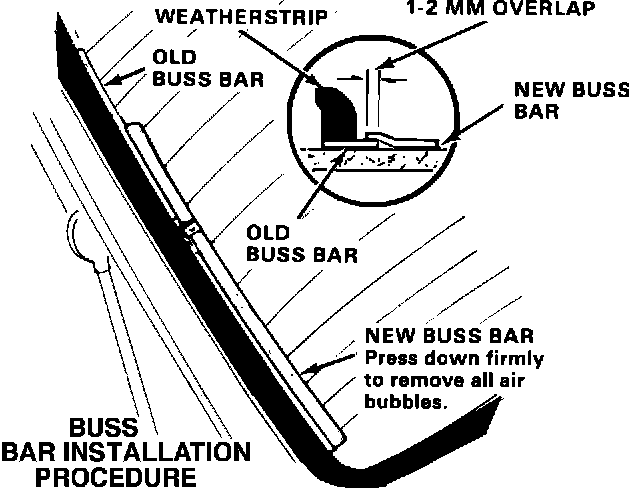
3. Clean the buss bar and adjacent glass with a wax and grease remover (Prep-Sol, Sher-Will-Clean, etc.) or alcohol, then wipe dry with a clean cloth.
4. Remove the backing from the new buss bar then install it over the old buss bar beginning at the grid line nearest the roof. The new buss bar should overlap the inboard edge of the old one by 1-2 mm, as shown.
NOTE: The new buss bars are slightly curved; make sure the curvature of the buss bar conforms to the curvature of the window edge.
Buss Bar Installation Procedure:
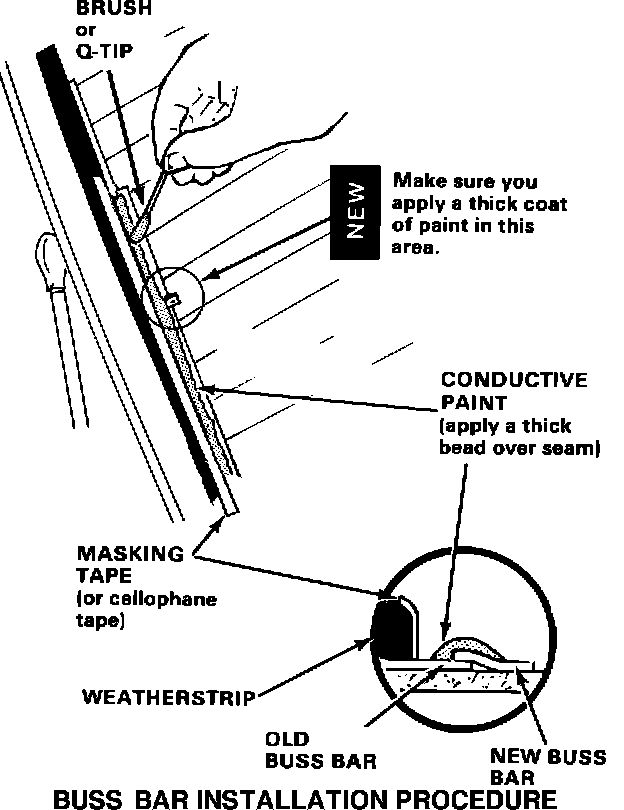
5. Put masking tape (or cellophane tape) along the edge of the weatherstrip, then apply a thick bead of conductive paint along the outboard edge of the new buss bar (where it overlaps the old buss bar).
6. Use a hairdryer to force-dry the paint; it must be dry all the way through, not just dry to the touch. Don't use a heat gun; the air it puts out may be hot enough to damage the weatherstrip or body paint.
NOTE: Each time you update a defogger, use a stick to stir up any silver that has settled to the bottom of the bottle.Then put the top back on and shake the bottle until all the ingredients are thoroughly mixed.
Silicone Adhesive:
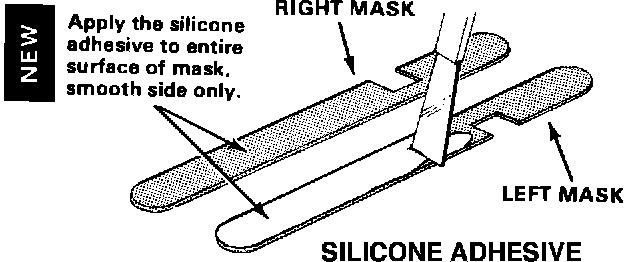
7.. Spread the silicone adhesive over the smooth side of the buss bar mask.
CAUTION: Use only the silicone adhesive supplied in the kit; any other kind may corrode the copper strips.
NOTE: The buss bar masks are slightly curved; make sure the curvature of the buss bar mask conforms to the curvature of the window edge.
Buss Bar Installation Procedure:
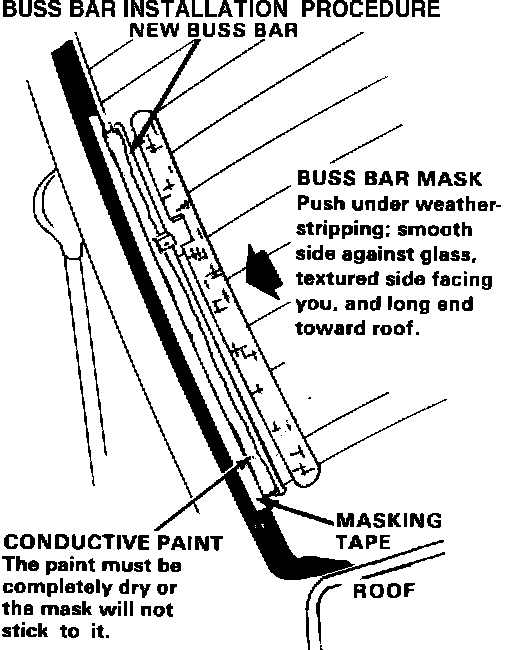
8. Remove the tape from the weatherstrip. Pull the weatherstrip back and fit the edge of the mask under it, then press the mask into position so it covers the buss bars.
Buss Bar Installation Procedure:
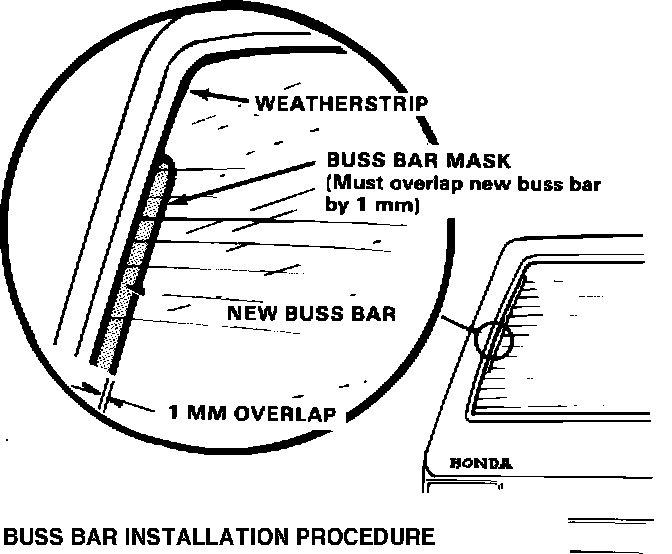
9. Check the fit from the outside of the glass; the mask should completely cover the new buss bar and overlap its inboard edge by 1 mm. If it doesn't, reposition the mask and check it again.
10. Gently scrape the excess silicone off the glass with a putty knife, then wipe off the remaining film with a clean rag.
Buss Bar Installation Procedure:
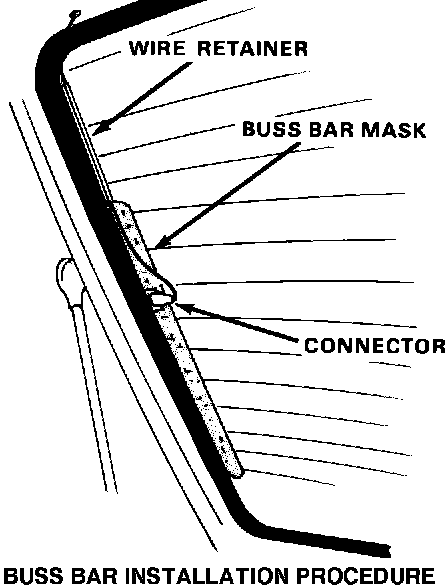
11. Remove the masking tape from the weatherstrip, reconnect the defogger wire, then reinstall the plastic wire retainer under the weatherstrip, next to the end of the buss bar mask.
12. Repeat the procedure on the other side.