Navigation Display Buttons Do Not Work or Respond Properly
Navigation display buttons do not work or respond properlySpecial Tools Required
SCS service connector 07PAZ-0010100
NOTE:
- Always check connectors for poor contact and poor pin fits.
- Before troubleshooting, get the navigation and radio anti-theft codes.
- Before troubleshooting, write down all the AM/FM/ XM presets and re-enter them after repairs are complete.
- Always verify the concern and compare the system operation to a known-good car with the same software loaded when ever possible. If the concern is duplicated in the known-good car, then it can be considered a characteristic of the system.
1. Turn the ignition switch ON (II).
Does the navigation display turn on?
YES - Go to step 2.
NO - Refer to troubleshooting for no picture is displayed.
2. Try to load and play a CD in the CD changer.
Does CD display on the audio unit when the CD button is pushed on the navigation screen?
YES - Go to step 8.
NO - Go to step 3.
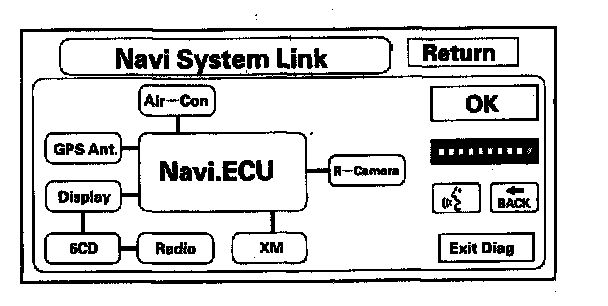
3. Do the forced starting of the display.
Are all the connections normal (green)?
YES - Check the operation of the navigation screen, press Return Monitor Check Touch Panel Check. If any the buttons on the screen do not respond properly, replace the navigation display.
NO -
- The display, 6CD, radio and the XM are RED: Go to step 4.
- Only some of the links are RED: Go to step 8.
4. Disconnect audio unit connector D (14P) [also audio unit connector C (16P) with rear entertainment system] .
5. Check the continuity between D9 and D10 of the audio unit connector D (14P) [also C9 and C11 with rear entertainment system] and body ground.
Is there about continuity?
YES - Go to step 6.
NO - Check all pin fits and recheck operation. If circuit OK, substitute a navigation control unit if no change, replace the navigation display unit.
6. In this order, disconnect the connectors one at a time until you no longer have continuity to ground at step 5.
- XM receiver A (20P) connector.
- Navigation unit B (14P) connector.
- Navigation unit A (20P) connector.
- Navigation display A (20P) connector.
- 6 CD changer B (14P) connector.
- 6 CD changer A (14P) connector.
- Audio unit B (14P) connector.
7. Check for continuity to ground on the connector terminals listed of connector disconnected when continuity is lost at the audio unit D and C connectors, at step 5.
- Navigation unit B2 and B8.
- Navigation unit A10 and A20.
- Navigation display A3 and A13.
- CD changer A5 and A15.
- Rear controller and screen 26P connector terminals No. 3 and No. 16 (with rear entertainment system).
Is there continuity to ground?
YES - Replace the shorted harness.
NO - Replace the unit that is shorted to ground.
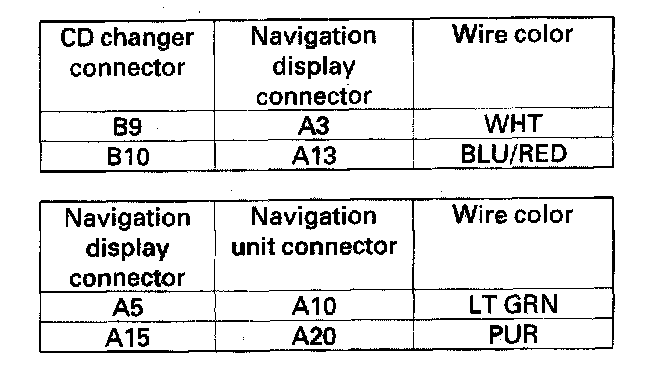
8. Check for continuity between the CD changer connector B, navigation display connector A and navigation unit connector A according to the table.
Is there continuity?
YES - Check all pin fits and recheck operation. If circuit OK, substitute a navigation unit. If no change, replace the navigation display unit.
NO - Replace the faulty harness.