A/T Clutch Pressure Control Solenoid Valve A Test
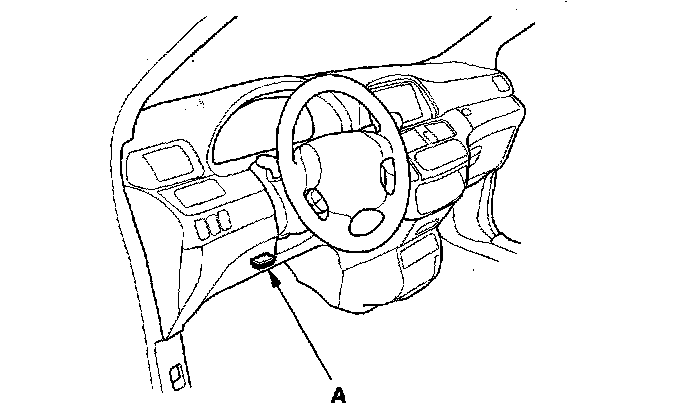
A/T Clutch Pressure Control Solenoid Valve A Test1. Connect the HDS to the DLC (A).
2. Choose Clutch Pressure Control (Linear) Solenoid A in Miscellaneous Test Menu on the HDS.
3. Test the A/T clutch pressure control solenoid valve A with the HDS.
^ If the valve tests OK, the test is complete. Disconnect the HDS.
^ If the valve does not test OK, follow the instructions on the HDS.
^ If the valve does not test OK, and the HDS does not determine the cause, go to step 4.
4. Make sure you have the anti-theft codes for the radio and navigation system, then write down the customer's audio presets.
5. Disconnect the negative cable from the battery first, then disconnect the positive cable. Remove the battery and battery tray.
6. Remove the intake air duct and air cleaner housing.
7. Loosen the two bolts securing the rear of the battery base, and remove the two bolts securing the front of the base, then remove the battery base.
8. Disconnect A/T clutch pressure control solenoid valve A connector.
9. Measure A/T clutch pressure control solenoid valve A resistance at the connector terminals.
Standard: 3 - 10 ohms
^ If the resistance is out of standard, replace A/T clutch pressure control solenoid valve A and B.
^ If the resistance is within the standard, go to step 10.
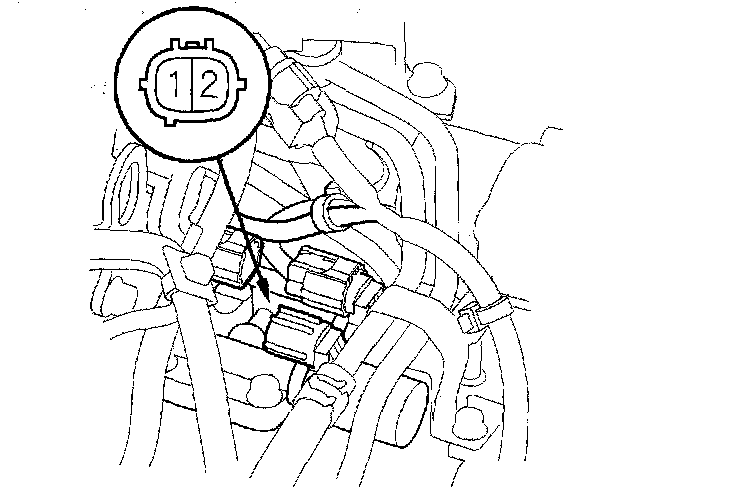
10. Connect the battery negative terminal to the solenoid valve A connector terminal No. 2, and connect the battery positive terminal to the connector terminal No. 1.
^ If a clicking sound is heard, the valve is OK. Reconnect the connector, and install all removed parts.
^ If no clicking sound is heard, go to step 11.
11. Remove the harness clamp (A) and breather tube clamp (B) from the clamp bracket on the dipstick guide pipe (C), remove the dipstick guide pipe, and remove the O-ring (D).
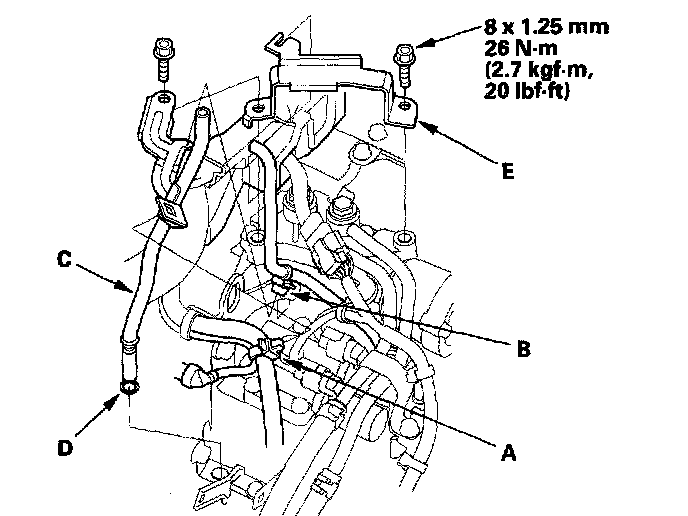
12. Remove the harness cover bracket (E).
13. Remove the transmission subharness clamps (A) from clamp bracket, and disconnect transmission subharness 6P connector (C) and A/T clutch pressure control solenoid valve B connector.
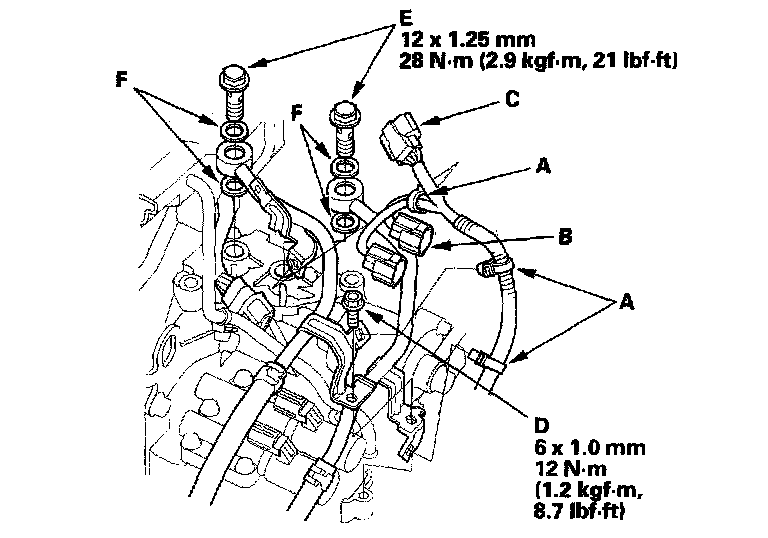
14. Remove the ATF cooler line bracket bolt (D), and remove the line bolts (E) and sealing washers (F).
15. Remove the A/T clutch pressure control solenoid valve A and B.
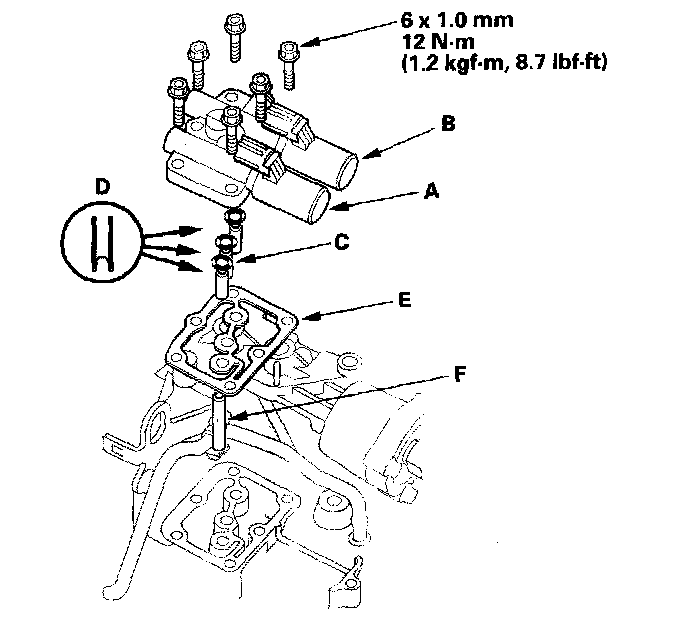
16. Remove the O-rings (C), 8 x 18 mm ATF feed pipes (D), gasket (E), and 8 x 40 mm ATF feed pipe (F).
17. Connect the battery negative terminal to A/T clutch pressure control solenoid valve A connector terminal No. 2, and connect the battery positive terminal to the connector terminal No. 1. Make sure A/T clutch pressure control solenoid valve A moves.

18. Disconnect one of the battery terminals and check valve movement at the fluid passage in valve body mounting surface.. If the valve binds or moves sluggishly, or if the solenoid valve does not operate, replace A/T clutch pressure control solenoid valve A and B.
19. Check the fluid passage of the A/T clutch pressure control solenoid Valve for dust and dirt, and clean the passage if necessary.
20. Place a new gasket on the transmission housing, then install the 8 x 18 mm ATF feed pipes with their filter side into the transmission housing.
21. Install new O-rings over the feed pipes, and install the 8 x 40 mm ATF feed pipe.
22. Install the new A/T clutch pressure control solenoid valve A and B.
23. Install the ATF cooler lines with new sealing washers and line bolts, secure the cooler lines with the bracket bolt.
24. Check the connectors for rust, dirt, or oil, then connect the connectors securely to the A/T clutch pressure control solenoid valve A, solenoid valve B, and subharness 6P connector.
25. Slide the harness cover bracket in the harness cover, and install the bracket on the transmission.
26. Install the new O-ring on the dipstick guide pipe, and install the dipstick guide pipe.
27. Install the harness clamps and breather tube clamp on the clamp brackets.
28. Install the battery base, then install the air cleaner housing and intake air duct.
29. Install the battery tray and battery, and battery cover, then secure the battery with the hold-down bracket.
30. Clean the battery posts and cable terminals with sandpaper, then assemble them and apply grease to prevent corrosion.
31. Connect the battery terminals, and enter the audio and navigation anti-theft codes, then enter the customer's audio presets, and set the clock.