Navigation Display Buttons Do Not Work or Respond Properly
Special Tools RequiredSCS service connector 07PAZ-0010100
Navigation display buttons do not work or respond properly
NOTE:
- Check the vehicle battery condition first.
- Make sure that the correct DVD color and version are installed.
- Check any official Honda service website for more service information and software updates for the navigation system.
- For problems with the rearview camera, do the rearview camera does not come on or work properly troubleshooting.
- Check the connectors for poor connections or loose terminals.
- Before troubleshooting, make sure you have the navigation system anti-theft code.
- Before troubleshooting, make sure you have the navigation and audio system anti-theft codes.
- Before troubleshooting, write down all the audio presets and re-enter them after repairs are complete.
- Verify the concern and compare the system operation to a known-good vehicle with the same software loaded whenever possible. If the concern is duplicated in the known-good vehicle, then it can be considered a characteristic of the system.
1. Turn the ignition switch to ON (II).
2. Eject the navigation DVD.
Does the DVD eject?
YES - Go to step 3.
NO - Do the troubleshooting for navigation unit will not eject or accept the navigation DVD.
3. Check the DVD label color, version number, and the reading surface for damage, scratches or dirt.
NOTE: Check any official Honda service website for more service information about the navigation system or navigation DVDs.
Is the DVD the correct color (white), correct version (minimum requirement), clean, and free of scratches?
YES - Go to step 4.
NO - Replace the navigation system DVD and recheck the system.
4. Turn the audio system ON and test all of its functions.
Does the audio system turn on and function normally?
YES - Go to step 5.
NO - Troubleshoot the audio system.
5. Turn the navigation display ON.
Does the navigation display turn ON, and display the disclaimer screen?
YES - Go to step 6.
NO - Do the troubleshooting for no picture is displayed.
6. Select OK on the disclaimer screen.
Can you select OK on the disclaimer screen?
YES - Go to step 7.
NO - Go to step 8.
7. Go into the Diagnostic Menu and use the Touch Panel Check and Hard Key to test all the possible touch locations on the screen and the hard key buttons that surround the navigation display.
Does the every button displayed on the screen and every hard key respond properly when touched?
YES - No problems at this time. Check any official Honda service website for more service information about the navigation buttons. Get further details from the customer and try to duplicate the problem under the same conditions and perform this troubleshooting again at that time.
NO - Substitute a known-good navigation display and recheck. If the problem goes away, replace the original navigation display. If the problem is still present, substitute a known-good navigation unit and recheck. If the problem goes away, replace the navigation unit.
8. Do the forced starting of display and check the connection links in the In-Line Diag mode.
Are the connection links normal (green)?
YES - Substitute a known-good navigation display and recheck. If the problem goes away, replace the original navigation display. If the problem is still present, substitute a known-good navigation unit and recheck. If the problem goes away, replace the navigation unit.
NO - Go to step 9.
9. Check the connection links on the In-Line Diag mode.
Are all the connection links red (failed response)?
YES - If the vehicle is equipped with any OEM audio accessories (audio disc changer. Music Link, etc.), go to step 11. If there are no OEM audio accessories connected to the vehicle, go to step 13.
NO - Some of the links are red, go to step 10.
10. Inspect the connections and pin fits of the following units:
- Audio unit
- Audio disc changer (behind the navigation display)
- Navigation display
- Navigation unit
Are all the connections properly connected and terminal fits tight?
YES - If the vehicle is equipped with any OEM audio accessories (audio disc changer, Music Link, etc.), go to step 11. If there are no OEM audio accessories connected to the vehicle, go to step 13.
NO - Repair the connection(s) and/or tighten the terminals and retest.
11. Turn the ignition switch to LOCK (0).
12. Completely disconnect all cables that connect an OEM audio accessory to the vehicles GA-NET II communication bus; then turn the ignition switch to ON (II) and recheck the navigation system.
Does the navigation display now respond to touch?
YES - Replace the defective OEM audio accessory or cable.
NO - Go to step 13.
13. Turn the ignition switch to LOCK (0).
14. Disconnect the XM receiver connector A (14P), then turn the ignition switch to ON (II) and recheck the navigation system.
Does the navigation display now respond to touch?
YES - Replace the defective XM receiver.
NO -
- With rear entertainment system: go to step 15.
- Without rear entertainment system: go to step 17.
15. Turn the ignition switch to LOCK (0).
16. Disconnect the rear controller and screen 26P connector, then turn the ignition switch to ON (II) and recheck the navigation system.
Does the navigation display now respond to touch?
YES - Replace the defective rear controller and screen.
NO - Go to step 17.
17. Turn the ignition switch to LOCK (0).
18. Disconnect the navigation display connector A (20P) and the audio disc changer connector B (14P).
19. Check for continuity between body ground and navigation display connector A (20P) terminals No. 3 and No. 13 individually.
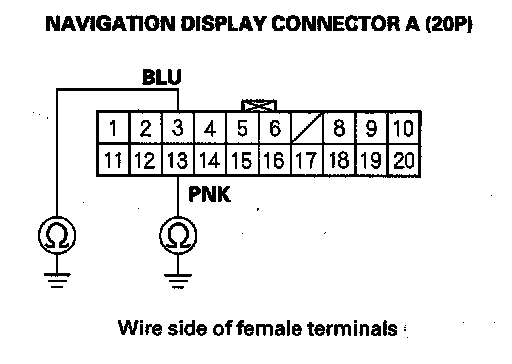
Is there continuity?
YES - Short to body ground in the wire(s) between the navigation display connector A (20P) and the audio disc changer connector B (14P). Replace the affected shielded harness.
NO - Go to step 20.
20. Check for continuity between navigation display connector A (20P) according to the table.
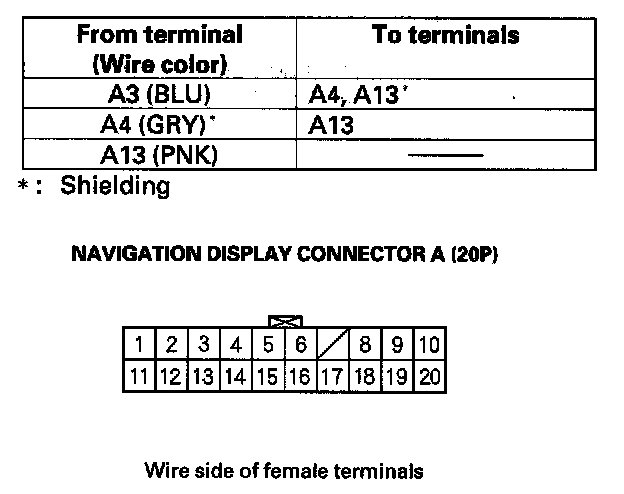
Is there continuity between any of the terminals?
YES - Short in the wires between the navigation display connector A (20P) and the audio disc changer connector B (14P). Replace the affected shielded harness.
NO - Go to step 21.
21. Check for continuity between the navigation display connector A (20P) and the audio disc changer connector B (14P) according to the table.
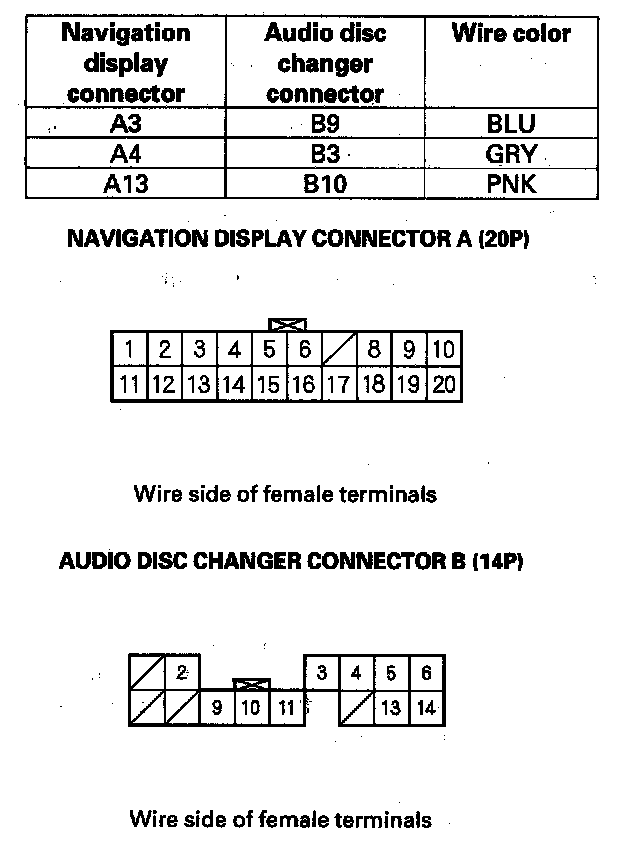
Is there continuity?
YES - Go to step 22.
NO - Open in the wire(s) between the navigation display connector A (20P) and the audio disc changer connector B (14P). Replace the affected shielded harness.
22. Disconnect the audio unit connector D (14P) and the audio disc changer connector A (18P).
23. Check for continuity between body ground and audio unit connector D (14P) terminals No. 9 and No. 10 individually.
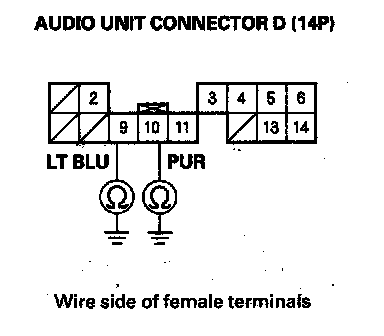
Is there continuity?
YES - Short to body ground in the wire(s) between the audio unit connector D (14P) and the audio disc changer connector A (18P). Replace the affected shielded harness.
NO - Go to step 24.
24. Check for continuity between audio unit connector D (14P) according to the table.
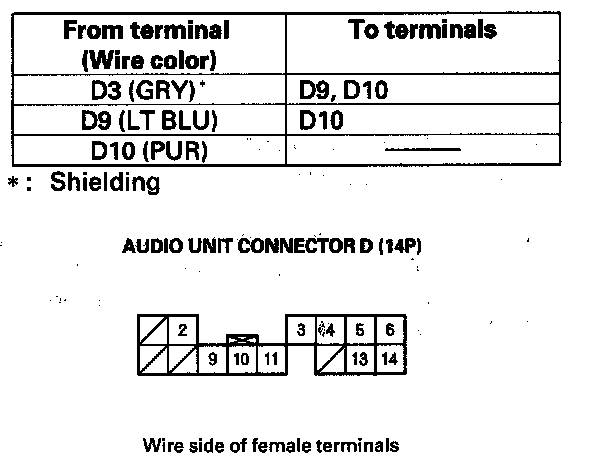
Is there continuity between any of the terminals?
YES - Short in the wires between the audio unit connector D (14P) and the audio disc changer connector A (18P). Replace the affected shielded harness.
NO - Go to step 25.
25. Check for continuity between audio unit connector D (14P) and audio disc changer connector A (18P) according to the table.
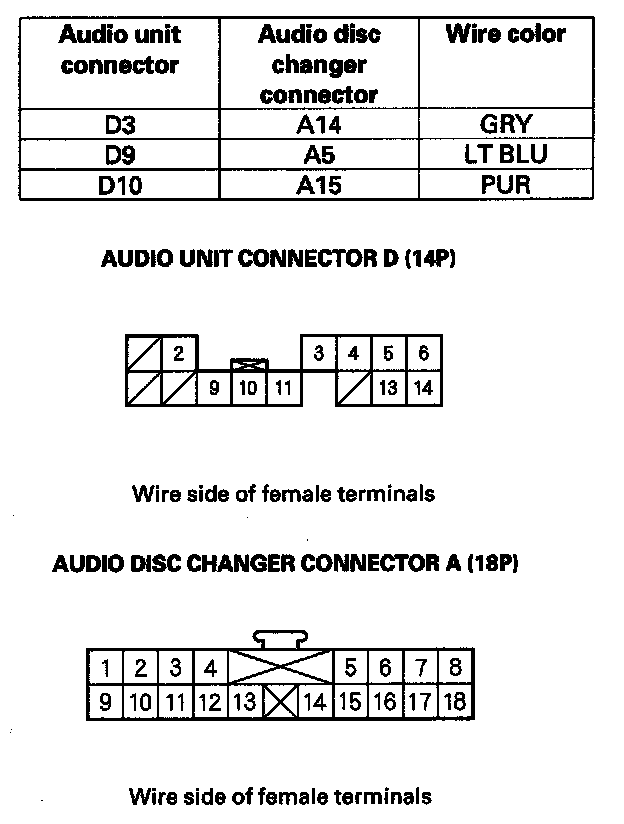
Is there continuity?
YES -
- With rear entertainment system: go to step 26.
- Without rear entertainment system: go to step 30.
NO - Open in the wire(s) between the audio unit connector D (14P) and the audio disc changer connector A (18P). Replace the affected shielded harness.
26. Disconnect the audio unit connector C (16P).
27. Check for continuity between body ground and audio unit connector C (16P) terminals No. 9 and No. 11 individually.
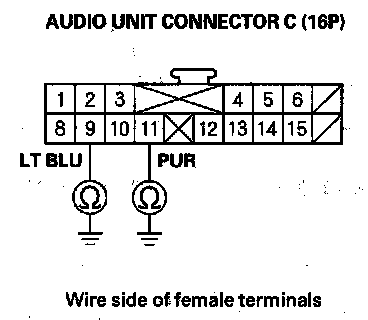
Is there continuity?
YES - Short to body ground in the wire(s) between the audio unit connector C (16P) and the rear controller and screen 26P connector. Replace the affected shielded harness.
NO - Go to step 28.
28. Check for continuity between audio unit connector C (16P) according to the table.
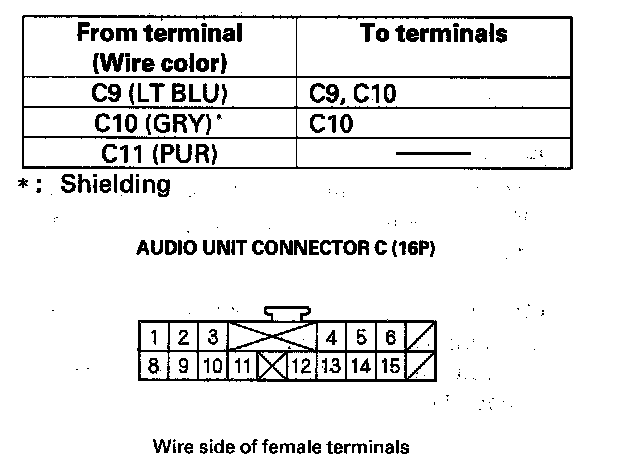
Is there continuity between any of the terminals?
YES - Short in the wires between the audio unit connector C (16P) and the rear controller and screen 26P connector. Replace the affected shielded harness.
NO - Go to step 29.
29. Check for continuity between audio unit connector C (16P) and rear controller and screen 26P connector according to the table.
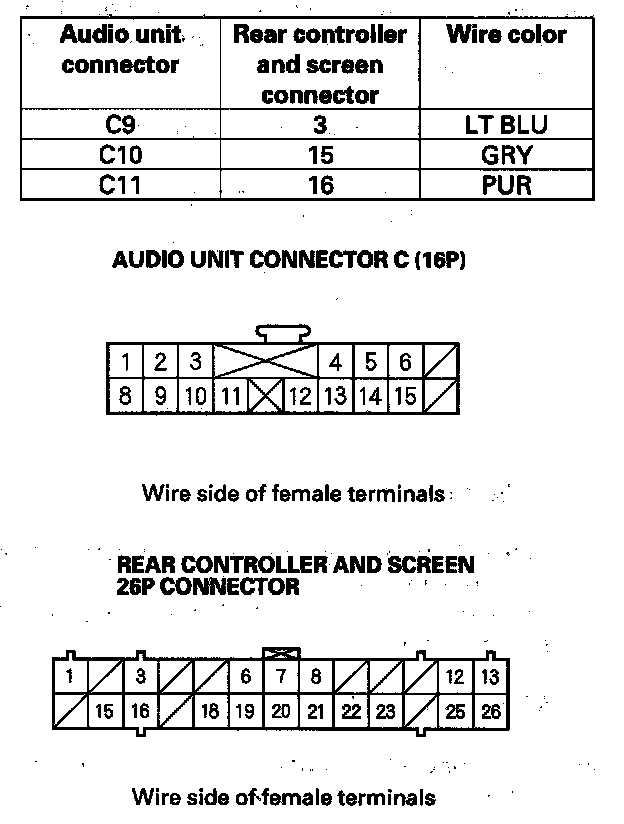
Is there continuity?
YES -
- '07 model: go to step 30.
- '08 model: go to step 38.
NO - Open in the wire(s) between the audio unit connector C (16P) and the rear controller and screen 26P connector. Replace the affected shielded harness.
30. Disconnect the navigation unit connector A (20P).
31. Check for continuity between body ground and navigation unit connector A (20P) terminals No. 10 and No. 20 individually.
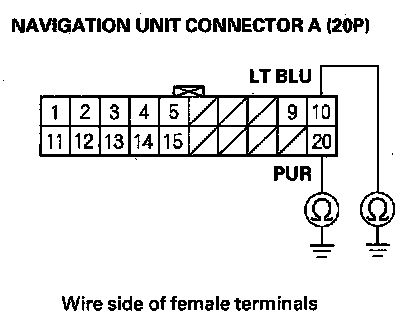
Is there continuity?
YES - Short to body ground in the wire(s) between the navigation unit connector A (20P) and the navigation display connector A (20P). Replace the affected shielded harness.
NO - Go to step 32.
32. Check for continuity between navigation unit connector A (20P) according to the table.
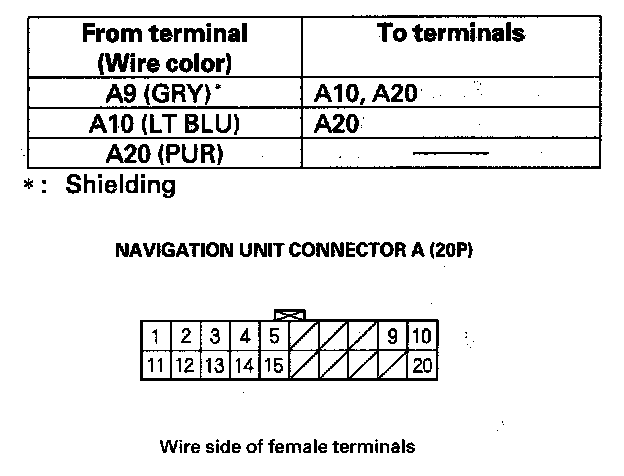
Is there continuity between any of the terminals?
YES - Short in the wires between the navigation unit connector A (20P) and the navigation display connector A (20P). Replace the affected shielded harness.
NO - Go to step 33.
33. Check for continuity between navigation unit connector A (20P) and navigation display connector A (20P) according to the table.
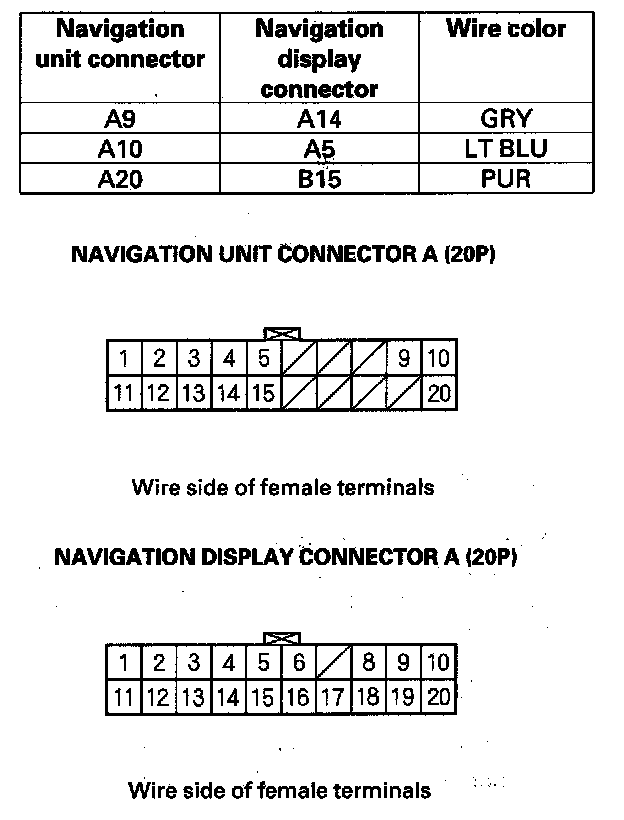
Is there continuity?
YES - Go to step 34.
NO - Open in the wire(s) between the navigation unit connector A (20P) and the navigation display connector A (20P). Replace the affected shielded harness.
34. Disconnect the navigation unit connector B (14P).
35. Check for continuity between body ground and navigation unit connector B (14P) terminals No. 2 and No. 8 individually.
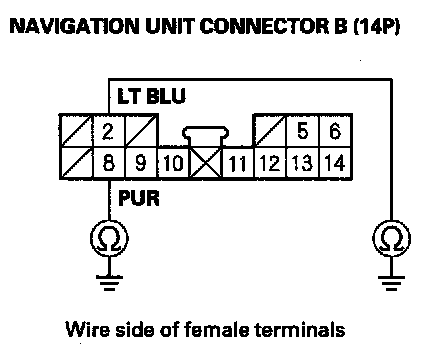
Is there continuity?
YES - Short to body ground in the wire(s) between the navigation unit connector B (14P) and the XM receiver connector A (14P). Replace the affected shielded harness.
NO - Go to step 36.
36. Check for continuity between navigation unit connector B (14P) according to the table.
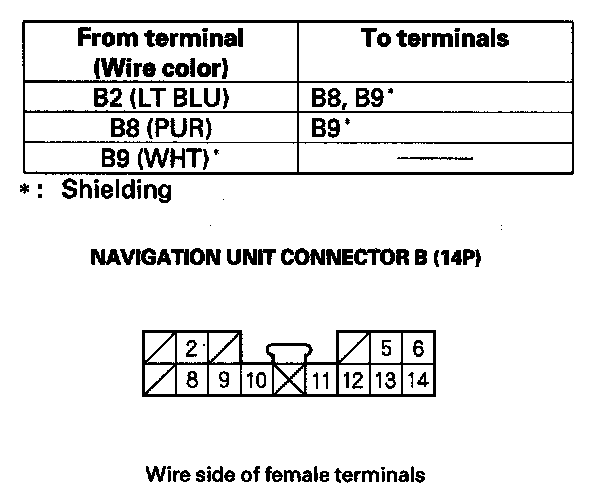
Is there continuity between any of the terminals?
YES - Short in the wires between navigation unit connector B (14P) and XM receiver connector A (14P). Replace the affected shielded harness.
NO - Go to step 37.
37. Check for continuity between navigation unit connector B (14P) and XM receiver connector A (14P) according to the table.
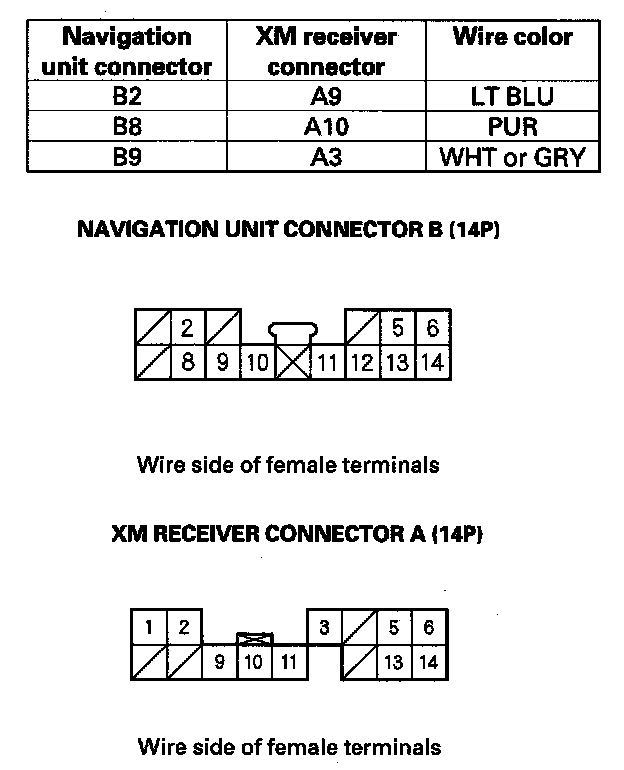
Is there continuity?
YES - Substitute the following units with known-good units, one at a time in the following order listed and recheck the navigation system operation after each unit substitution:
- Audio unit
- Audio disc changer
- Navigation display
- Navigation unit
If the problem goes away, replace the original defective unit.
NO - Open in the wire(s) between the navigation unit connector B (14P) and the XM receiver connector A (14P). Replace the affected shielded harness.
38. Disconnect the navigation unit connector A (32P).
39. Check for continuity between body ground and navigation unit connector A (32P) terminals No. 10 and No. 26 individually.
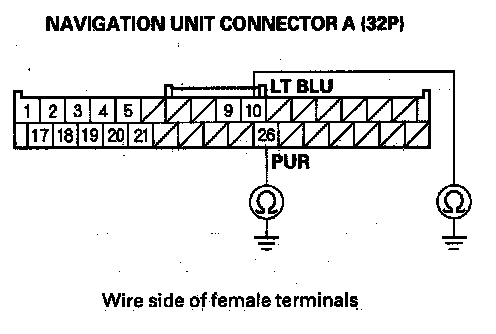
Is there continuity?
YES - Short to body ground in the wire(s) between the navigation unit connector A (32P) and the navigation display connector A (20P). Replace the affected shielded harness.
NO - Go to step 40.
40. Check for continuity between navigation unit connector A (32P) according to the table.
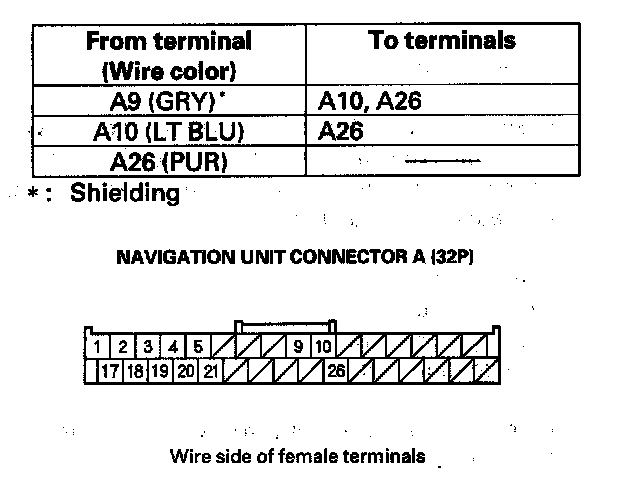
Is there continuity between any of the terminals?
YES - Short in the wires between the navigation unit connector A (32P) and the navigation display connector A (20P). Replace the affected shielded harness.
NO - Go to step 41.
41. Check for continuity between navigation unit connector A (32P) and navigation display connector A (20P) according to the table.
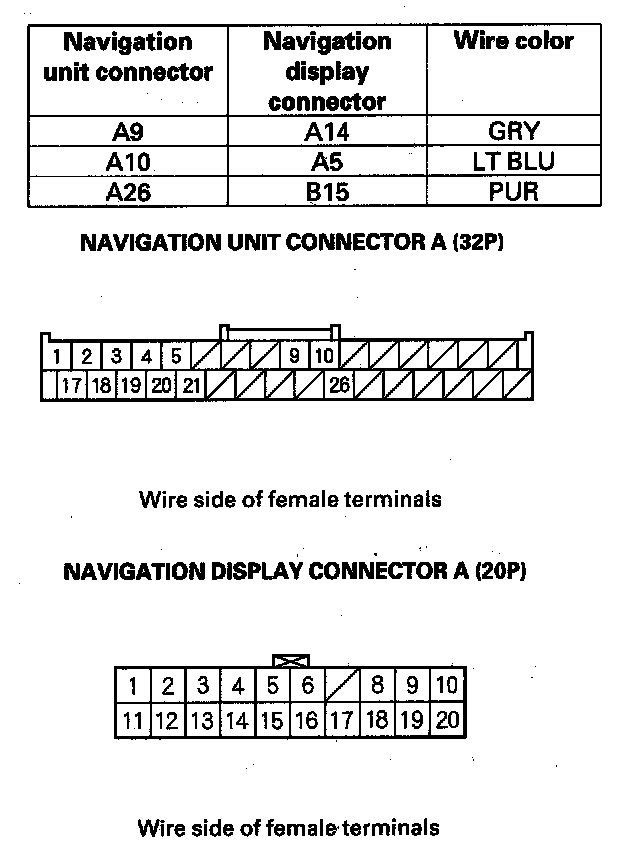
Is there continuity?
YES - Go to step 42.
NO - Open in the wire(s) between the navigation unit connector A (32P) and the navigation display connector A (20P). Replace the affected shielded harness.
42. Disconnect the navigation unit connector B (16P).
43. Check for continuity between body ground and navigation unit connector B (16P) terminals No. 2 and No. 10 individually.
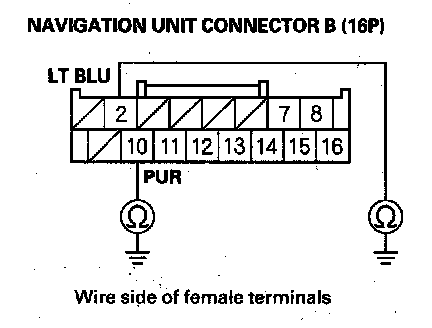
Is there continuity?
YES - Short to body ground in the wire(s) between the navigation unit connector B (16P) and the XM receiver connector A (14P). Replace the affected shielded harness.
NO - Go to step 44.
44. Check for continuity between navigation unit connector B (16P) according to the table.
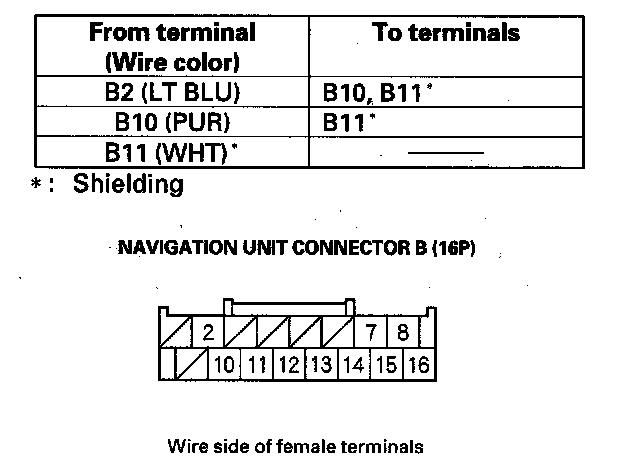
Is there continuity between any of the terminals?
YES - Short in the wires between navigation unit connector B (16P) and XM receiver connector A (14P). Replace the affected shielded harness.
NO - Go to step 45.
45. Check for continuity between navigation unit connector B (16P) and XM receiver connector A (14P) according to the table.
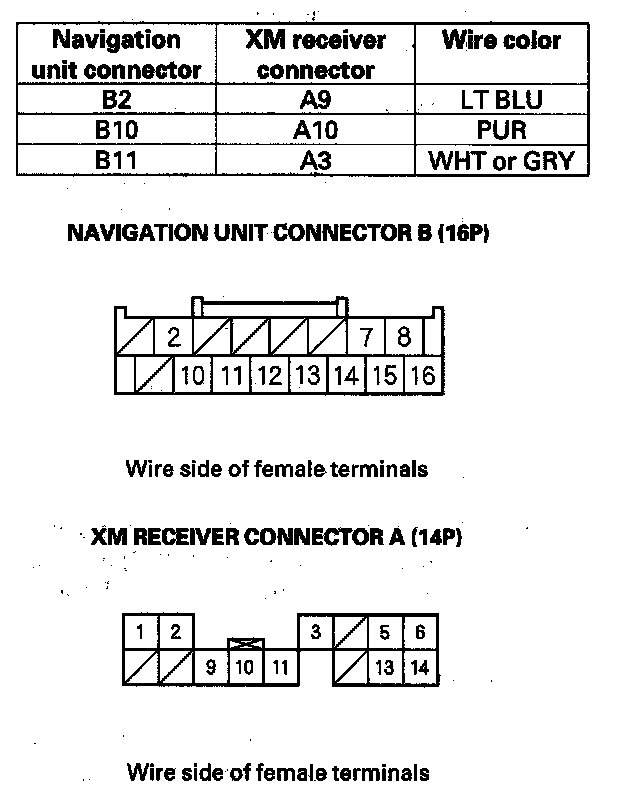
Is there continuity?
YES - Substitute the following units with known-good units, one at a time in the following order listed and recheck the navigation system operation after each unit substitution:
- Audio unit
- Audio disc changer
- Navigation display
- Navigation unit
If the problem goes away, replace the original defective unit.
NO - Open in the wire(s) between the navigation unit connector B (16P) and the XM receiver connector A (14P). Replace the affected shielded harness.