Engine Stalls
Engine
Fuel and Emissions Systems Symptom Troubleshooting - Engine stalls
Engine stalls
Special Tools Required
Vacuum Pump/Gauge, 0-30 inHg Snap-on YA4000A or equivalent, commercially available
NOTE: Before beginning this troubleshooting:
* Make sure the battery is fully charged.
* Make sure the fuel tank is at least 1/4 full.
* Make sure the engine oil level is correct.
1. DTC check:
DTC check
-1. Turn the ignition switch to ON (II).
-2. Check for Pending or Confirmed DTCs with the HDS.
Are any Pending or Confirmed DTCs indicated?
-YES- Go to the indicated DTC's troubleshooting.
-NO- Go to step 2.
NOTE: If the HDS does not communicate with the vehicle, go to the PCM power and ground troubleshooting PCM Power And Ground Circuit Troubleshooting.
2. Problem verification:
Problem verification
-1. Set the HDS to record a snapshot for 30 seconds.
-2. Begin the snapshot, then start the engine and let it idle without load (in neutral).
-3. Use the HDS and MVCI to take a snapshot.
Did the engine stall?
-YES- Go to step 4 (diagnosis by parameter (MAF SENSOR)).
-NO- Go to step 3.
3. On-board snapshot check:
On-board snapshot check
-1. Check for a record of engine stall in the on-board snapshot with the HDS.
Is there a Engine Stall record in the on-board snapshot?
-YES- Go to step 4 (diagnosis by parameter (MAF SENSOR)).
-NO- Go to step 12 (fuel system troubleshooting).
NOTE: If an engine stall on-board snapshot was not found, the snapshot may have been lost due to low battery voltage or because of battery disconnection or replacement.
4. On-board snapshot check (MAF SENSOR):
On-board snapshot check (MAF SENSOR)
-1. Select HDS Engine Stall in the on-board snapshot.
-2. Select the MAF sensor and engine speed in the configuration list.
Check the recorded snapshot parameters of the engine stall, then compare the MAF sensor pattern from the charts, and determine the problem.
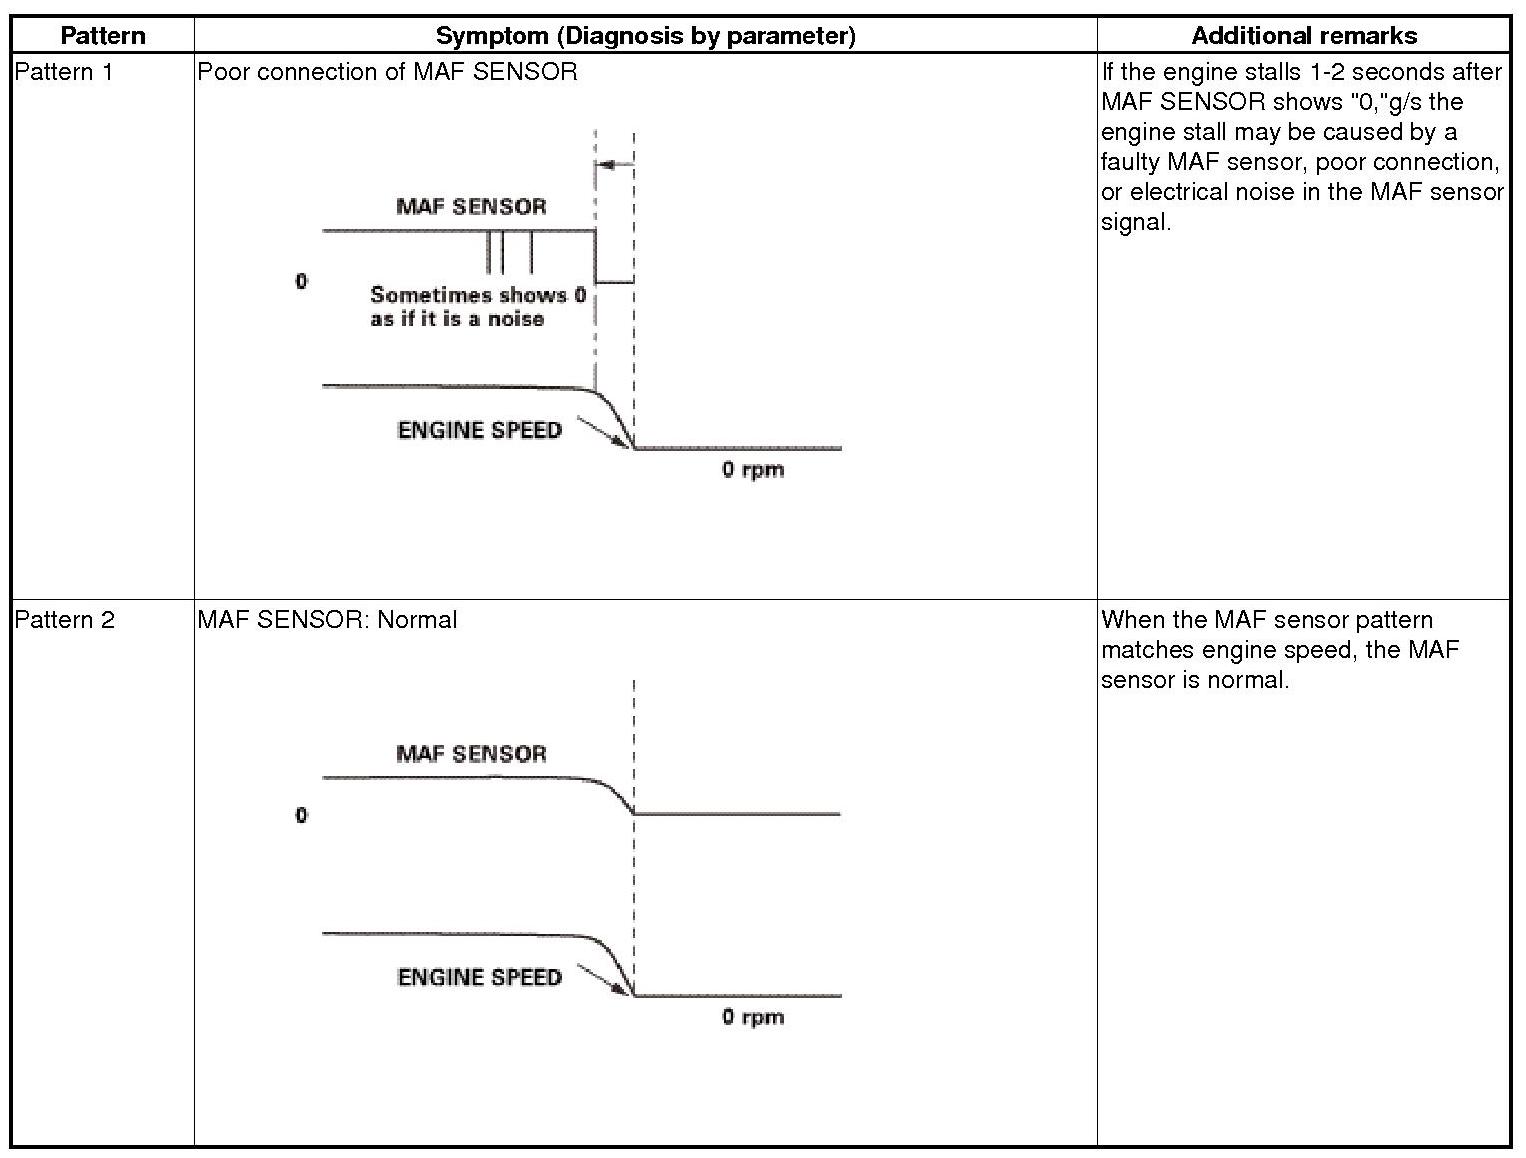
Which pattern is indicated?
-Pattern 1- Check the MAF sensor for loose terminals or poor connections. If the terminals and connections are OK, substitute a known-good MAF sensor Service and Repair.
-Pattern 2- The MAF sensor is OK. Go to step 5 (diagnosis by parameter (ECT SENSOR 1)).
5. On-board snapshot check (ECT SENSOR 1):
On-board snapshot check (ECT SENSOR 1)
-1. Select HDS Engine Stall in the on-board snapshot.
-2. Select the ECT sensor 1 and engine speed in the configuration list.
Check the recorded snapshot parameters of the engine stall, then compare the ECT sensor 1 pattern from the charts, and determine the problem.
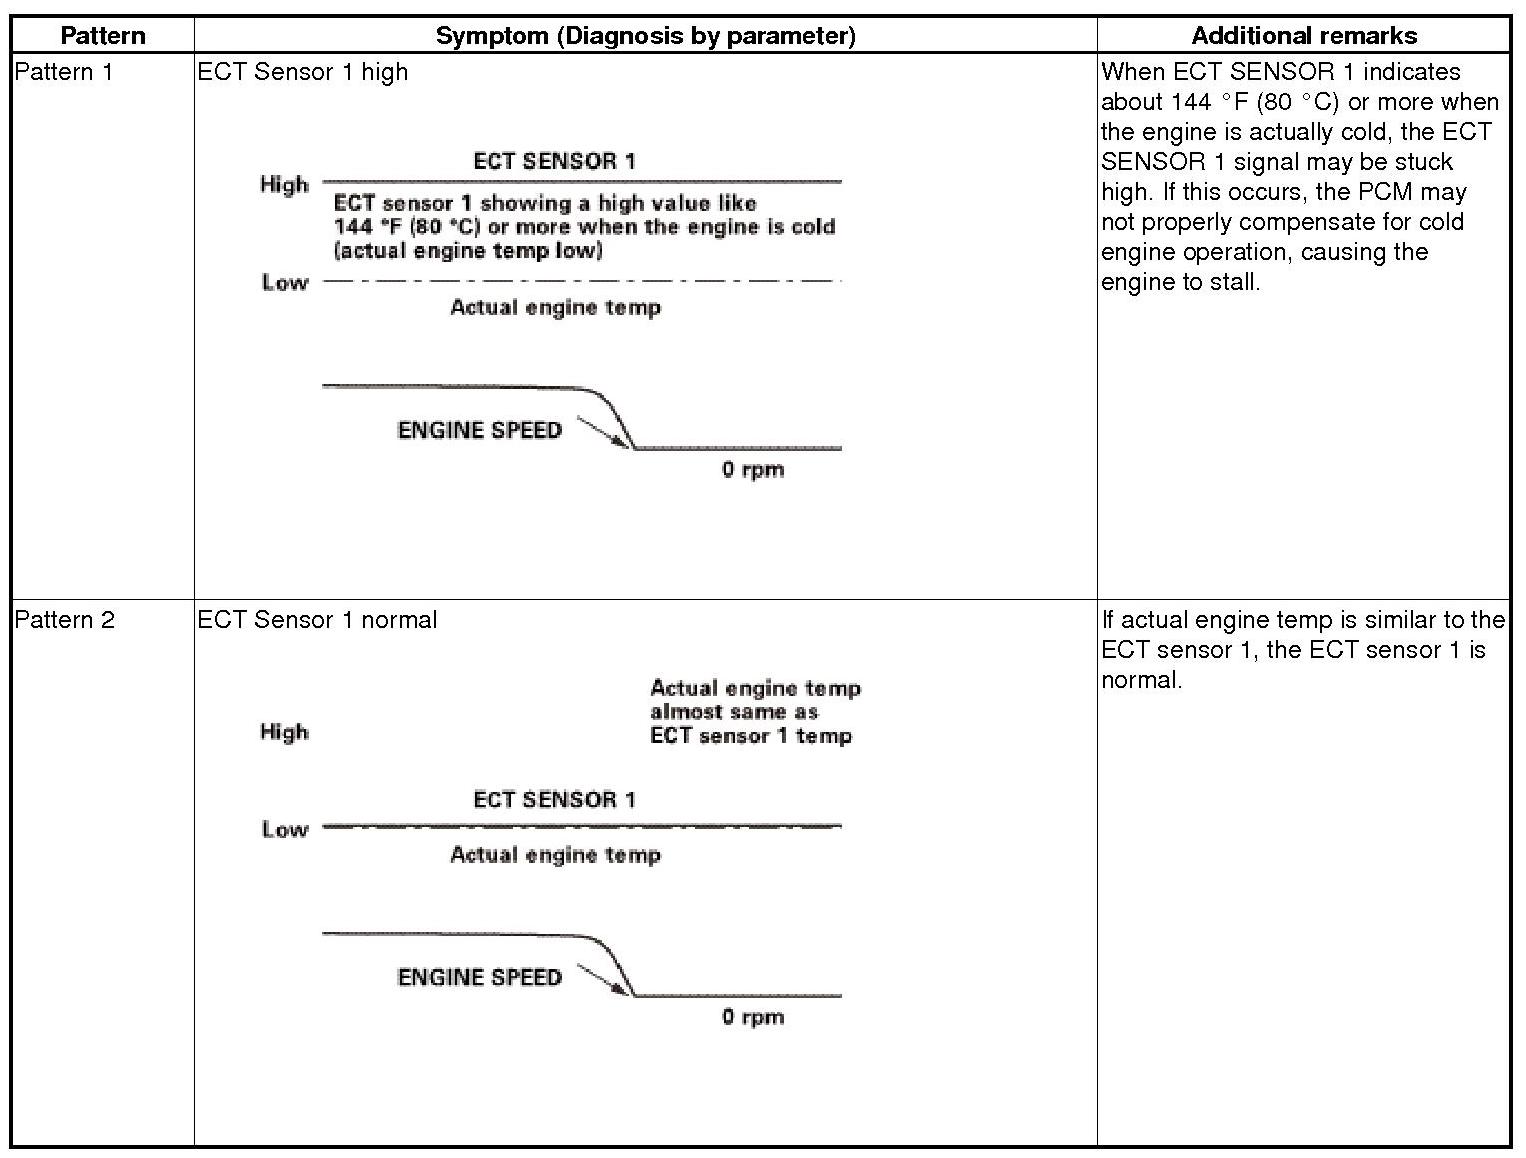
Which pattern is indicated?
-Pattern 1- Check ECT sensor 1 for loose terminal or poor connection.
-Pattern 2- ECT sensor 1 is OK. Go to step 6 (diagnosis by parameter (BATTERY)).
6. On-board snapshot check (BATTERY):
On-board snapshot check (BATTERY)
-1. Select HDS Engine Stall in the on-board snapshot.
-2. Select the BATTERY and engine speed in the configuration list.
Check the recorded snapshot parameters of the engine stall, then compare the BATTERY pattern from the charts, and determine the problem.
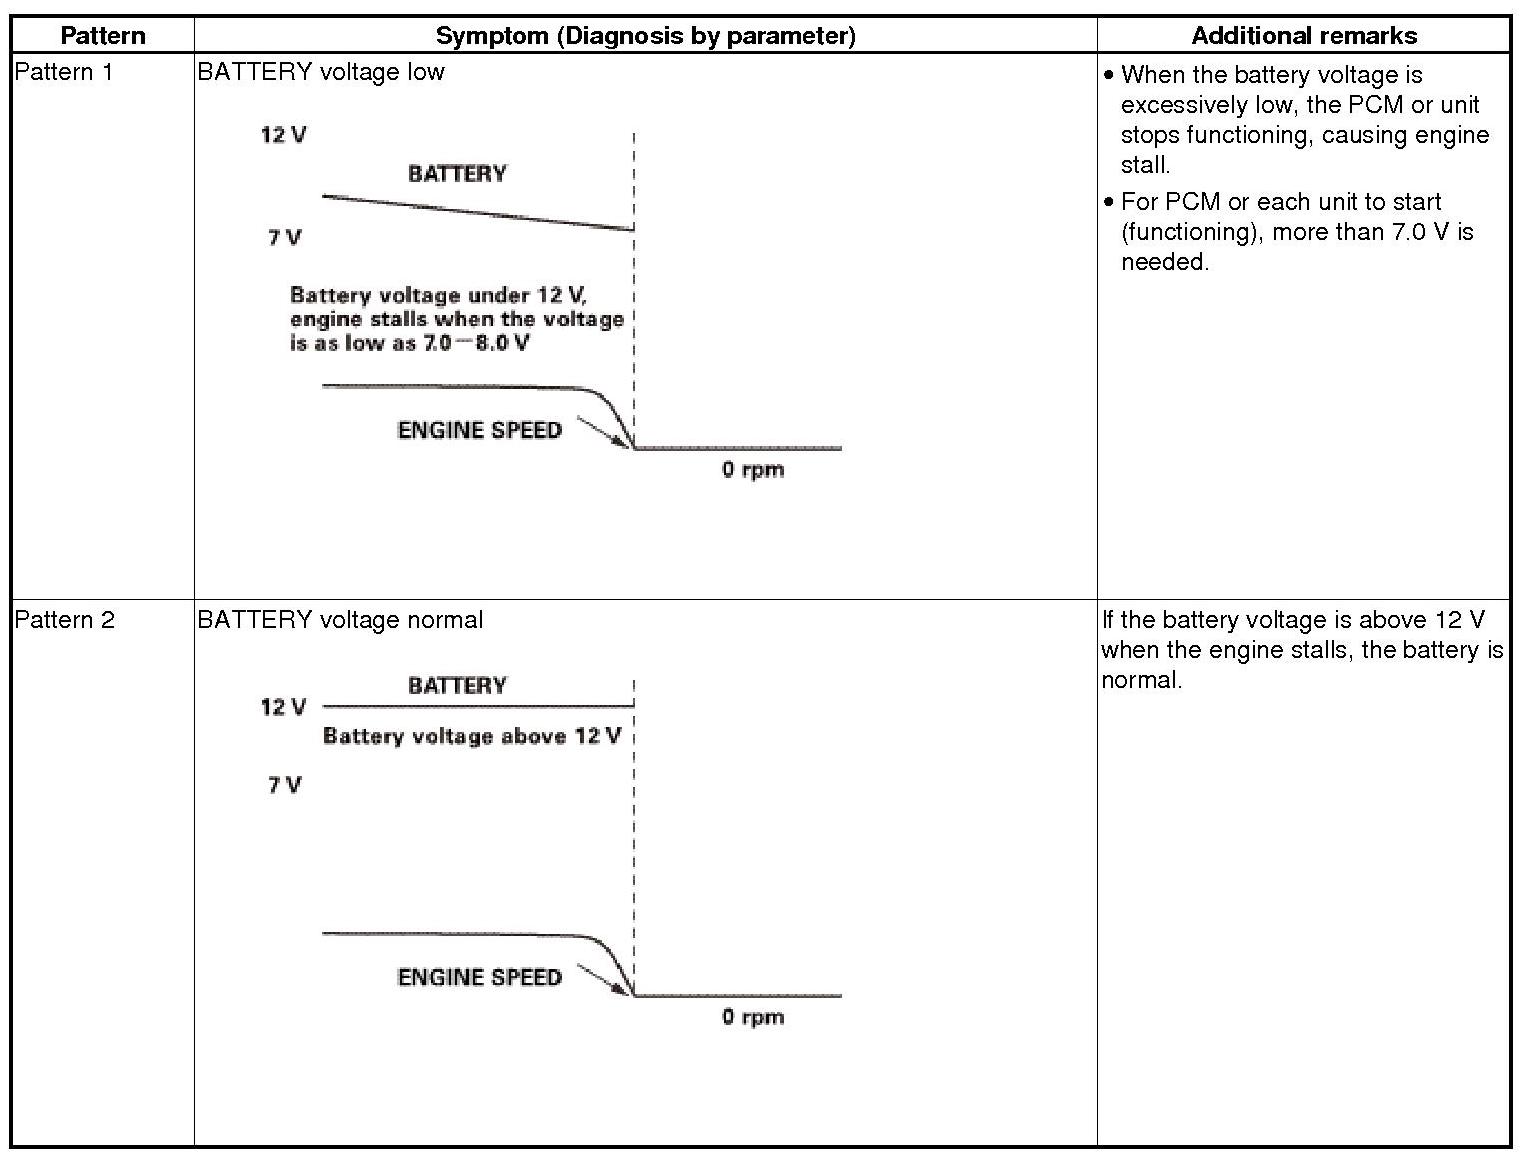
Which pattern is indicated?
-Pattern 1- Test the battery 12 Volt Battery Test, and check the battery cables and terminals
-Pattern 2- The battery is OK. Go to step 7 (diagnosis by parameter (CKP NO PULSE)).
7. On-board snapshot check (CKP NO PULSE):
On-board snapshot check (CKP NO PULSE)
-1. Select HDS Engine Stall in the on-board snapshot.
-2. Select the CKP NO PULSE and engine speed in the configuration list.
Check the recorded snapshot parameters of the engine stall, then compare the CKP NO PULSE pattern from the charts, and determine the problem.
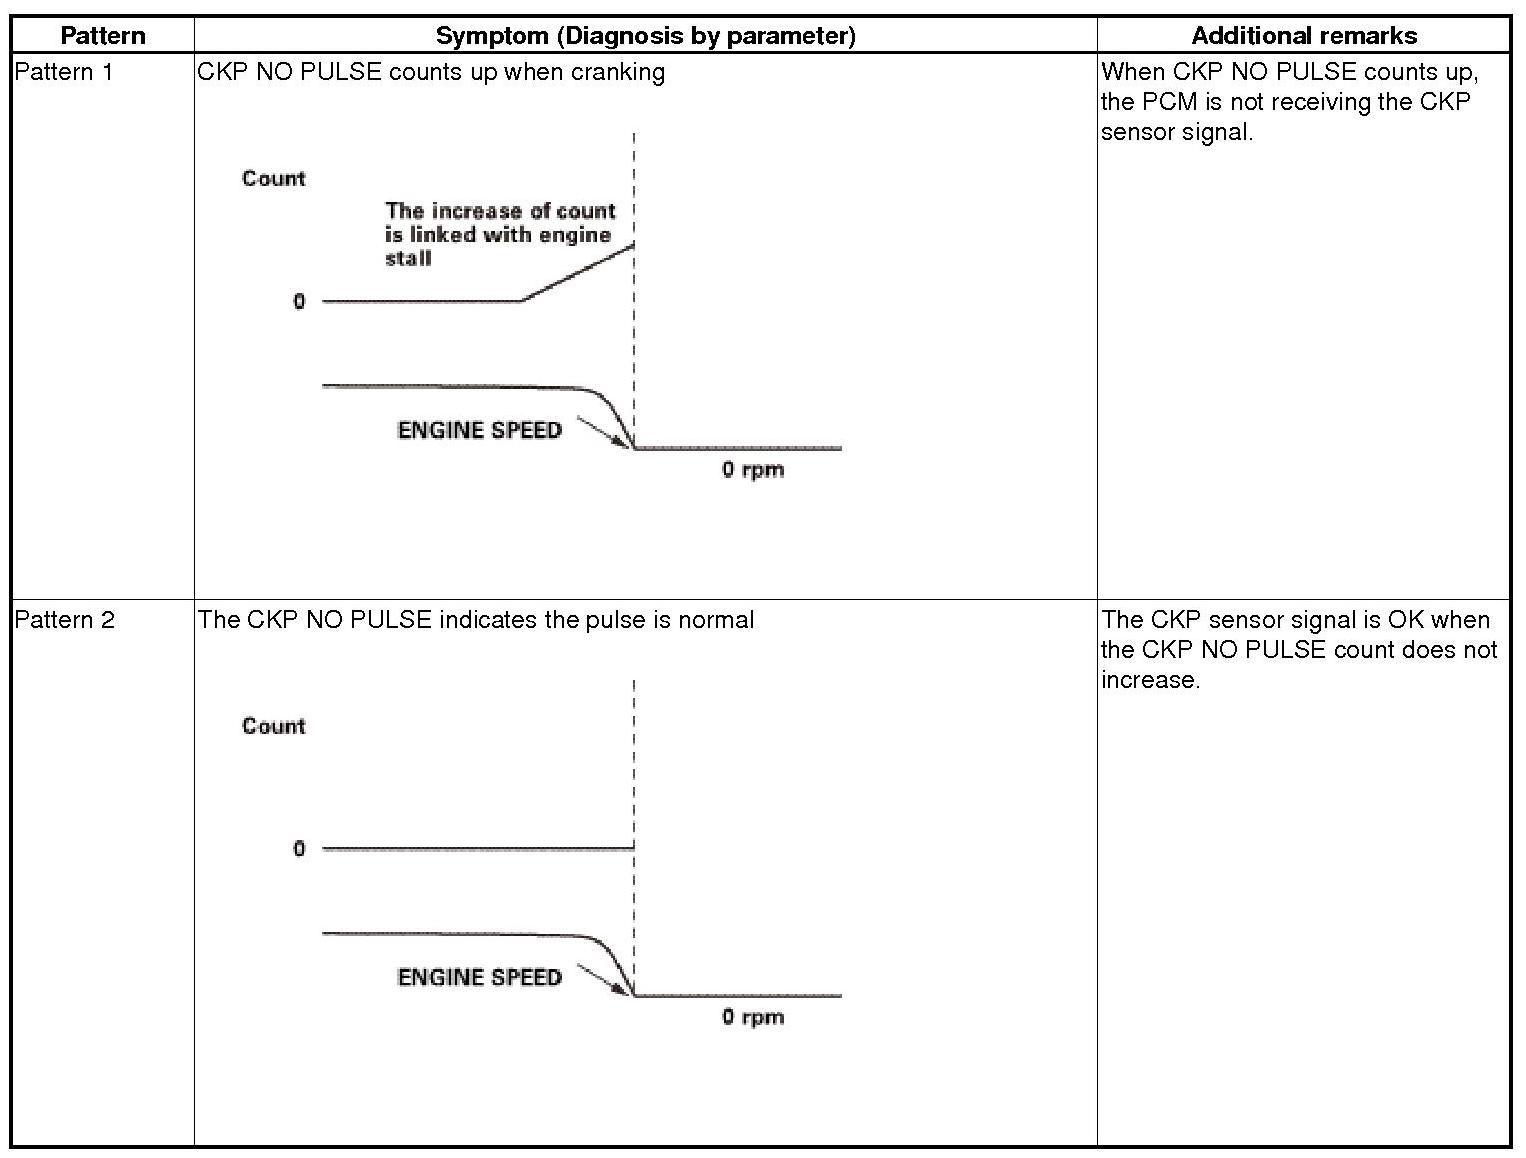
Which pattern is indicated?
-Pattern 1- Do the troubleshooting procedure for DTC P0335 DTC Troubleshooting. Check for after market accessories.
-Pattern 2- Go to step 8 (diagnosis by parameter (CKP NOISE)).
8. On-board snapshot check (CKP NOISE):
On-board snapshot check (CKP NOISE)
-1. Select HDS Engine Stall in the on-board snapshot.
-2. Select the CKP NOISE and engine speed in the configuration list.
Check the recorded on-board snapshot parameters while the engine stall, then compare the CKP NOISE pattern from these charts, and determine the problem.
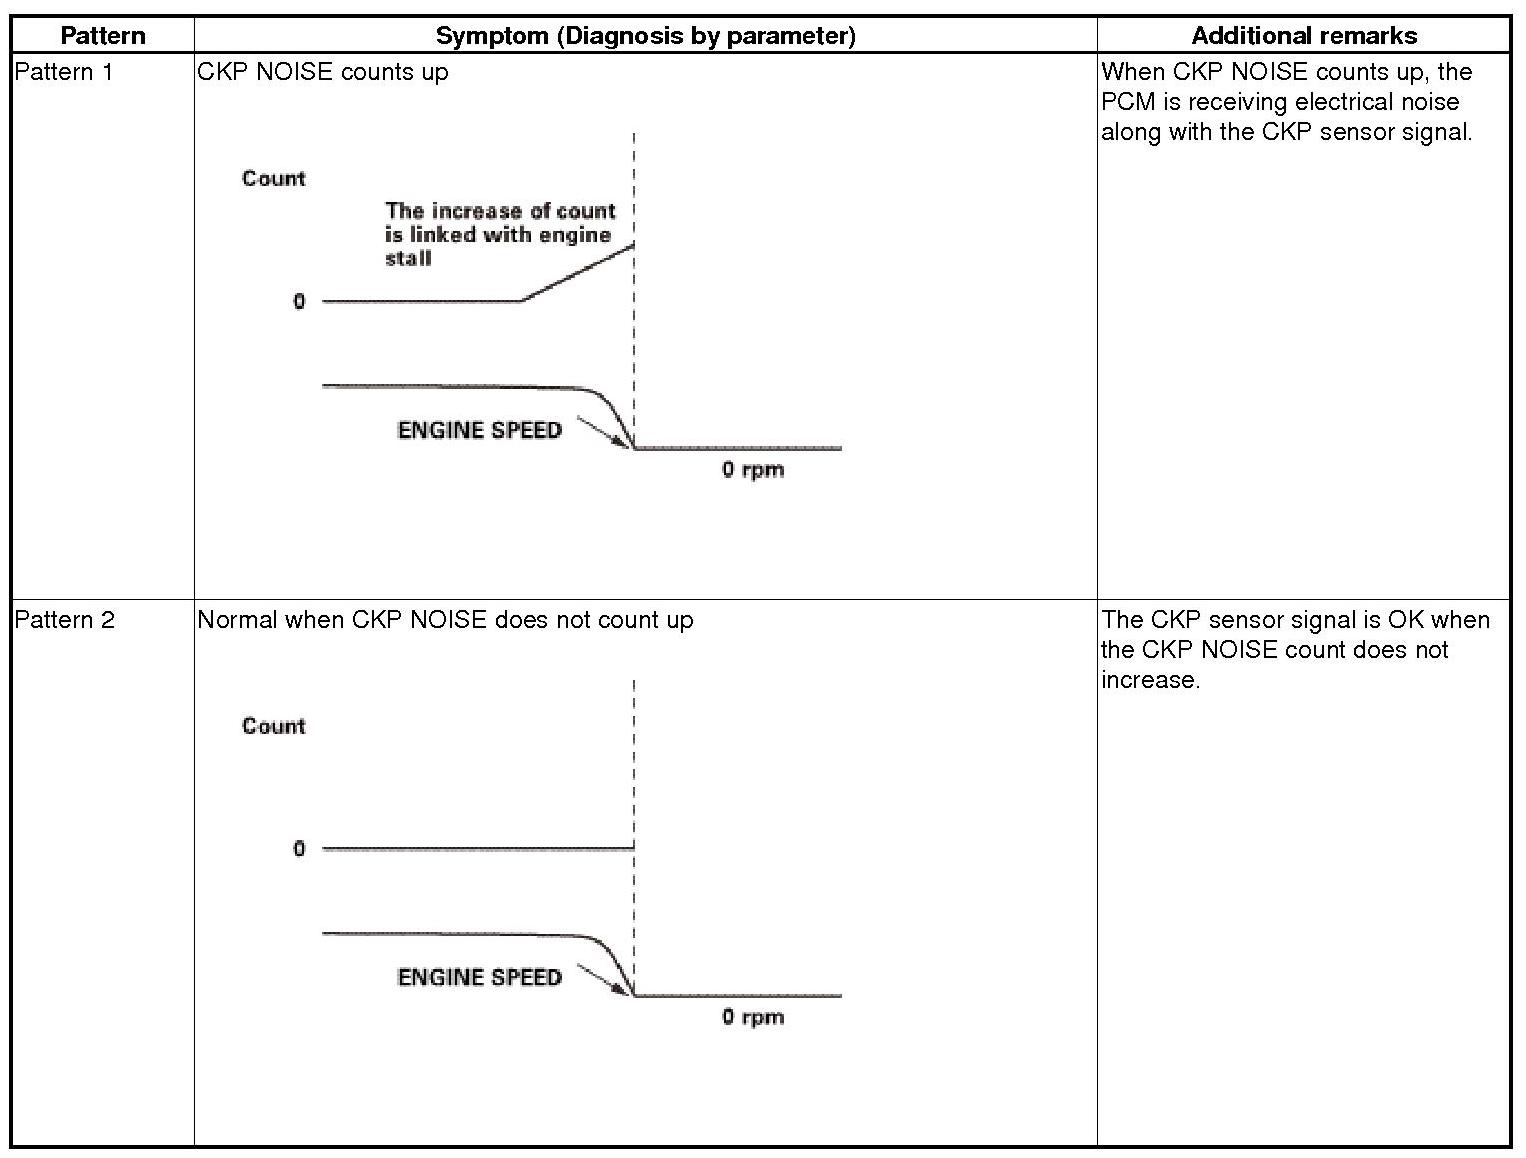
Which pattern is indicated?
-Pattern 1- Go to the troubleshooting procedure for DTC P0339 DTC Troubleshooting. Check for after market accessories.
-Pattern 2- The CKP sensor is OK. Go to step 9 (diagnosis by parameter (ST FUEL TRIM)).
9. On-board snapshot check (AF FB (ST FUEL TRIM)):
On-board snapshot check (AF FB (ST FUEL TRIM))
-1. Select HDS Engine Stall in the on-board snapshot.
-2. Select the AF FB (ST FUEL TRIM) and engine speed in the configuration list.
Check the recorded snapshot parameters of the engine stall, then compare the AF FB (ST FUEL TRIM) pattern from the charts, and determine the problem.
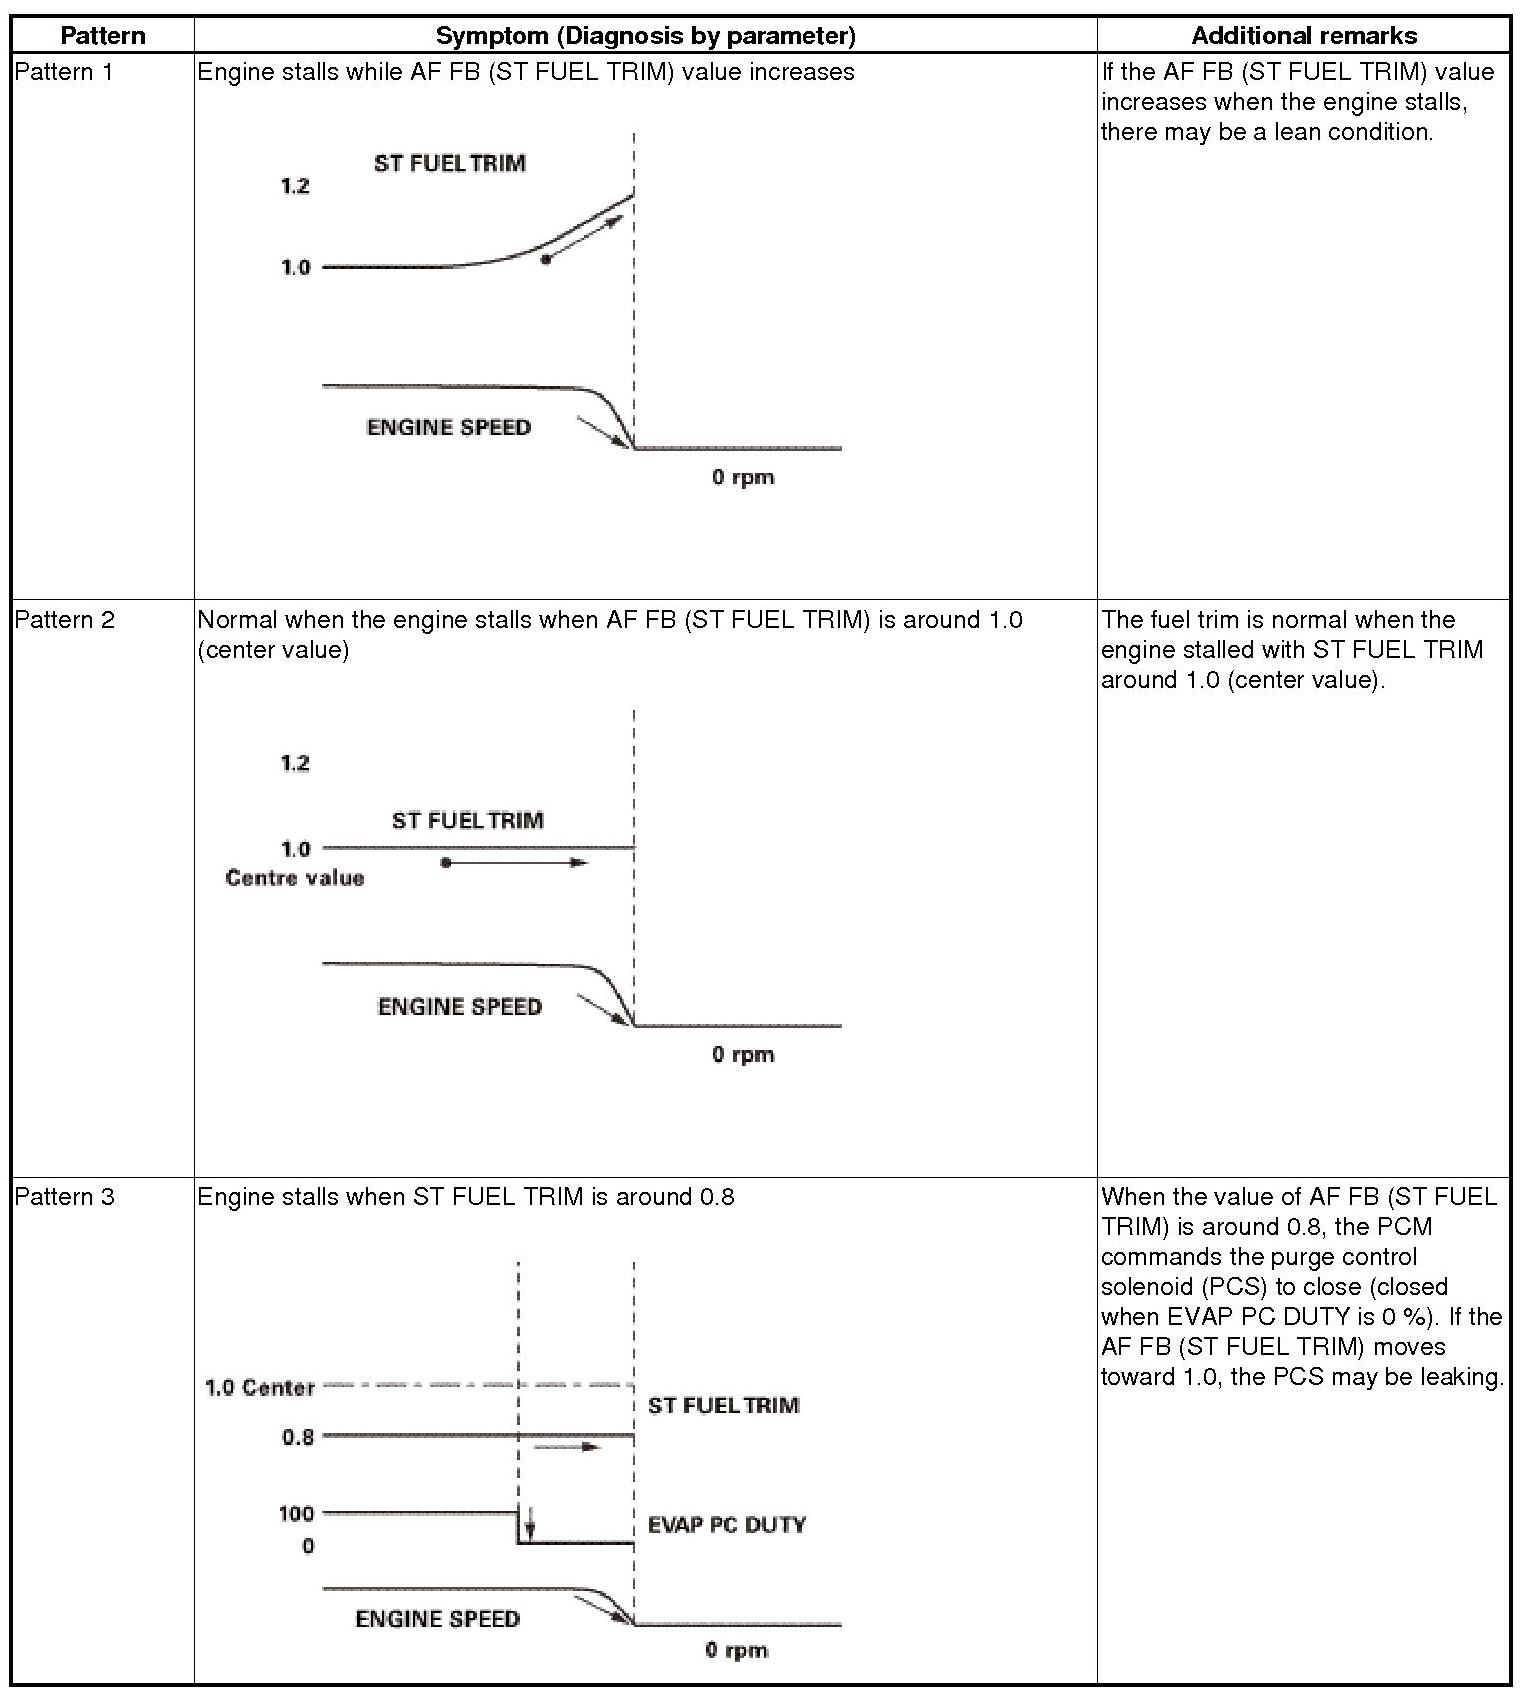
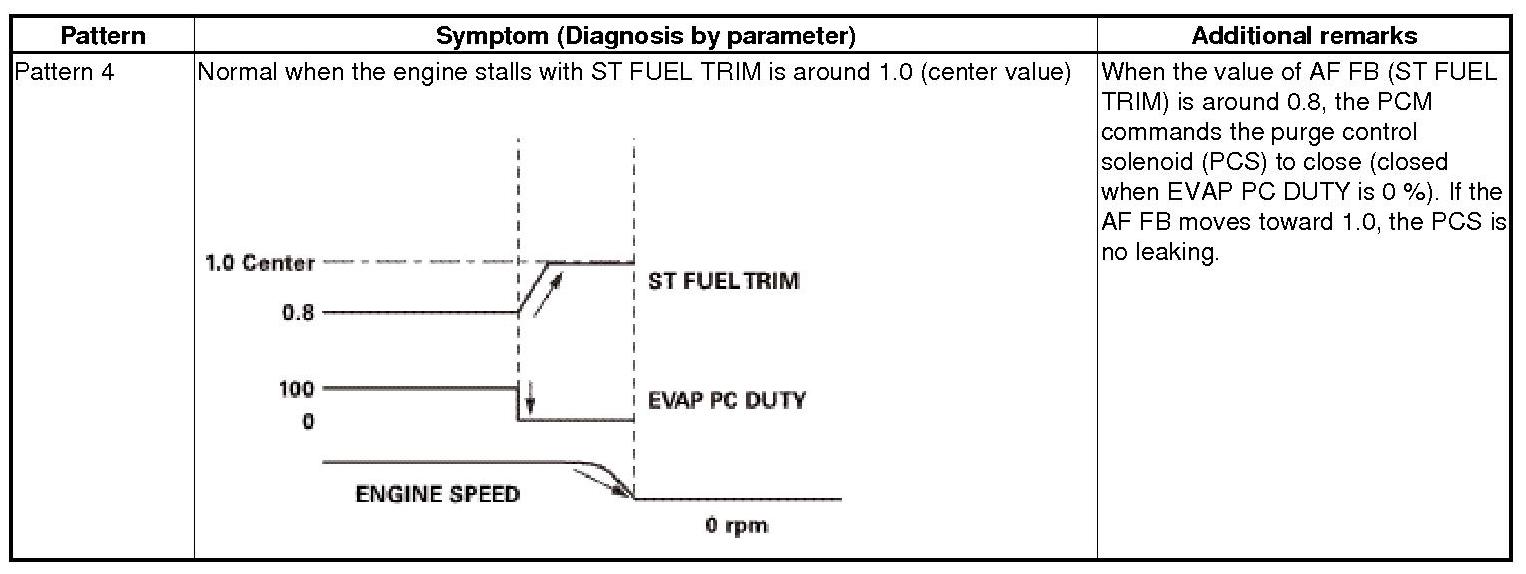
Which pattern is indicated?
-Pattern 1- Diagnostic procedure:
1. Check fuel pump operation sound.
2. Go to the Fuel pressure test Testing and Inspection.
3. Go to the fuel pump circuit troubleshooting Testing and Inspection.
4. Test the PGM-FI main relay Testing and Inspection.
5. Test PGM-FI main relay 2 Testing and Inspection.
6. Check for the following fuses:
*No. A21 (15 A) fuse (in the under-hood fuse/relay box)
*No. B4 (15 A) fuse (in the under-dash fuse/relay box)
-Pattern 3- Check the PCS for leaks.
-Pattern 2 and 4- Go to step 10 (diagnosis by parameter (MISFIRE)).
10. On-board snapshot check (MISFIRE):
On-board snapshot check (MISFIRE)
-1. Select HDS Engine Stall in the on-board snapshot.
-2. Select the MISFIRE and engine speed in the configuration list.
Check the recorded snapshot parameters of the engine stall, then compare the MISFIRE pattern from the charts, and determine the problem.
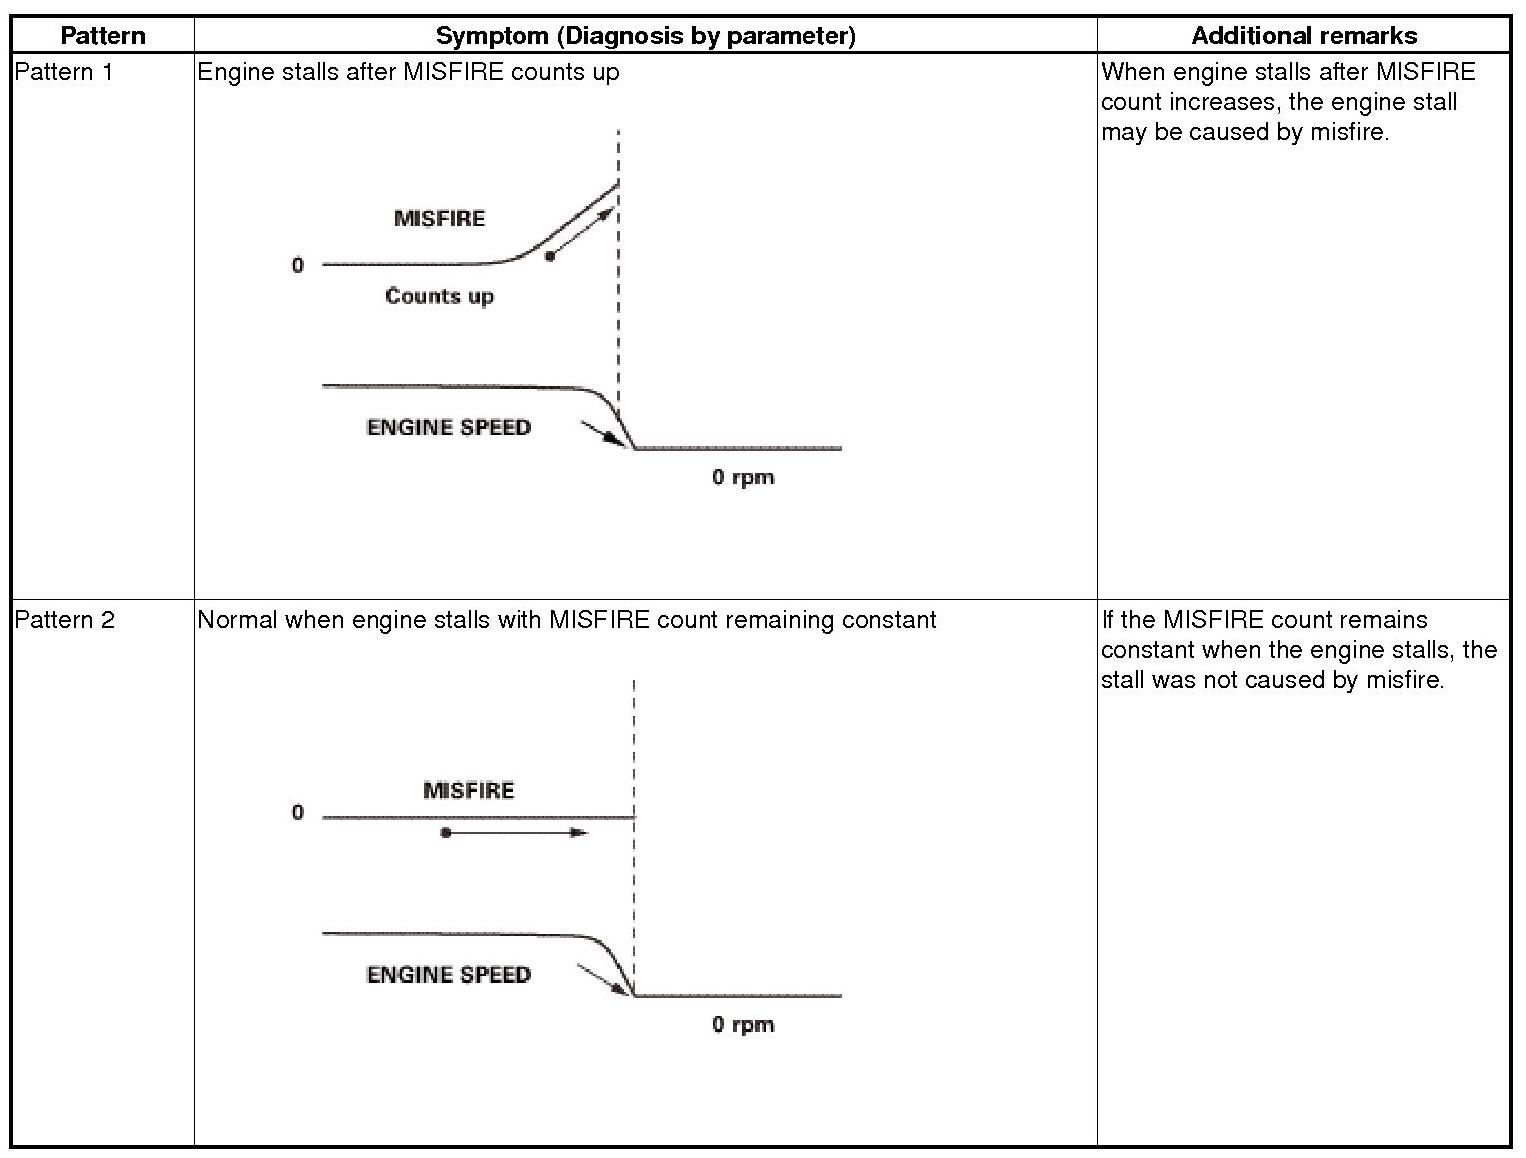
Which pattern is indicated?
-Pattern 1- Diagnostic procedure:
1. When misfire counts up without storing misfire DTC P0300-P0304, go to DTC P0300-P0304 troubleshooting DTC Troubleshooting.
2. When the misfire count reaches prescribed value, DTC P0300-P0304 is stored. Go to the DTC P0300-P0304 troubleshooting DTC Troubleshooting.
-Pattern 2- Go to step 11 (diagnosis by parameter (A/C CLUTCH)).
11. On-board snapshot check (A/C CLUTCH):
On-board snapshot check (A/C CLUTCH)
-1. Select HDS Engine Stall in the on-board snapshot.
-2. Select the A/C CLUTCH and engine speed in the configuration list.
Check the recorded snapshot parameters of the engine stall, then compare the A/C CLUTCH pattern from the charts, and determine the problem.
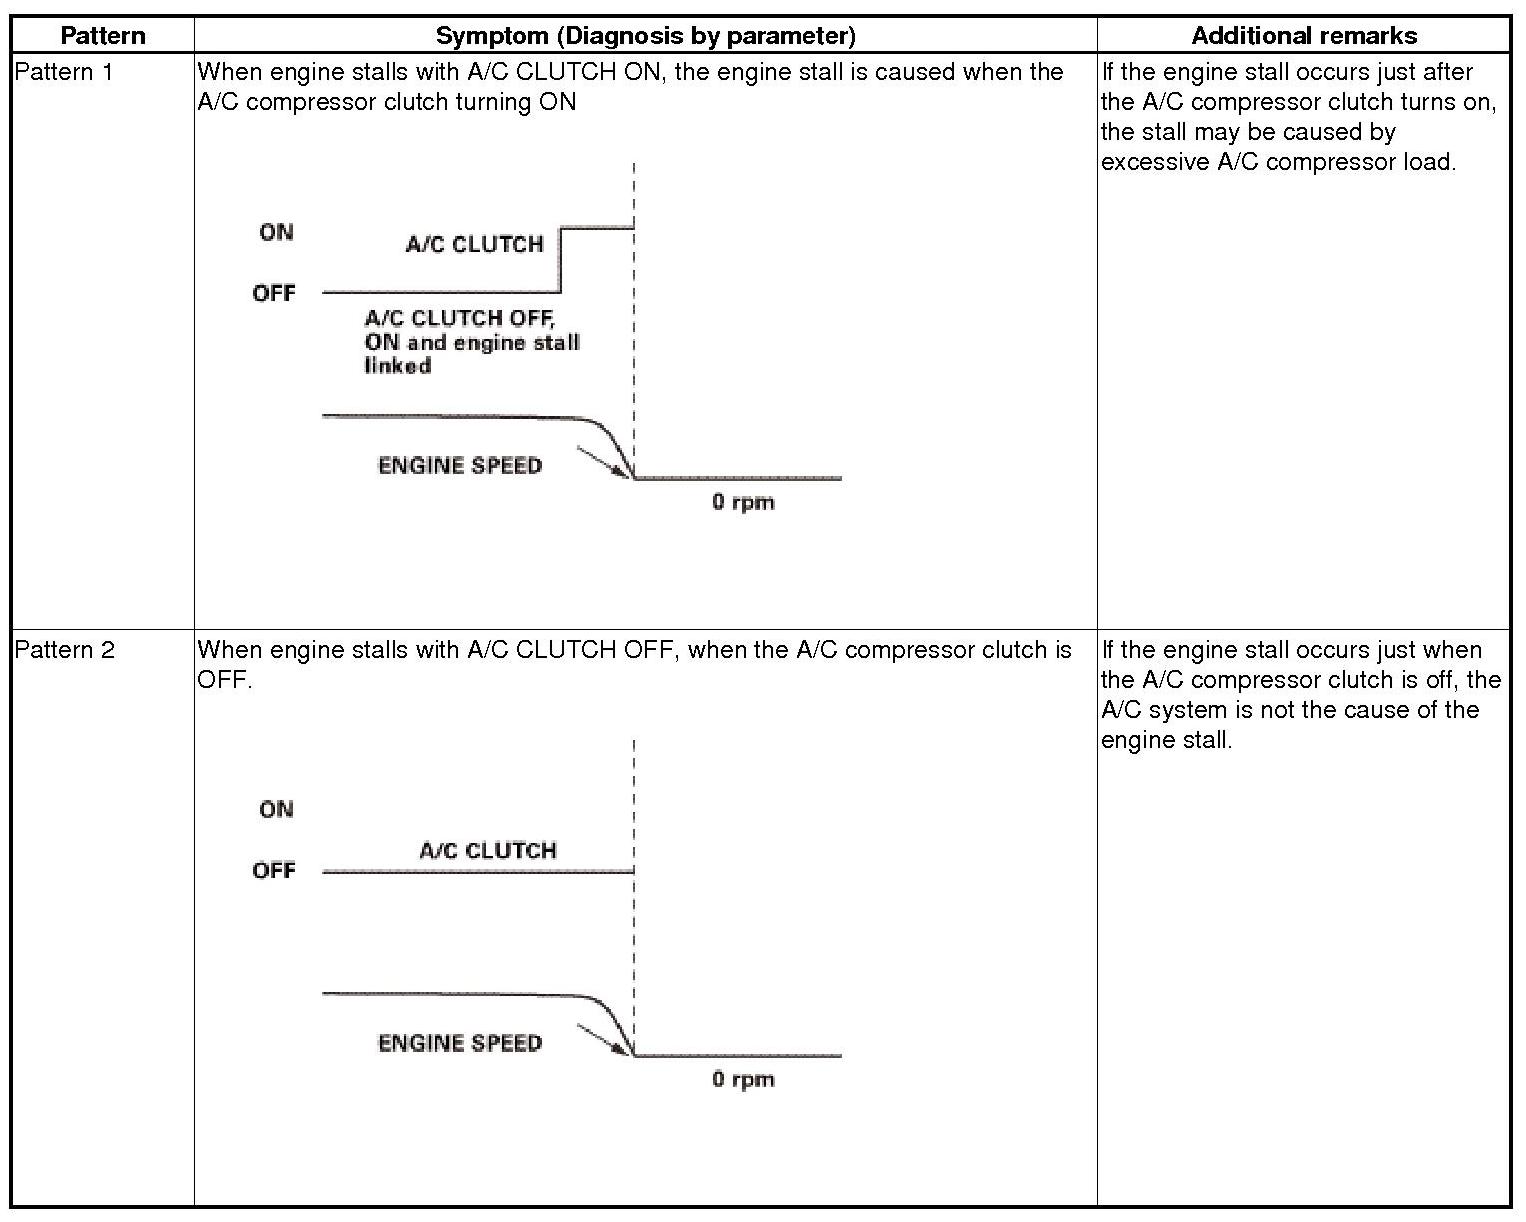
Which pattern is indicated?
-Pattern 1- Diagnostic procedure:
1. Check for excessive charging of A/C refrigerant.
2. Check for charging of other gas.
-Pattern 2- Go to step 12 (fuel system troubleshooting).
12. Fuel pressure check:
Fuel pressure check
-1. Do the fuel pressure test Testing and Inspection.
Is the fuel pressure OK?
-YES- Go to step 13 (ignition system troubleshooting).
-NO- Check for following pars:
* Fuel pump circuit Testing and Inspection
* Fuel pressure regulator Service and Repair
* Fuel filter Service and Repair
13. Spark plug visual check:
Spark plug visual check
-1. Turn the ignition switch to LOCK (0).
-2. Remove the spark plugs Service and Repair.
-3. Check conditions of spark plug electrode.
NOTE: Make sure the spark plugs are the correct part number for the vehicle. If the plugs are aftermarket or they are not the correct part number, replace all of the plugs and retest.
Is the electrode damage or wet?
-YES (wet)- Check the following conditions. If they are OK, go to step 14.
* In very cold conditions, multiple very short trips can cause the spark plug to foul. If this is the case, drive the vehicle a longer distance and recheck.
* Incorrect or poor quality fuel can cause a wet spark plug. Replace the fuel and recheck.
-YES (damaged)- Replace the damaged spark plugs Service and Repair, determine the cause of the spark plug damage.
-NO- Go to step 14.
14. Determine possible failure area (Ignition system, Others):
Determine possible failure area (Ignition system, Others)
-1. Do the ALL INJECTOR FUNCTION TEST in the INSPECTION MENU with the HDS, stop fuel injection from injector.
-2. Turn the ignition switch to LOCK (0).
-3. Fit spark plug to the ignition coil and ground it to the engine.
-4. Crank the engine and watch for spark at the spark plugs.
Do the spark plugs spark?
-YES- The ignition system is OK. Select PCM reset in the PGM-FI INSPECTION MENU to cancel ALL INJECTORS STOP with the HDS, then go to step 16 (engine compression troubleshooting).
-NO- Go to step 15.
15. Ignition coil power circuit check:
Ignition coil power circuit check
-1. Disconnect the following connector(s).

-2. Remove the ignition coil relay (A) from the under-hood fuse/relay box.
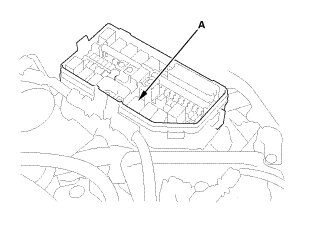
-3. Turn the ignition switch to ON (II).
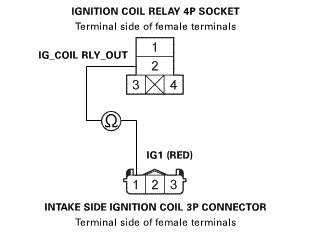
-4. Check for continuity between test points 1 and 2.


Intake side:
Exhaust side:
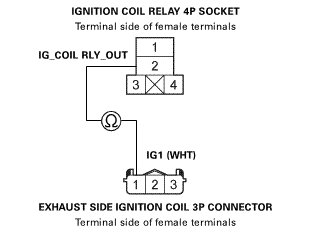
Is there continuity?
-YES- Go to step 16.
-NO- Repair open in the IG1/IG_COIL RLY_OUT wire between the ignition coil relay and ignition coil.
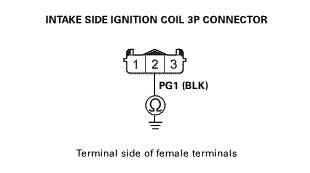
16. Open wire check (PG1, PG2 lines):
Open wire check (PG1, PG2 lines)
-1. Turn the ignition switch to LOCK (0).
-2. Check for continuity between test points 1 and 2.


INTAKE SIDE:
EXHAUST SIDE:
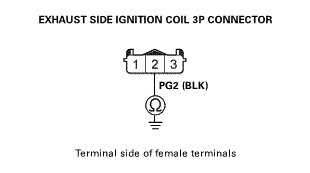
Is there continuity?
-YES- The PG1/PG2 wires are OK. Go to step 17.
-NO- Repair an open in the PG1/PG2 wire between the ignition coil and G101.
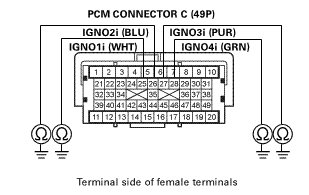
17. Shorted wire check (IGNO lines):
Shorted wire check (IGNO lines)
-1. Jump the SCS line with the HDS.
-2. Disconnect the following connectors.

-3. Check for continuity between body ground and the appropriate PCM connector terminal of the problem ignition coil (see table).
INTAKE SIDE:

EXHAUST SIDE:

INTAKE SIDE:
EXHAUST SIDE:
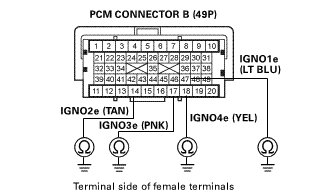
Is there continuity?
-YES- Repair a short in the IGNO wire between the PCM and the ignition coil.
-NO- The IGNO wires are not shorted. Go to step 18.
18. Open wire check (IGNO lines):
Open wire check (IGNO lines)
-1. Check for continuity between appropriate ignition coil 3P connector terminal No. 3 and the appropriate PCM connector terminal of the problem ignition coil (see table).
INTAKE SIDE:

EXHAUST SIDE:

INTAKE SIDE:
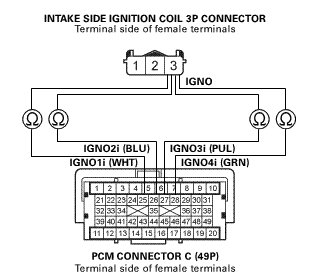
EXHAUST SIDE:
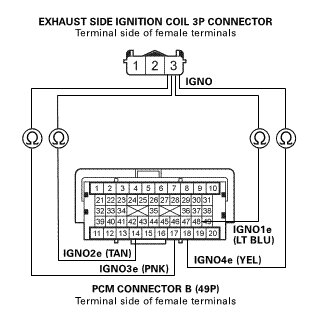
Is there continuity?
-YES- Replace the ignition coil(s) Service and Repair.
-NO- Repair an open in the IGNO wire between the PCM and the ignition coil.
19. Engine compression check:
Engine compression check
-1. Do an engine compression inspection Engine Compression Inspection.
NOTE: Make sure the spark plugs are the correct part number for the vehicle. If the plugs are aftermarket or they are not the correct part number, replace all of the plugs and retest.
Is engine compression OK?
-YES- Go to step 20 (EVAP canister purge valve check).
-NO- Check for wear or damage to these parts:
* Incorrect valve clearance
* Confirmation of cam timing
* Oil pressure relief valve
* Damage or worn cam lobes
* Damage or worn valve and seats
* Damage cylinder head gasket
* Damage or worn piston rings
* Damage or worn piston and cylinder bore
20. EVAP canister purge valve check:
EVAP canister purge valve check
-1. Turn the ignition switch to LOCK (0).
-2. Disconnect the following connector.

-3. Disconnect the vacuum hose (A) from the EVAP canister purge valve (B) in the engine compartment, and connect a vacuum pump/gauge, 0-30 inHg, to the purge valve.
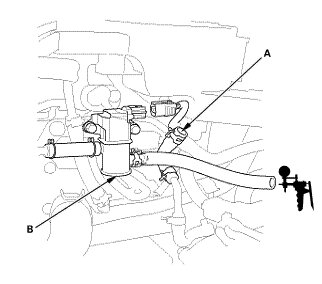
-4. Start the engine.
Vacuum occurs in the vacuum pump?
-YES- Replace the EVAP canister purge valve Service and Repair.
-NO (Reproducible failure)- Go to step 21 (fuse check).
-NO (Intermittent failure)- Go to step 22 (relay check).
21. Fuse check:
Fuse check
-1. Check the following fuses.


Are the fuses OK?
-YES- The fuses are OK. Go to step 22 (relay check).
-NO- Replace the blown fuse(s).
22. Relay check:
Relay check
-1. Test the following relays Testing and Inspection:
NOTE: In case the failure is not reproduced, the following relays may have intermittent failure.
* PGM-FI main relay 2
* Ignition coil relay
* PGM-FI main relay 1
* PGM-FI subrelay
Are the relays OK?
-YES- Go to the Diagnostic Interview Fuel And Emissions Systems Diagnostic Interview Engine Will Not Start, Engine Starts But Stalls Immediately.
-NO- Replace any damaged relays.