Steering Linkage (Non-Rack & Pinion)
Steering Linkage Inner Tie Rod Replacement
Special Tools
J 34028 Inner Tie Rod Wrench
Removal Procedure
1. Remove the engine protection shield. Refer to Engine Protection Shield Replacement (Service and Repair).
2. Remove the steering linkage outer tie rods. Refer to Steering Linkage Outer Tie Rod Replacement (Steering Linkage Outer Tie Rod Replacement).
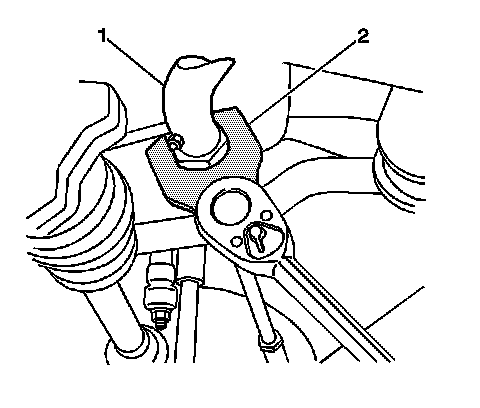
3. Remove the steering linkage inner tie rods (1) using wrench J 34028 (2).
Installation Procedure
Caution: Refer to Fastener Caution (Fastener Caution).
Note: Perform the following procedure before installing the new steering linkage inner tie rods.
* Remove all traces of the oil, grease, or other contaminants.
* Clean the threads of the steering linkage inner tie rods with denatured alcohol or the equivalent and allow to dry.
* Apply Threadlocker GM P/N 12345493 or Canadian P/N 10953488 to the threads of the steering linkage inner tie rods.
1. Install the steering gear inner tie rods to the relay rod.
Tighten the steering linkage inner tie rod to 100 Nm (74 lb ft).
2. Install the steering linkage outer tie rods. Refer to Steering Linkage Outer Tie Rod Replacement (Steering Linkage Outer Tie Rod Replacement).
3. Install the engine protection shield. Refer to Engine Protection Shield Replacement (Service and Repair).
4. Adjust the front toe. Refer to Wheel Alignment - Steering Wheel Angle and/or Front Toe Adjustment (Wheel Alignment - Steering Wheel Angle and/or Front Toe Adjustment).