Mirrors: Description and Operation
ELECTRO CHROMIC INSIDE REAR VIEW MIRROR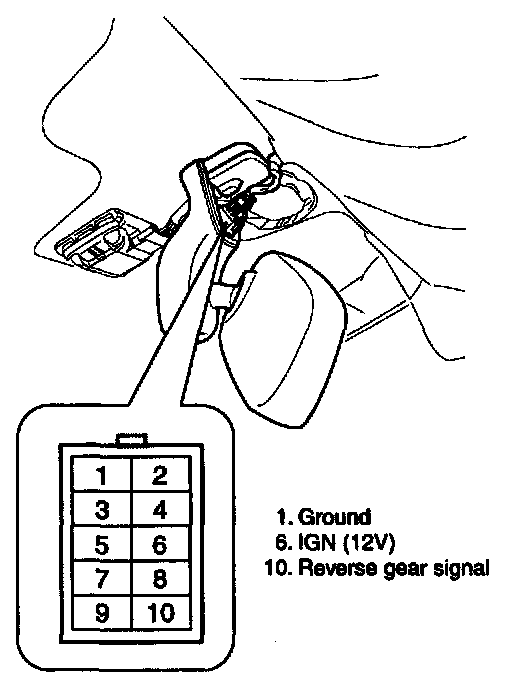
DESCRIPTION
The ECM (Electro Chromic inside rear view Mirror) is for dimming the reflecting light from a vehicle behind at night. The front looking sensor detects brightness of the surroundings, while the rearward looking sensor the strength of the reflecting light so that adjusts the reflexibility of the mirror in the range of 7-85%. But, when the reverse gear is engaged, it stops functioning.
1. The front looking sensor sees if the brightness of the surroundings is low enough for the mirror to operate its function.
2. The rearward looking sensor detects glaring of the reflecting light from a vehicle behind.
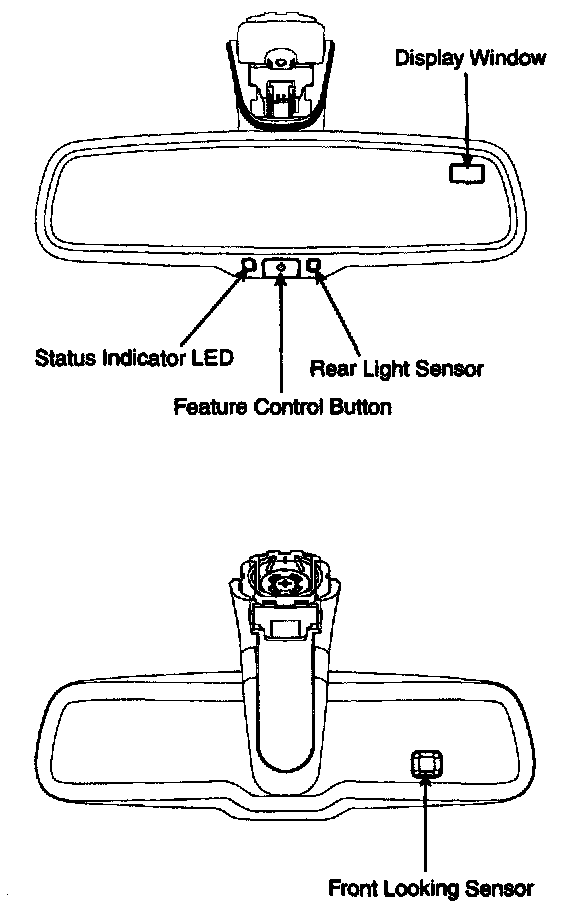
3. The ECM is darkened to the level as determined by the rearward looking sensor. When the glaring is no longer detected, the mirror stops functioning.
AUTOMATIC-DIMMING FUNCTION
To protect your vision during nighttime driving, your mirror will automatically dim upon detecting glare from the vehicles traveling behind you. The auto-dimming function can be controlled by the Dimming ON/OFF Button:
1. Pressing and holding the Feature Control button for more than 3 but less than 6 seconds turns the auto-dimming function OFF which is indicated by the green Status Indicator LED turning off.
2. Pressing and holding the Feature Control button again for more than 3 but less than 6 seconds turns the auto-dimming function ON which is indicated by the green Status Indicator LED turning on.
NOTE
- The minor defaults to the "ON" position each time the vehicle is started.
- The display may change state (ON/OFF) during this 3 seconds hold time.
COMPASS FUNCTION
The Compass can be turned ON and OFF and will remember the last state when the ignition is cycled. To turn the display feature ON/OFF:
1. Press and release the Feature Control button to turn the display feature OFF.
2. Press and release the Feature Control button again to turn the display back ON.
Additional options can be set with press and hold sequences of the Feature Control button and are detailed below.
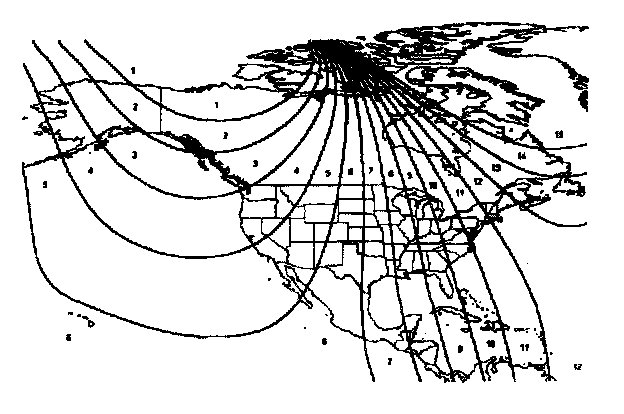
There is a difference between magnetic north and true north. The compass in the mirror can compensate for this difference when it knows the Magnetic Zone in which it is operating. This is set either by the dealer or by the user. The operating Zone Numbers for North America are shown in the figure to the right.
TO ADJUST THE ZONE SETTING:
1. Determine the desired Zone Number based upon your current location on the Zone Maps below.
2. Press and hold the Feature Control button for more than 6 but less than 9 seconds, the current Zone Number will appear on the display.
3. Pressing and holding the Feature Control button again will cause the numbers to increment (NOTE: they will repeat...13, 14, 15,1, 2,..). Releasing the button when the desired Zone Number appears on the display will set the new Zone.
4. Within about 5 seconds the compass will start displaying a compass heading again.
There are some conditions that can cause changes to the vehicle magnets. Items such as installing a ski rack or a CB antenna or even some body repair work on the vehicle can cause changes to the vehicle's magnetic field. In these situations, the compass will need to be re-calibrated to quickly correct for these changes.
TO RE-CALIBRATE THE COMPASS:
1. Press and hold the Feature Control button for more than 9 seconds. When the compass memory is cleared a "C" will appear in the display.
2. To calibrate the compass, drive the vehicle is 2 complete circles at less than 5 MPH.