Installation
Installation
1. Install oil pump.
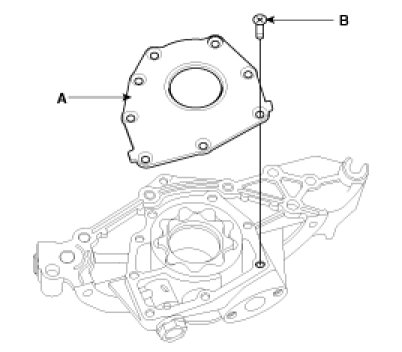
(1) Place the inner and outer rotors into front case with the marks facing the oil pump cover side.
(2) Install the oil pump cover(A) to front case with the 8screws(B).
Tightening torque
8 - 12Nm (0.8 - 1.2kgf.m, 6 - 8.8lb-ft)
2. Check that the oil pump turns freely.
3. Install the oil pump on the cylinder block.
(1) Remove any old liquid gasket and be careful not to drop any oil on the contact surfaces of the oil pump and cylinder block.
A. Using a razor blade and gasket scraper, remove all the old liquid gasket from the gasket surfaces and sealing grooves.
B. Using a non-residue solvent, clean both sealing surfaces.
(2) Apply liquid gasket to the oil pump as shown in the illustration.
Use liquid gasket MS 721-40A.
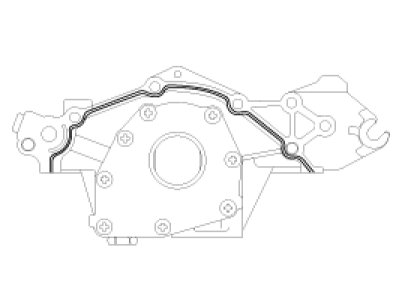
NOTE:
- To prevent leakage of oil, apply liquid gasket to the inner threads of the bolt holes.
- Do not install the parts if five minutes or more have elapsed since applying the liquid gasket. Instead, reapply liquid gasket after removing the residue.
- After assembly, wait at least 30 minutes before filling the engine with oil.
(3) Place a new O-ring on the cylinder block.
(4) Engage the spline teeth of the oil pump drive gear with large teeth of the crankshaft, and slide the oil pump on the crankshaft.
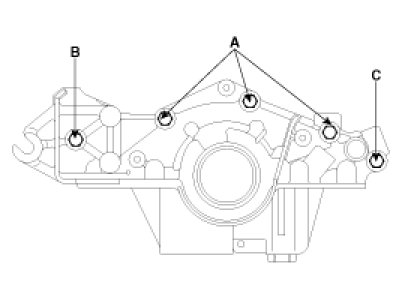
(5) Install the oil pump with 5bolts.
Uniformly tighten the bolts in several passes.
Tightening torque
12 - 15Nm (1.2 - 1.5kgf.m, 8.8 - 11lb-ft)

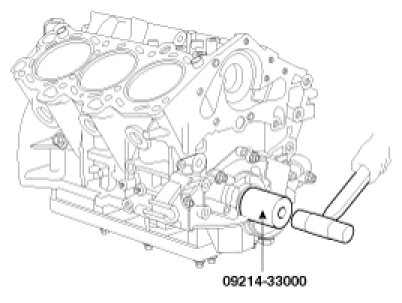
4. Apply a light coat of oil to the seal lip.
5. Using the special tool(09214-33000), install the oil seal.
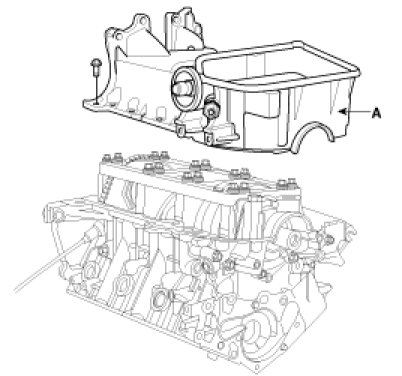
6. Install the upper oil pan.
(1) Using a razor blade and gasket scraper, remove all the old packing material from the gasket surfaces.
NOTE:
Check that the mating surfaces are clean and dry before applying liquid gasket.
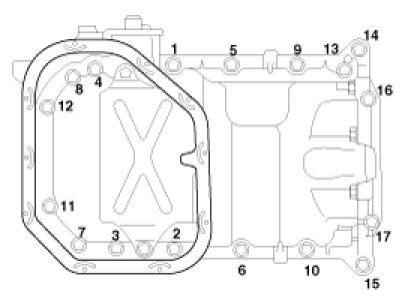
(2) Install the oil pan(A) with the 17bolts.
Uniformly tighten the bolts in several passes.
Tightening torque
18.6 - 23.5Nm (1.9 - 2.4kgf.m, 13.7 - 17.4lb-ft) : (1 - 15)
4.9 - 6.9Nm (0.5 - 0.7kgf.m, 3.6 - 5.1lb-ft) : (16,17)
NOTE:
- To prevent leakage of oil, apply liquid gasket to the inner threads of the bolt holes.
- Do not install the parts if five minutes or more have elapsed since applying the liquid gasket. Instead, reapply liquid gasket after removing the residue.
- After assembly, wait at least 30 minutes before filling the engine with oil.
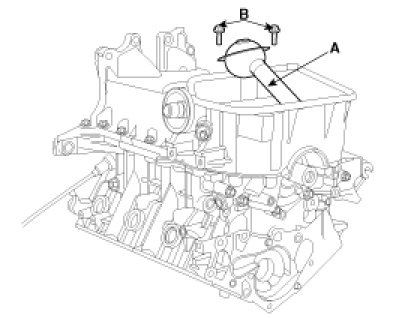
7. Install oil screen.
Install a new gasket and oil screen(A) with 2bolts(B).
Tightening torque
14.7 - 21.6Nm (1.5 - 2.2kgf.m, 10.8 - 15.9lb-ft)
8. Install the lower oil pan.
(1) Apply liquid gasket as an even bead, centered between the edges of the mating surface.
Use liquid gasket MS 721-40A or equivalent.
A. To prevent leakage of oil, apply liquid gasket to the inner threads of the bolt holes.
B. Do not install the parts if five minutes or more have elapsed since applying the liquid gasket. Instead, reapply liquid gasket after removing the residue.
C. After assembly, wait at least 30 minutes before filling the engine with oil.
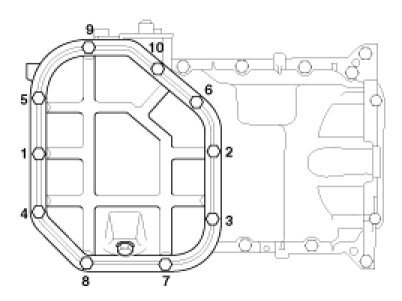
(2) Install the lower oil pan 10bolts.
Uniformly tighten the bolts several passes
Tightening torque
9.8 - 11.8Nm (1.0 - 1.2kgf.m, 7.2 - 8.7lb-ft)
9. Install the timing belt.
10. Install the drive belt
11. Install the alternator.
12. Install the front exhaust pipe.
13. Install the RH front wheel.
14. Fill engine with oil.
15. Start engine and check for leaks.
16. Recheck engine oil level.