Repair Procedures
Removal
1. Loosen the wheel nuts slightly.
Raise the vehicle, and make sure it is securely supported.
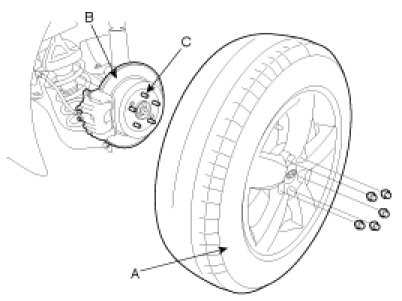
2. Remove the rear wheel and tire (A) from the rear hub (B).
CAUTION:
Be careful not to damage to the hub bolts (C) when removing the rear wheel and tire (A).
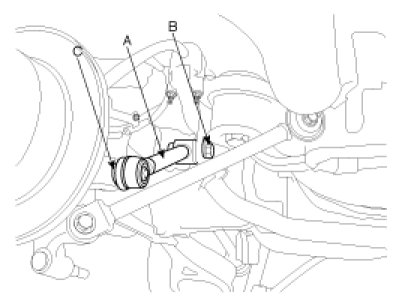
3. Remove the assist arm (A) from the rear carrier.
NOTE:
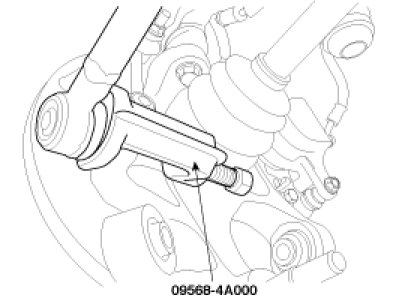
Remove the rear assist arm ball joint (A) by using the special tool(09568-4A000).
CAUTION:
If the bush is excessive worn and damaged, replace the assist arm assembly.
Inspection
1. Check the bushing for wear and deterioration.
2. Check the rear assist arm for bending or breakage.
3. Check the ball joint dust cover for cracks.
4. Check all bolts.
Installation
1. Install the rear assist arm (A) to the rear carrier.
Tightening torque :
Bolt(B) : 137.3 - 156.9N.m (14 - 16kgf.m, 101.3 - 115.7lb-ft)
Nut(C) : 98.1 - 117.7N.m (10.0 - 12.0kgf.m, 72.3 - 86.8lb-ft)
NOTE:
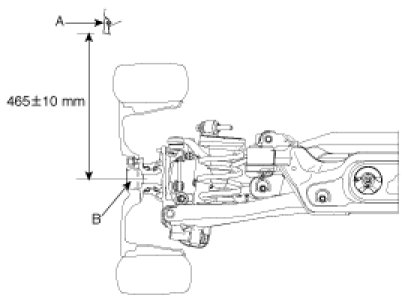
After checking the distance(465±10mm(18.31±0.39in)) between the wheel housing garnish (A) and the hub assembly (B) as shown in the illustration, tighten the mounting bolts and nuts of rear chassis part with specified torque.
2. Install the wheel and tire (A) to the rear hub (B).
Tightening torque :
88.3 - 107.9N.m (9 - 11kgf.m, 65.1 - 79.6lb-ft)
CAUTION:
Be careful not to damage the hub bolts (C) when installing the rear wheel and tire (A).
3. Check the alignment.