Repair Procedures
Removal
1. Remove the floor console assembly.
2. Remove the control cable (A).

3. Remove the main crash pad.
4. Remove the heater unit.
5. Remove the retainer (A) and nuts (B).
Tightening torque:
9.8 - 14.7 N.m (1.0 - 1.5 kgf.m, 7.2 - 10.8 lb-ft)

6. Remove the nut (C).
Tightening torque:
9.8 - 13.7 N.m (1.0 - 1.4 kgf.m, 7.2 - 10.1 lb-ft)
7. Remove the cable (B) from the bracket (A) at transaxle assembly side.

8. Remove the control cable inside of cab.
Installation
1. Installation is the reverse of removal.
NOTE:
Make sure vehicle does not roll before setting room side shift lever and Automatic Transaxle(AT) side.
Adjustment
Adjusting method for T/M control cable
1. Make sure vehicle does not roll before setting room side shift lever and T/M side manual control lever to "N" position.
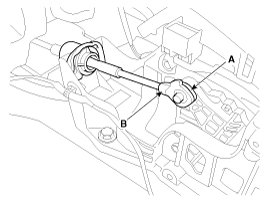
2. Connect room side lever (A) and control cable (B).
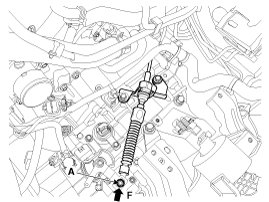
3. Push cable to "F" direction shown to eliminate FREE PLAY.
4. Tighten adjusting nut (A).
Tightening torque:
9.8 - 13.7 N.m (1.0 - 1.4 kgf.m, 7.2 - 10.1 lb-ft)
5. After adjusting, check to be sure that this part operates as designed at each range of T/M side corresponding to each position of room lever.