Catalytic Converter: Service and Repair
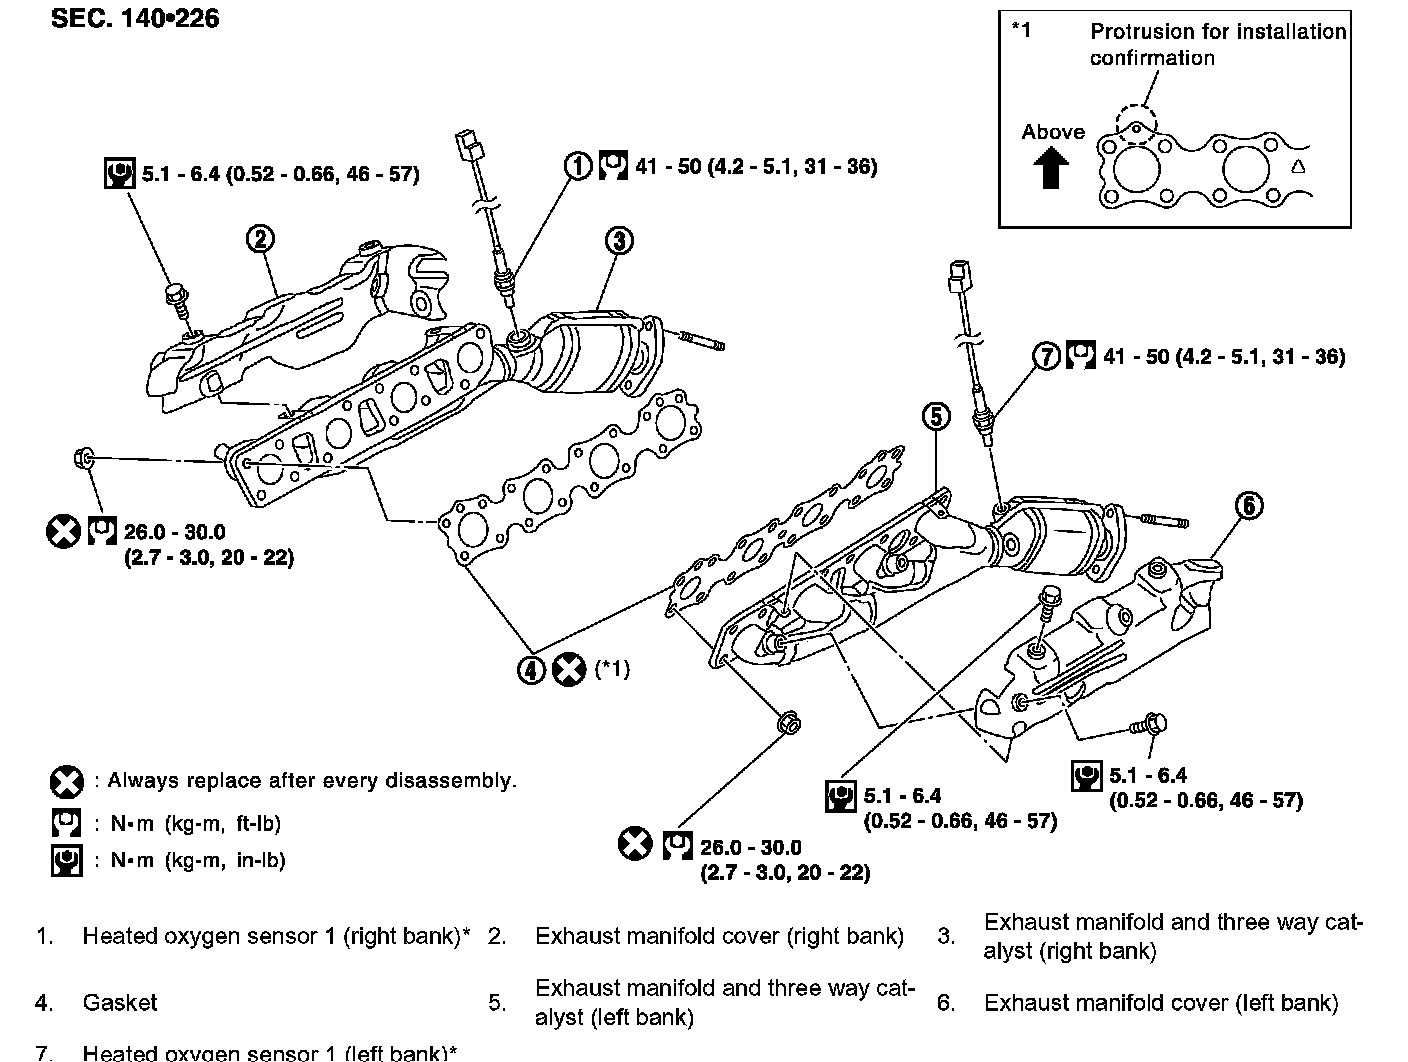
EXHAUST MANIFOLD AND THREE WAY CATALYST
Removal and Installation
REMOVAL
1. Remove heated oxygen sensors.
^ Put marks to identify installation positions of each heated oxygen sensor 1.
a. Remove engine cover, air duct (inlet), battery cover and air cleaner cover. Refer to "ENGINE ROOM COVER".
b. Remove engine undercover (with power tool).
c. Disconnect harness connector of each heated oxygen sensor 1, and harness from bracket and middle clamp.
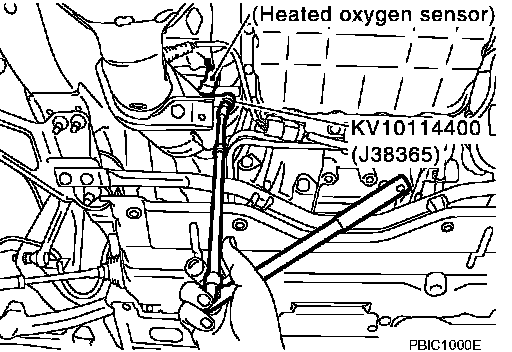
d. Using the heated oxygen sensor wrench (SST), remove heated oxygen sensor 1 (left and right bank).
CAUTION:
^ Be careful not to damage heated oxygen sensor.
^ Discard any heated oxygen sensor which has been dropped from a height of more than 0.5 m (19.7 inch) onto a hard surface such as a concrete floor; use a new one.
2. Remove exhaust manifold and three way catalyst (left bank) using the steps.
a. Remove A/C compressor with power tool and put aside with piping connected. Refer to "Removal and Installation of Compressor".
b. Remove exhaust front tube with power tool. Refer to "Removal and Installation".
c. Remove steering lower joint to enable steering shaft to move freely. Refer to "POWER STEERING GEAR AND LINKAGE".
d. Support and lift up bottom of engine with transmission jack. Remove left engine mounting insulator along with left engine mounting brackets.
e. Remove exhaust manifold cover (left bank).
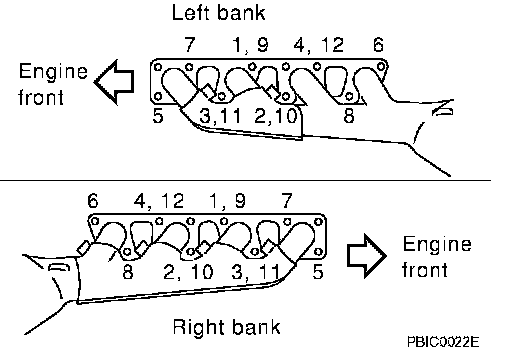
f. Loosen nuts in the reverse order of figure to remove exhaust manifold and three way catalyst (left bank) with power tool.
NOTE: Disregard No. 9 to No. 12 when loosening.
3. Remove exhaust manifold and three way catalyst (right bank) using the steps.
a. Remove drive belt. Refer to "DRIVE BELTS".
b. Remove alternator. Refer to "Removal and Installation".
c. Remove exhaust front tube with power tool. Refer to "Removal and Installation".
d. Remove nuts on bottom of right engine mounting insulator, and lift up right side of engine approximately 3 cm (1.18 inch) with transmission jack.
e. Remove starter motor. Refer to "Removal and Installation".
f. Support and lift up bottom of engine with transmission jack. Remove right engine mounting insulator along with right engine mounting brackets.
g. Remove exhaust manifold cover (right bank).
h. Loosen nuts in the reverse order of figure to remove exhaust manifold and three way catalyst (right bank) with power tool.
NOTE: Disregard No. 9 to No. 12 when loosening.
INSPECTION AFTER REMOVAL
Surface Distortion
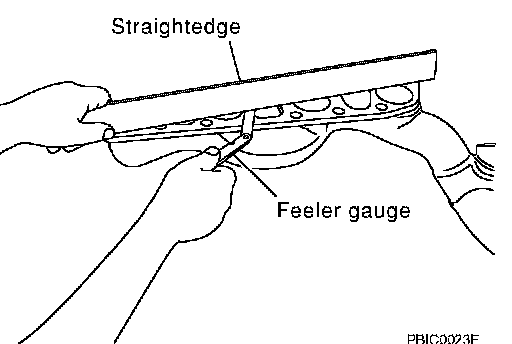
^ Use a straightedge and a feeler gauge to check the surface distortion of each exhaust manifold and three way catalyst flange surface.
Limit: 0.3 mm (0.01 inch)
^ If it exceeds the limit, replace exhaust manifold and three way catalyst.
INSTALLATION
Note the following, and install in the reverse order of removal.
Exhaust Manifold Gasket
Install exhaust manifold gasket with its directional protrusion set upward. Refer to "Removal and Installation".
Exhaust Manifold
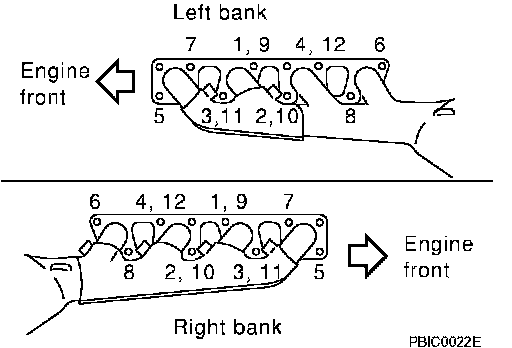
^ Install exhaust manifold and three way catalyst in numerical order shown in the figure.
^ Tighten nuts No. 1 to No. 4 in two steps. Order No. 9 to 12 shows second step.
Heated Oxygen Sensor
^ Install heated oxygen sensors in the original position.
^ Install referring the following if the installation positions cannot be identified.
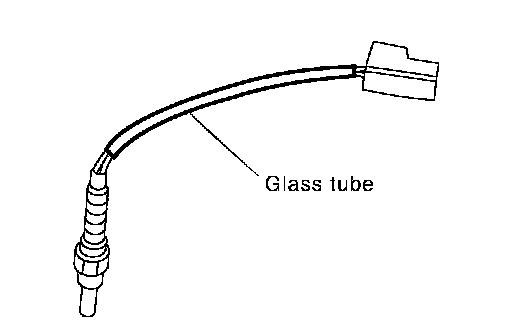
Glass tube color
Heated oxygen sensor 1 *1:Black
Heated oxygen sensor 2 *2:White
*1: Length of left bank for heated oxygen sensor is different from right bank.
*2: Refer to "EXHAUST SYSTEM" about heated oxygen sensor 2.
CAUTION:
^ When using the heated oxygen sensor wrench [SST: KV10114400 (J-38365)], tighten to the middle of specified torque because length of tool may induce slight indication increase. (Do not tighten to the maximum specified torque)
^ Before installing new heated oxygen sensor, clean exhaust system threads using the heated oxygen sensor thread cleaner (commercial service tool: J-43897-18 or J-43897-12), and apply antiseize lubricant (commercial service tool).
^ Do not over torque the heated oxygen sensor. Doing so may cause damage to the heated oxygen sensor, resulting in the MIL coming on.