Alternator: Service and Repair
REMOVAL PROCEDURECAUTION: This vehicle has a Supplemental Inflatable Restraint (SIR) System. Refer to SIR Component Location View in order to determine whether you are performing service on or near the SIR components or the SIR wiring. When you are performing service on or near the SM components or the SM wiring, refer to SM On-Vehicle Service information. Failure to follow the CAUTIONS could cause air bag deployment, personal injury, or unnecessary SM system repairs.
1. Disconnect the battery negative cable. Refer to Battery Disconnect Caution in Service Precautions.
2. Remove the accessory drive belt. Refer to Drive Belt Replacement.
3. Remove the brace bolt from the back of the generator.
4. Remove the generator brace nut from the exhaust manifold stud.
5. Remove the generator brace.

6. Remove the battery feed terminal nut from the back of the generator (under the boot).
7. Disconnect the battery feed wire.
8. Disconnect the voltage regulator connector.
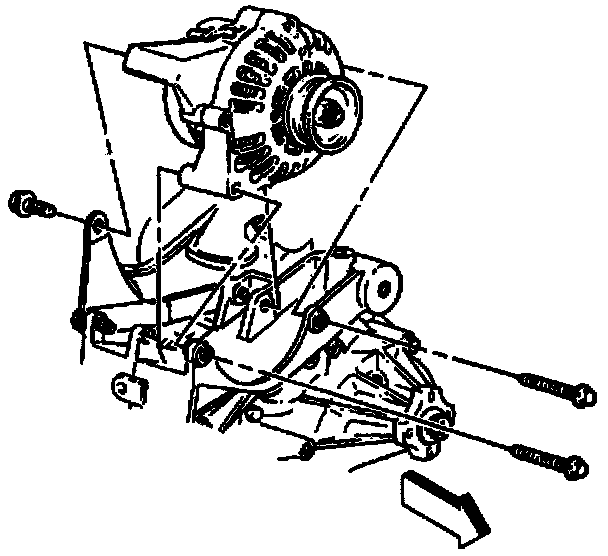
9. Remove the two generator mounting bolts.
10. Remove the generator from the mounting bracket.
INSTALLATION PROCEDURE
1. Install the generator to the mounting bracket with the two generator mounting bolts.
2. Install the brace to the back of the generator with the bolt.
3. Install the brace nut to the exhaust manifold stud.
NOTICE: Refer to Fastener Notice in Service Precautions.
4. Connect the generator BAT terminal wire. Make sure the insulating boot is covering the terminal nut.
4.1. Tighten the front generator bolt to 50 Nm (36 ft. lbs.).
4.2. Tighten the rear generator bolt 25 Nm (18 ft. lbs.).
4.3. Tighten the brace bolt 25 Nm (18 ft. lbs.).
4.4. Tighten the brace nut 30 Nm (22 ft. lbs.).
4.5. Tighten the nut on the generator BAT terminal to 8 Nm (71 inch lbs.).
5. Connect the voltage regulator connector.
6. Install the accessory drive belt. Refer to Drive Belt Replacement.
7. Connect the negative battery cable.