Timing Cover: Service and Repair
Engine Front CoverRemoval
1. Remove the cover and disconnect the battery ground cable.
2. Recover the A/C refrigerant.
3. WARNING: Do not work on or under a vehicle supported only by a jack. Always support the vehicle on safety stands.
Raise and support the vehicle.
4. Remove the hood.
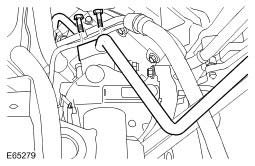
5. Vehicles with secondary air injection: Remove the air control valve to exhaust manifold tube.
6. Remove the coolant manifold.
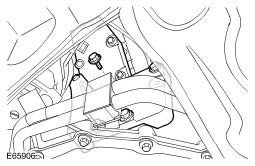
7. Remove the LH valve cover.
8. Remove the RH valve cover.
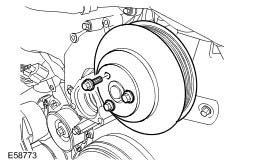
9. Remove the crankshaft pulley.
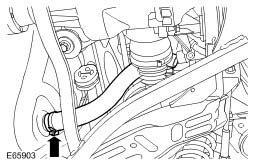
10. Remove the radiator bottom hose.
> Release the clip.
11. Remove the power steering pump.
12. NOTE: Restrain the pulley to aid the removal of the bolts.
Remove the coolant pump pulley.
> Remove the 3 bolts.
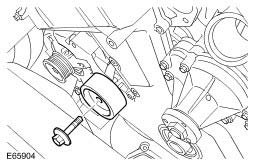
13. Remove the accessory drive belt idler pulley.
> Remove the bolt.
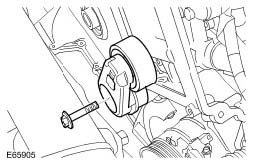
14. Remove the accessory drive belt tensioner.
> Remove the bolt.
15. CAUTION: Immediately cap all refrigerant lines to prevent ingress of dirt and moisture.
Disconnect the refrigerant lines from the A/C compressor.
> Remove the 2 bolts.
> Remove and discard the 2 O-ring seals.
16. Position the A/C compressor aside to access the A/C compressor mounting bracket.
17. Remove the A/C compressor mounting bracket.
> Remove the 4 bolts.
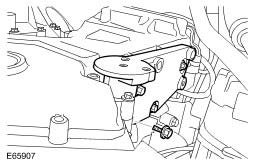
18. Remove the power steering pump mounting bracket.
> Remove the 4 bolts.
19. LH side: Release the wiring harness.
> Release the 2 clips.

20. RH side: Release the wiring harness.
> Remove the bolt.
> Release the clip.
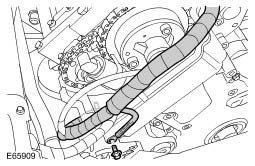
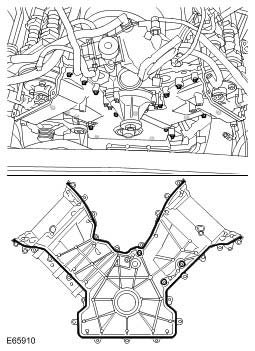
21. Remove the engine front cover.
> Remove the 24 bolts.
> Remove and discard the 2 gaskets.
> Remove and discard the 3 O-ring seals.
Installation
1. Install the engine front cover.
> Clean the component mating faces.
> Install the gaskets.
> Install the O-ring seals.
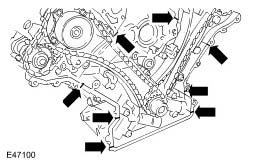
> Apply a bead of sealant 3 mm diameter, by 12 mm long, to the 8 places indicated.
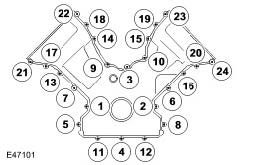
2. Install the engine front cover bolts.
> Evenly and progressively tighten the bolts in the sequence shown to 12 Nm (9 lb.ft).
3. RH side: Attach the wiring harness.
> Secure the clip.
> Tighten the bolt to 10 Nm (7 lb.ft).
4. LH side: Attach the wiring harness.
> Secure the clips.
5. Install the power steering pump mounting bracket.
> Tighten the bolts to 25 Nm (18 lb.ft).
6. Install the A/C compressor mounting bracket.
> Tighten the bolts to 25 Nm (18 lb.ft).
7. CAUTION: Lubricate the new seals with clean refrigerant oil.
Connect the refrigerant lines.
> Clean the component mating faces.
> Install the new O-ring seals.
> Tighten the bolts to 9 Nm (7 lb.ft).
8. Install the accessory drive belt tensioner.
> Tighten the bolt to 45 Nm (33 lb.ft).
9. Install the accessory drive belt idler pulley.
> Tighten the bolt to 45 Nm (33 lb.ft).
10. Install the coolant pump pulley.
> Tighten the bolts to 10 Nm (7 lb.ft).
11. Install the power steering pump.
12. Install the radiator bottom hose.
> Secure the clip.
13. Install the crankshaft pulley.
14. Install the RH valve cover.
15. Install the LH valve cover.
16. Install the coolant manifold.
17. Vehicles with secondary air injection: Install the air control valve to exhaust manifold tube.
18. Install the hood.
19. Recharge the A/C system.
20. Connect the battery ground cable and install the cover.