Engine - Splash Shield Service Kit
87amcjeep069E360
1987 WRANGLER/YJ MODELS WITH 4.2L I-6 ENGINE
AUGUST 1987
ENGINE Attention: Workshop, Parts Department
ENGINE COMPARTMENT SPLASH SHIELDS
1987 Wrangler/YJ models with 4.2L I-6 engine may collect dirt contamination during off-road driving. Dirt or water may enter the engine compartment and interfere with engine operation. Several modifications have been incorporated in vehicles built after VIN 1JXXXXXXXXX500974 to reduce water and dirt contamination.
A service kit has been developed to provide shielding in the engine compartment for vehicles built prior to the VIN above. This kit consists of two front splash shields, an air intake deflector, two air cleaner grommets and sealed nuts for the footman loop on the hood. The following procedures outline installation of this shield kit.
PROCEDURES
Front Splash Shields
1. Raise the vehicle with a frame contact hoist.
2. Remove both front wheels and tires.
FIGURE 1:
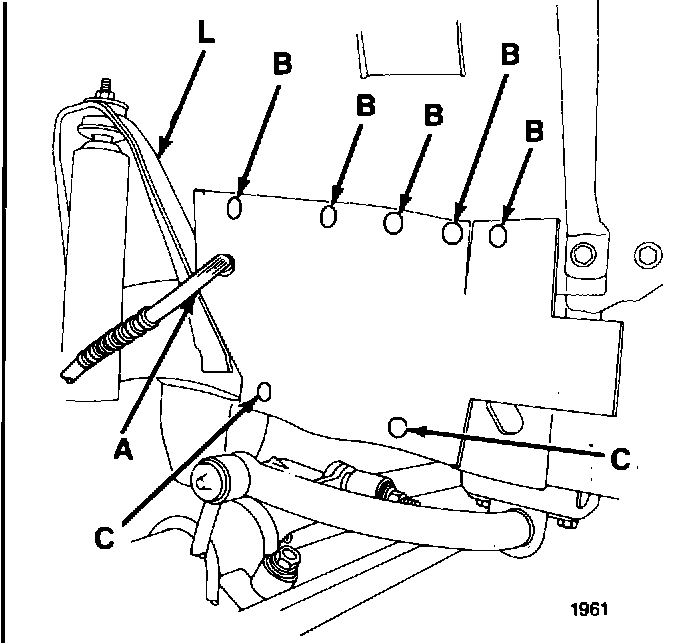
3. Position a front splash shield to the right front wheelhouse using the brake hose as a locator (A-Fig. 1).
4. Mark the center of each splash shield hole. There are five holes for the wheelhouse and two holes for the frame (B, C-Fig. 1).
5. Remove splash shield and center punch all hole locations. Using a 7 mm (9/32 in.) drill bit, drill all seven holes for the right splash shield.
Note: Be careful when drilling holes through the wheelhouse into the engine compartment. Keep drill from contacting components inside the engine compartment.
6. Using Ditzler DP40/401, Sikkens Washprimer or Sherwin Williams E2Y36, prime bare metal areas exposed by drilling holes. After applying primer, apply an enamel top coat and allow it to dry.
FIGURE 1:
7. Position splash shield and install it using panel fasteners (Fig. 1). Push the rear end of shield in behind shock absorber bracket (L-Fig. 1).
8. Position the other front splash shield to the left wheelhouse using the brake hose as a locator.
9. Mark the center of the top splash shield holes. Do not mark the two lower holes at the frame (C-Fig. 1). These holes are not used on the driver side shield.
10. Remove splash shield and center punch the five top hole locations. Using a 7 mm (9/32 in.) drill bit, drill the five holes into the wheelhouse.
Note: Be careful when drilling holes through the wheelhouse into the engine compartment. Keep drill from contacting components inside the engine compartment.
11. Using Ditzier DP 40/401, Sikkens Washprimer, or Sherwin Williams E2Y36, prime bare metal areas exposed by drilling holes. After applying primer, apply an enamel top coat and allow to dry.
12. Position splash shield and install it using panel fasteners. Push rear end of the shield behind the shock absorber bracket.
13. Install both front wheels and tires.
14. Lower vehicle.
Air Intake Deflector Installation
1. Remove left headlamp trim ring.
2. Remove headlamp and headlamp bucket.
3. Open hood and remove the two top screws from the ambient air duct attached to the radiator support.
FIGURE 2:
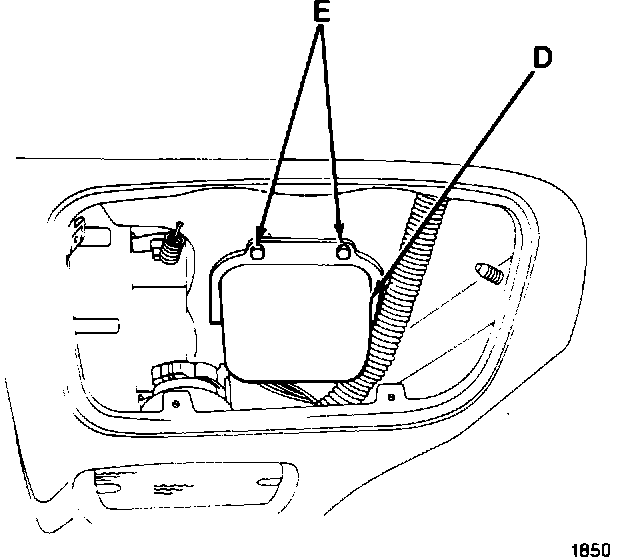
4. Reaching through the headlamp opening, install the ambient air duct deflector, PN 8953 005 120, using two screws and nuts provided in the kit (D, E-Fig. 2). Install screws from the headlamp side to provide clearance for the headlamp bucket.
5. Install headlamp bucket and headlamp.
6. Install headlamp trim ring.
FIGURE 3:
Footman Loop Nuts and Air Cleaner Grommets
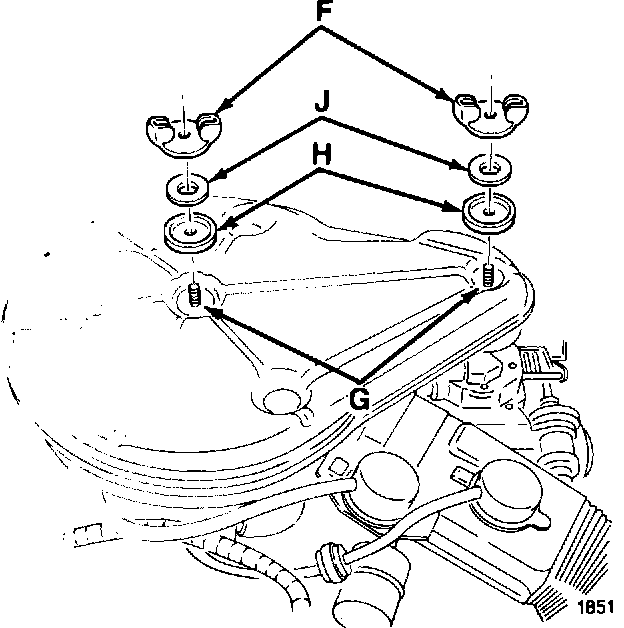
1. Remove air cleaner wing nuts (F-Fig. 3).
2. Install grommet (H-Fig. 3) and flat washer, (J-Fig. 3) on each air cleaner stud.
3. Install air cleaner wing nuts.
4. Using a trim panel removal tool, remove fasteners and lower hood insulation pad, if equipped, from underside of hood.
FIGURE 4:
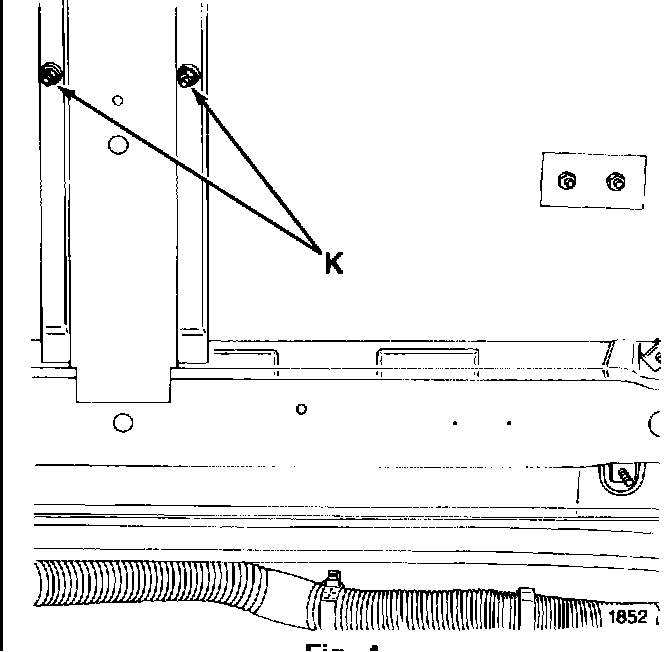
5. Remove both footman loop nuts (K-Fig. 4) located at the center of the hood.
6. Install new footman nut and sealed washer assemblies, PN 400 0220.
Note: These nuts have sealer on them to close up the holes in the hood for the footman loop.
7. Install hood insulation pad, if equipped.
8. Close hood.
PARTS INFORMATION
Description Quantity Part Number
KIT, Splash Shields 1 8983 100 056
Kit Contents:
Grommet, Air Cleaner 2 8933 001 941
Washer, Flat 2 400 0847
Splash Shield, Front 2 8955 019 470
Fastener, Panel 12 400 4919
Deflector Assembly, Ambient Air Duct 1 8953 005 120
Screw 2 942 1073
Nut 2 1150 2722
Nut (W/Sealed Washer) 2 400 0220
SRT/TIC INFORMATION
Operation
Operation Description Number Time TIC
CO. KIT, SPLASH SHIELDS-INSTALL 0407 0.7 6-430
FILING INSTRUCTIONS
Record this I.S. Note on page B-217 of MR 279 and file it in the manual.