Left Hand Drive
Fig 36 Accumulator Removal/Installation -- Left Hand Drive:
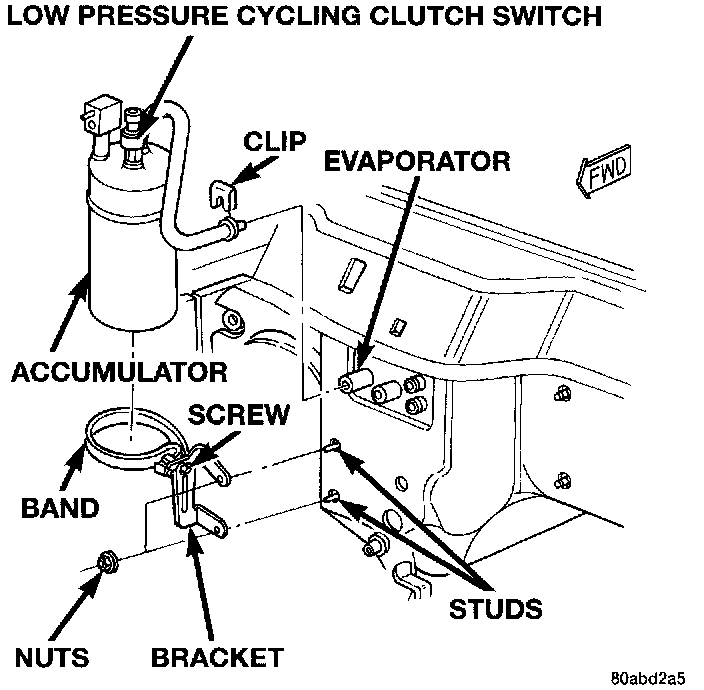
WARNING: Review the Service Precautions before performing the following operation.
REMOVAL
1. Disconnect and isolate the battery negative cable.
2. Recover the refrigerant from the refrigerant system.
3. Unplug the wire harness connector from the low pressure cycling clutch switch.
4. Loosen the screw that secures the accumulator retaining band to the support bracket.
5. Disconnect the suction line from the accumulator.
6. Disconnect the accumulator inlet tube refrigerant line coupler from the evaporator outlet tube. See A/C Coupler for the procedures. Install plugs in, or tape over all of the open refrigerant fittings.
7. Slide the accumulator out of the retaining band and remove the accumulator from the vehicle.
INSTALLATION
1. Install the accumulator into the retaining band.
2. Remove the tape or plugs from accumulator inlet and evaporator outlet tube fittings, and install the accumulator refrigerant line coupler to the evaporator outlet tube. See A/C Coupler for the procedures.
3. Install the suction line to the accumulator.
4. Tighten the accumulator retaining band screw to 5 Nm (45 in. lbs.).
5. Plug the wire harness connector into the low pressure cycling clutch switch.
6. Connect the battery negative cable.
7. Evacuate and charge the refrigerant system.
NOTE: If the accumulator is replaced, add 120 ml (4 oz.) of refrigerant oil to the refrigerant system.