Windshield Washer Reservoir: Service and Repair
REMOVAL1. Turn the front wheels full lock to the right.
2. Unlatch and open the hood.
3. Disconnect and isolate the battery negative cable.
4. Remove the air cleaner housing from the top of the right front fender wheel house.
Fig.23 Washer Reservoir Cap Remove/Install:
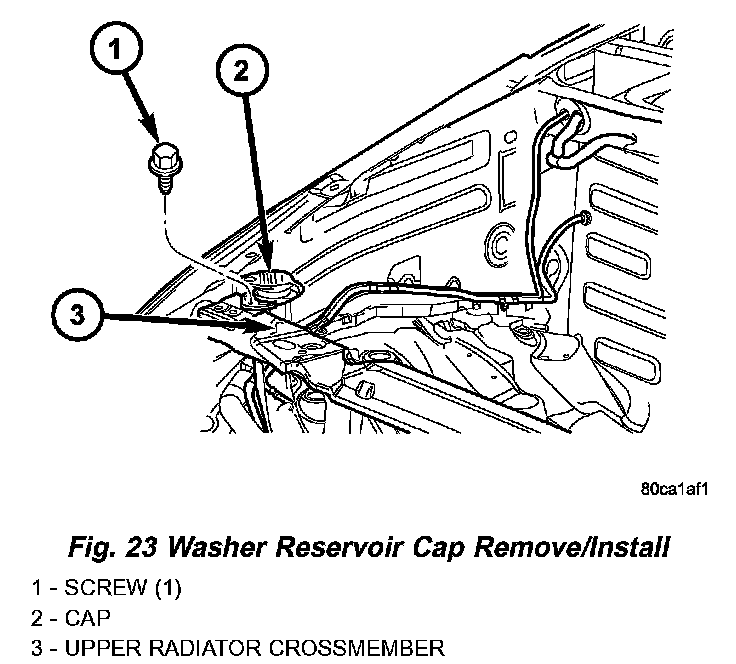
5. Remove the screw that secures the washer reservoir filler neck support to upper radiator crossmember .
6. Raise and support the vehicle.
7. Remove the splash shield from the right front fender wheel house.
8. Release the "W" clip that secures the front bumper fascia to the front bumper support. This clip is located behind the bumper support and below the right front lamp unit.
9. Place a clean container on the floor beneath the washer pump/motor location to catch any washer fluid that is spilled during the following procedure.
Fig.24 Washer Reservoir Remove/Install:
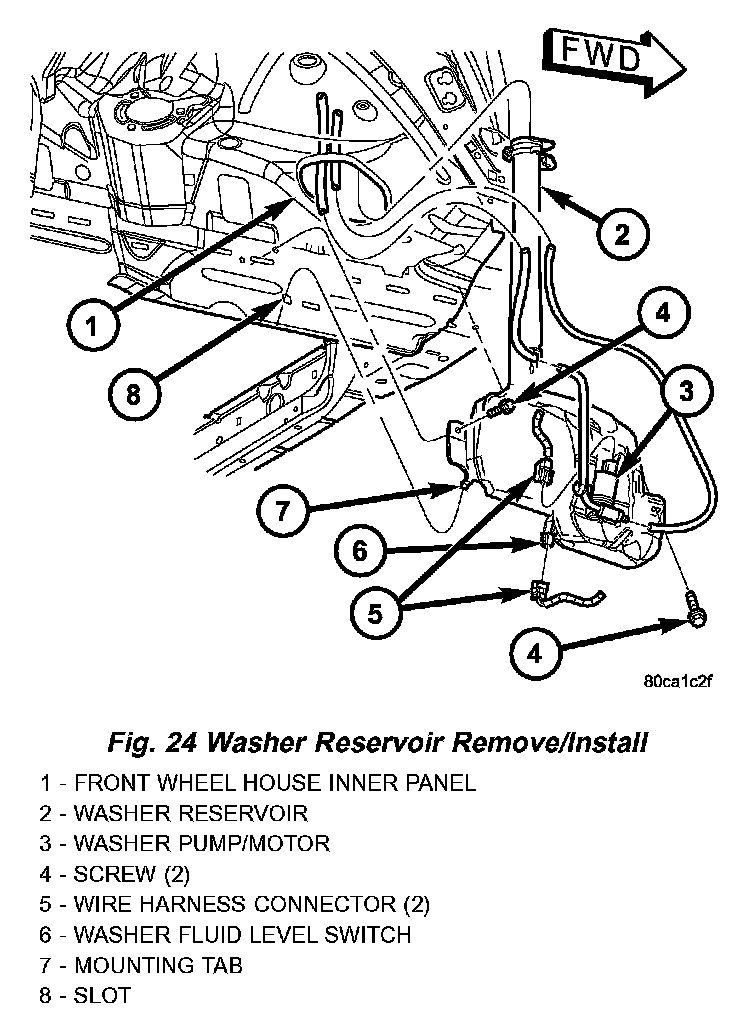
10. Disconnect the front and rear washer hoses from the washer pump/motor unit outlet nipples and allow the washer fluid to drain into the container for reuse.
11. Disconnect the headlamp and dash wire harness connector for the washer pump/motor unit from the connector receptacle on the top of the motor housing.
12. Disconnect the headlamp and dash wire harness connector for the washer fluid level switch from the connector receptacle on the bottom of the switch.
13. Disengage the front and rear washer hoses from the integral washer reservoir troughs and routing clips.
14. Using a long extension with a swivel socket and pulling forward on the front bumper fascia, remove the screw that secures the washer reservoir to the right front frame rail.
15. Remove the screw that secures the rear of the washer reservoir to the right front frame rail.
16. Disengage the mounting tab at the back of the washer reservoir from the slot in the right front frame rail.
17. Lower the washer reservoir far enough for the filler neck to be removed from the clearance hole in the right front fender wheel house panel extension.
18. Remove the washer reservoir from the right front fender wheel house.
INSTALLATION
1. Position the washer reservoir into the right front fender wheel house.
2. Insert the washer reservoir filler neck through the clearance hole in the right front fender wheel house panel extension.
3. Raise the washer reservoir far enough to engage the mounting tab at the back of the reservoir into the slot in the right front frame rail.
4. Install and tighten the screw that secures the rear of the washer reservoir to the right front frame rail. Tighten the screw to 7 Nm (65 in. lbs.).
5. Using a long extension with a swivel socket and pulling forward on the front bumper fascia, install and tighten the screw that secures the washer reservoir to the right front frame rail. Tighten the screw to 7 Nm (65 in. lbs.).
6. Engage the front and rear washer hoses into the integral washer reservoir troughs and routing clips. Be certain that the rear washer hose is routed rearward of the washer pump/motor unit, and the front washer hose is routed forward of the washer pump/motor unit. The rear washer hose can be identified by an in-line hose connector that joins the reservoir hose to the engine compartment hose located near the top of main body of the reservoir.
7. Reconnect the headlamp and dash wire harness connector for the washer fluid level switch to the connector receptacle on the bottom of the switch.
8. Reconnect the headlamp and dash wire harness connector for the washer pump/motor unit to the connector receptacle on the top of the motor housing.
9. Reconnect the front and rear washer hoses to the washer pump/motor unit outlet nipples. Be certain that the rear washer hose in the trough rearward of the washer pump/motor unit is connected to the rear nipple, and the hose in the trough forward of the washer pump/motor unit is connected to the front nipple.
10. Engage the "W" clip that secures the front bumper fascia to the front bumper support. This clip is located behind the bumper support and below the right front lamp unit.
11. Reinstall the splash shield into the right front fender wheel house.
12. Lower the vehicle.
13. Install and tighten the screw that secures the washer reservoir filler neck support to upper radiator crossmember. Tighten the screw to 7 Nm (65 in. lbs.).
14. Reinstall the air cleaner housing onto the top of the right front fender wheel house.
15. Refill the washer reservoir with the washer fluid drained from the reservoir during the removal procedure.
16. Reconnect the battery negative cable.