Fuel Rail: Service and Repair
WARNING: THE FUEL SYSTEM IS UNDER CONSTANT PRESSURE EVEN WITH ENGINE OFF. BEFORE SERVICING FUEL RAIL, FUEL SYSTEM PRESSURE MUST BE RELEASED.The fuel rail can be removed without removing the intake manifold if the following procedures are followed.
1. Remove fuel tank filler tube cap.
2. Perform Fuel System Pressure Release Procedure.
3. Remove negative battery cable at battery.
4. Remove air duct at throttle body.
5. Disconnect fuel line latch clip and fuel line at fuel rail. A special tool will be necessary for fuel line disconnection. Refer to Quick-Connect Fittings.
6. Remove necessary vacuum lines at throttle body
7. Drain engine coolant and remove thermostat and thermostat housing.
8. Remove PCV hose and valve at valve cover.
Fig.11 Fuel Rail Mounting - 2.4L:
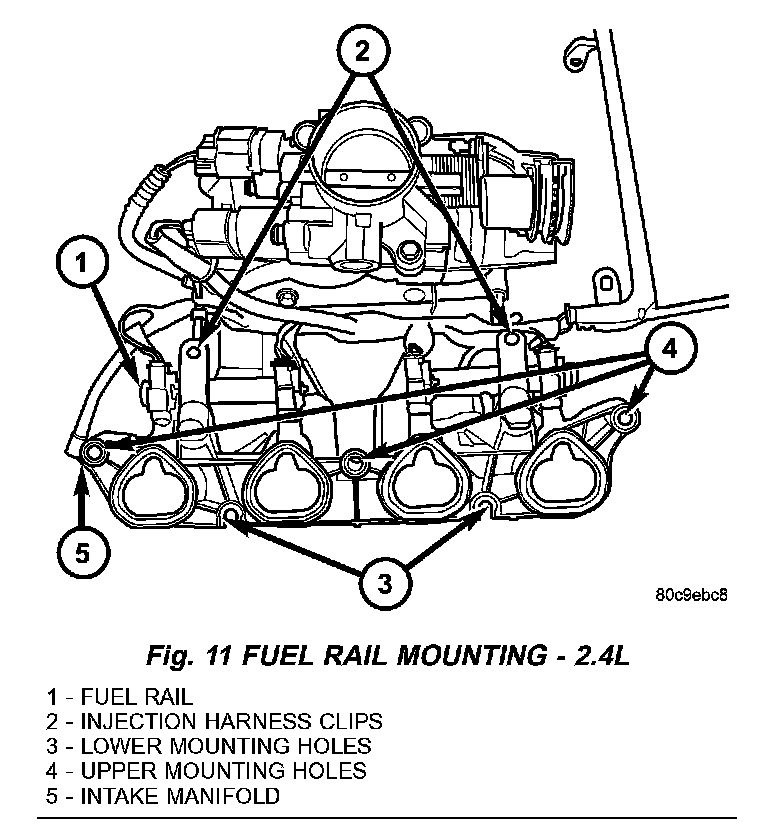
9. Remove 3 upper intake manifold mounting bolts (Fig. 11), but only loosen 2 lower bolts about 2 turns.
Fig.10 Map Sensor Location - 2.4L:
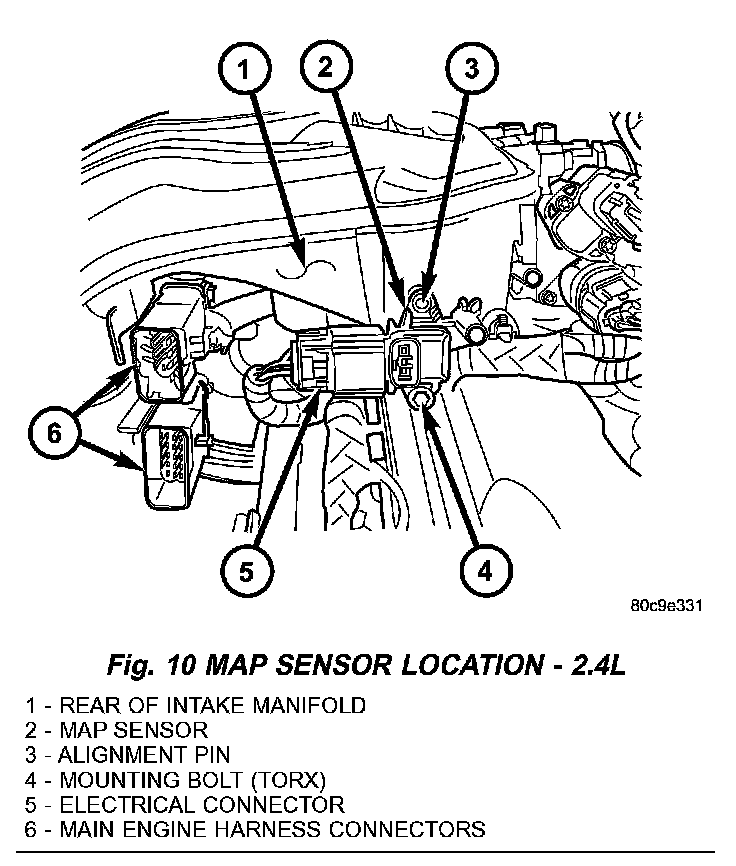
10. Disconnect 2 main engine harness connectors at rear of intake manifold (Fig. 10).
11. Disconnect 2 injection wiring harness clips at harness mounting bracket (Fig. 11).
Fig.12 Remove/Install Injector Connector:
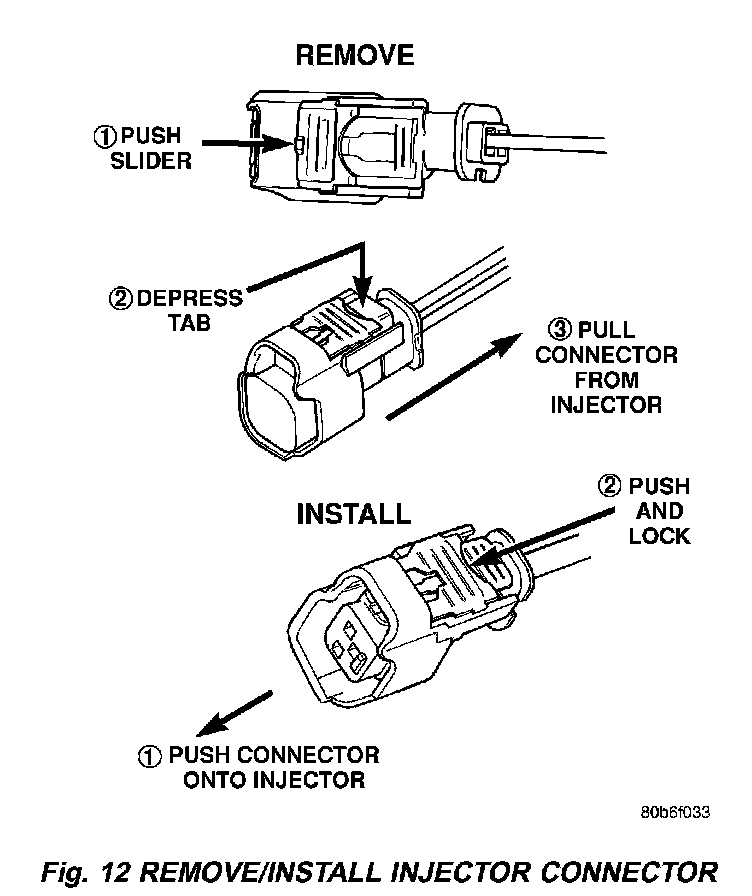
12. Disconnect electrical connectors at all 4 fuel injectors. To remove connector refer to (Fig. 12). Push red colored slider away from injector 1. While pushing slider, depress tab 2. and remove connector 3. from injector. The factory fuel injection wiring harness is numerically tagged (INJ 1, INJ 2, etc.) for injector position identification. If harness is not tagged, note wiring location before removal.
Fig.9 Fuel Rail - 2.4L:
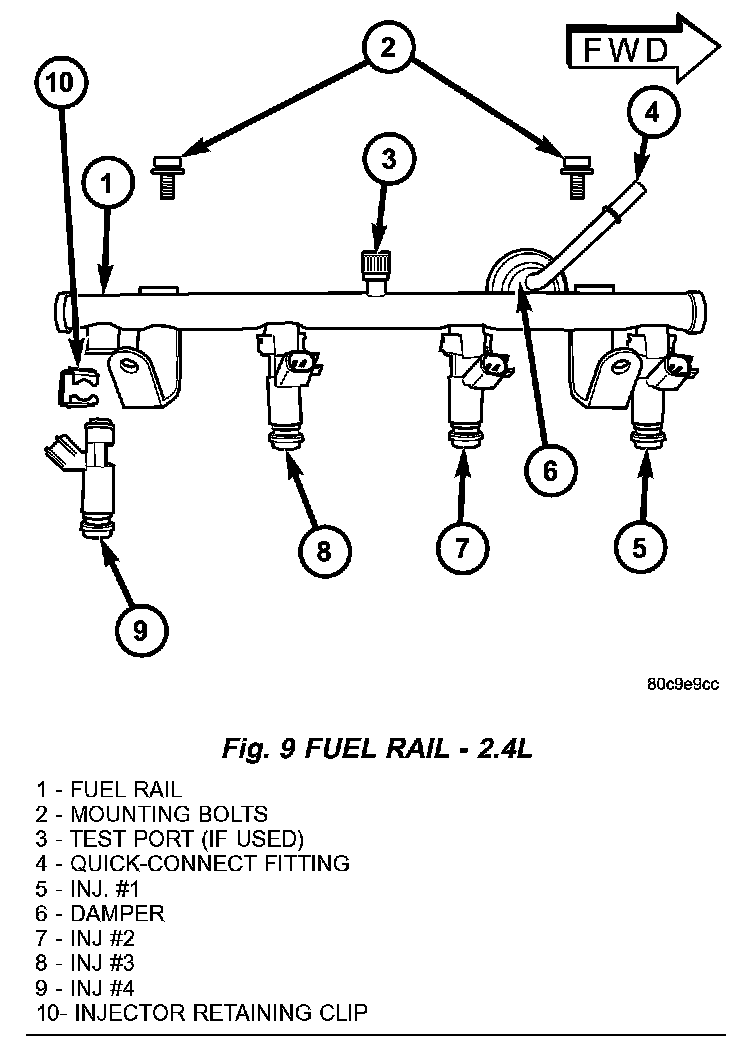
13. Remove 2 injection rail mounting bolts (Fig.9).
14. Gently rock and pull fuel rail until fuel injectors just start to clear machined holes in intake manifold.
15. Remove fuel rail (with injectors attached) from intake manifold.
16. If fuel injectors are to be removed, refer to Fuel Injector Removal/Installation.
INSTALLATION
1. If fuel injectors are to be installed, refer to Fuel Injector Removal/Installation.
2. Clean out fuel injector machined bores in intake manifold.
3. Apply a small amount of engine oil to each fuel injector 0-ring. This will help in fuel rail installation.
4. Position fuel rail/fuel injector assembly to machined injector openings in intake manifold.
5. Guide each injector into cylinder head. Be careful not to tear injector O-rings.
6. Push fuel rail down until fuel injectors have bottomed on shoulders.
7. Install 2 fuel rail mounting bolts and tighten. Refer to torque specifications.
8. Connect electrical connectors at all fuel injectors. To install connector, refer to (Fig. 12). Push connector onto injector 1. and then push and lock red colored slider 2. Verify connector is locked to injector by lightly tugging on connector.
9. Snap 2 injection wiring harness clips (Fig. 11) into brackets.
10. Connect 2 main engine harness connectors at rear of intake manifold (Fig. 10).
11. Tighten 5 intake manifold mounting bolts. Refer to Engine Torque Specifications.
12. Install PCV valve and hose.
13. Install thermostat and radiator hose. Fill with coolant. Refer to Cooling.
14. Connect necessary vacuum lines to throttle body
15. Connect fuel line latch clip and fuel line to fuel rail. Refer to Quick-Connect Fittings.
16. Install air duct to throttle body.
17. Connect battery cable to battery.
18. Start engine and check for leaks.