Air Outlet - Installation
INSTALLATION
NOTE: LHD model shown in illustrations. RHD model similar.
OUTBOARD OUTLETS
NOTE: Underside of instrument panel cover shown. Instrument panel duct removed from view for clarity.
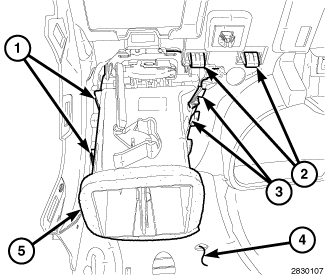
NOTE: Make sure that the air outlet is properly aligned to the instrument panel opening and that the foam seal on the outlet is properly installed.
1. Install the outboard instrument panel air outlet (5) through the opening in the instrument panel cover (4) and connect it to the duct
2. Engage the four retaining tabs (1 and 3) that secure each outboard air outlet to the instrument panel cover. Make sure the retaining tabs are fully engaged.
3. Engage the retaining tabs (2) that secure the outboard air outlet trim panel to the face of the instrument panel cover. Make sure the retaining tabs are fully engaged.
4. When servicing the passenger side air outlet:
- Install the IP trim panel, glove box shelf and glove box Instrument Panel Glove Box - Installation
- install the passenger side instrument panel silencer
5. When servicing the driver side air outlet:
- install the knee blocker Instrument Panel - Installation
- install the driver side instrument panel silencer
6. Reconnect the negative battery cable.
INBOARD OUTLETS
NOTE: Take the proper precautions to protect the front face of the center bezel from cosmetic damage while performing this procedure.
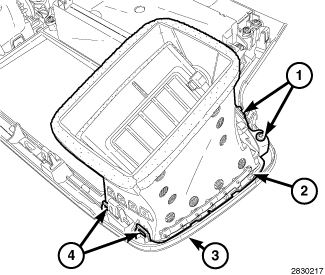
NOTE: If the foam seal on an air outlet is deformed or damaged, the seal must be replaced.
1. Position the inboard air outlet(s) (2) to the center bezel (3).
2. Engage the two retaining tabs (4) that secure each air outlet to the center bezel. Make sure the retaining tabs are fully engaged.
3. Install the two screws (1) that secure each air outlet to the center bezel. Tighten the screws securely.
4. Install the instrument panel center bezel Instrument Panel Center Bezel - Installation.
5. Reconnect the negative battery cable.
FLOOR CONSOLE OUTLETS
NOTE: Take the proper precautions to protect the floor console rear trim panel from cosmetic damage while performing this procedure.
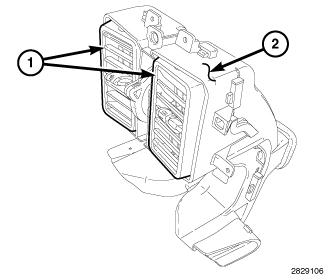
1. Position the air outlet barrel(s) (1) into the console rear duct (2) and gently push the barrel(s) into the duct, until the barrel snaps into position on the pivot shafts. Make sure each barrel is square in the duct opening and moves freely on the pivot shafts.
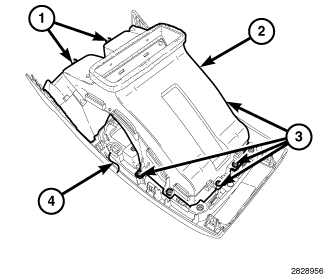
NOTE: If the foam seal on the console rear duct is deformed or damaged, the seal must be replaced.
2. Install the floor console rear duct (2) onto the floor console rear trim panel (4).
3. Install the six screws (1 and 3) that secure floor console rear duct to the floor console rear trim panel. Tighten the screws securely.
4. Install the floor console rear trim panel (1) onto the back of the floor console. Be sure to connect any necessary electrical connectors and properly align the console ducts.
5. Reconnect the negative battery cable.