Installation
INTERIOR PANELS / TRIM: FRONT CONSOLE BOX: INSTALLATION
HINT
A bolt without a torque specification is shown in the standard bolt chart Standard Bolt - Specified Torque For Standard Bolts.
1. INSTALL REAR CONSOLE BOX ASSEMBLY
(a) Install the rear console box with the 2 screws and 4 bolts.
(b) Attach the clamp.
(c) Connect each connector.
2. INSTALL REAR CONSOLE END PANEL SUB-ASSEMBLY
(a) w/ Rear Air Conditioning System:
Connect the connector.
(b) Attach the 8 clips to install the rear console end panel.
3. INSTALL REAR UPPER CONSOLE PANEL SUB-ASSEMBLY
(a) Attach the 4 clips and 2 guides to install the rear upper console panel.
4. INSTALL CONSOLE COIN BOX
(a) Install the console coin box.
5. INSTALL UPPER CONSOLE PANEL SUB-ASSEMBLY
(a) Connect each connector.
(b) Attach the 7 clips to install the upper console panel.
6. INSTALL SHIFT LEVER KNOB SUB-ASSEMBLY
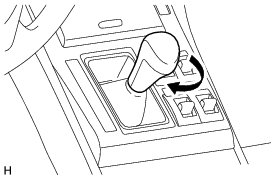
(a) Install the shift lever knob and twist it in the direction indicated by the arrow.
7. INSTALL INSTRUMENT PANEL FINISH PANEL END LH
(a) Attach the 11 clips to install the instrument panel finish panel end.
8. INSTALL INSTRUMENT PANEL FINISH PANEL END RH
(a) Attach the 11 clips to install the instrument panel finish panel end.
9. INSTALL FRONT NO. 1 CONSOLE BOX INSERT
(a) Attach the 2 clips and guide to install the front No. 1 console box insert.
10. INSTALL FRONT NO. 2 CONSOLE BOX INSERT
(a) Attach the 2 clips and guide to install the front No. 2 console box insert.
11. INSTALL NO. 1 INSTRUMENT PANEL UNDER COVER SUB-ASSEMBLY
(a) Connect the connector and attach the clamp.
(b) Attach the 2 clips and 2 guides to install the No. 1 instrument panel under cover.
(c) Install the screw.
12. INSTALL NO. 2 INSTRUMENT PANEL UNDER COVER SUB-ASSEMBLY
(a) Connect the foot light and attach the clamp.
(b) Attach the 3 clips and 2 guides to install the No. 2 instrument panel under cover.
(c) Install the screw.