Removal
2UR-FSE EMISSION CONTROL: EXHAUST GAS TEMPERATURE SENSOR: REMOVAL
1. REMOVE FRONT SEAT ASSEMBLY
(a) Remove the front seat LH and RH Removal.
2. REMOVE REAR SEAT CUSHION ASSEMBLY
(a) for Power Seat Type:
Remove the rear seat cushion Removal.
(b) for Ottoman Type:
Remove the rear seat cushion Removal.
(c) for Fixed Seat Type:
Remove the rear seat cushion Removal.
3. REMOVE FRONT DOOR SCUFF PLATE LH Removal
4. REMOVE FRONT DOOR SCUFF PLATE RH Removal
5. REMOVE REAR DOOR SCUFF PLATE LH Removal
6. REMOVE REAR DOOR SCUFF PLATE RH Removal
7. REMOVE CENTER LOWER PILLAR GARNISH LH Removal
8. REMOVE CENTER LOWER PILLAR GARNISH RH Removal
9. REMOVE FRONT FLOOR CARPET ASSEMBLY
10. REMOVE FRONT FLOOR SILENCER PAD LH

11. REMOVE FRONT FLOOR SILENCER PAD RH
12. REMOVE EXHAUST GAS TEMPERATURE SENSOR
(a) Interior Side:

(1) Disconnect the sensor LH and RH connector.
(b) Exterior Side:

(1) Disconnect the 2 grommets.
(2) Disconnect the wire harness from the clamp on the LH and RH side.
(3) Using a union nut wrench, remove the 4 sensors.
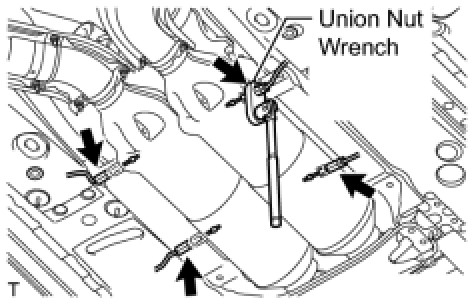
NOTICE:
* When removing the sensor, place a union nut wrench within the 16 mm (0.630 in.) area A shown in the illustration to avoid deformation of the hexagonal part.

* When removing/installing the grommet and sensor, be careful not to twist the wire and do not apply tension to the accessories.
* If oil, etc. enters the sensor's connector, do not use it.