DPFE Sensor - Growling Noise From Dash
Bulletin No.: 004/95Issued: 2/28/94
Revised:
Category
F
Applicable Model/s
1994 B23O0
Subject:
GROWLING NOISE FROM DASH
DPFE SENSOR NOISE
NOTE:
This bulletin was originally issued 12/23/94 as.. S/B # 009/94. This bulletin is being reissued with additional information.
APPLICABLE MODELS/VINS
All 1994 B23O0 Vehicles
DESCRIPTION
Noise may be heard in the passenger compartment during steady to moderate acceleration. This noise is caused by exhaust vibration being conducted into the passenger compartment through the Differential Pressure Feedback EGR (DPFE) sensor mounting studs.
To correct this problem, a countermeasure mounting bracket and dual ply hoses are available. Customers complaining of this problem should have the vehicle diagnosed and if needed, countermeasure parts installed.
DIAGNOSIS PROCEDURE
1. Verify that the exhaust system is properly installed and no Diagnostic Trouble Codes (DTCs) are stored in memory.
NOTE:
This countermeasure is designed to eliminate noise created through normal DPFE operation. Correct any problems found by retrieving the DTCs prior to countermeasure installation. Retest vehicle after troubleshooting to verify problem still exists.
2. If the exhaust system is properly installed, bypass the DPFE operation and perform the following checks.
3. Disconnect both single ply hoses from the DPFE sensor.
4. Remove the larger hose (5.6 mm I/D) from the EGR tube and retain hose.
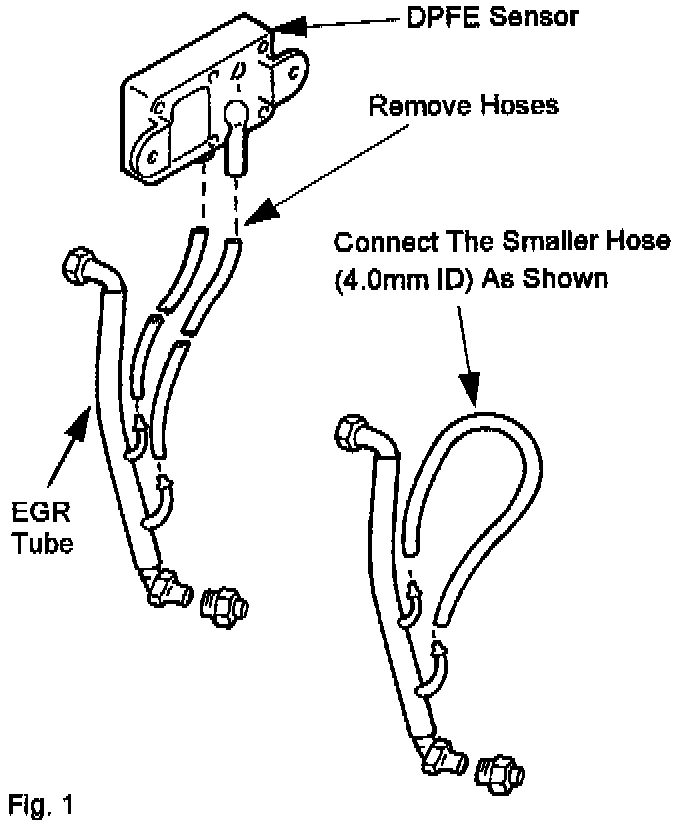
5. Make a loop in the smaller hose (4.0 mm I/D) and connect the other end to the remaining filling. See Fig. 1.
6. Run engine to normal operating temperature and test drive vehicle using steady to moderate acceleration.
7. If the noise level is not reduced, reconnect the DPFE system, clear any DTCs from memory and troubleshoot.
8. If the noise level is greatly reduced, clear any DTCs from memory and proceed to step 1 of the Repair Procedure.
REPAIR PROCEDURE
1. Disconnect connector at DPFE sensor.
2. Remove sensor from mounting bracket. Discard nuts.
3. Remove and discard mounting bracket from the lower dash panel.
NOTE:
Save the mounting screws for attaching the countermeasure bracket to the lower dash panel.
4. Attach the countermeasure bracket to the lower dash panel. Tightening Torque: 2.5 - 3.5 N-m (22 - 31 in.lbs.)
NOTE:
While installing the bracket, the rubber insulator may begin to rotate with the screw. Keep the insulator from rotating by carefully holding it with pliers. Take care not to damage the insulator.
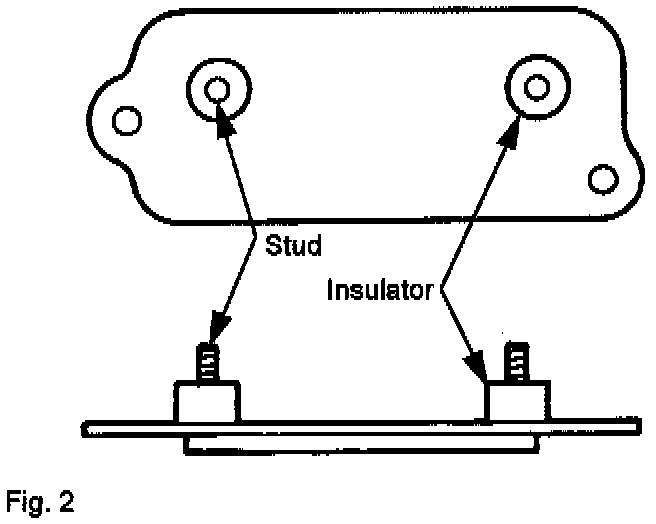
5. Install the DPFE sensor on the bracket insulator studs with two (2) new nuts. Tightening Torque: 3.0 - 3.5 N-m (27 - 31 in.lbs.). See Fig. 2.
6. Discard single ply hoses and install the dual ply countermeasure hoses onto the proper DPFE fittings and EGR tube connections.
7. Reconnect electrical connectors.
8. Verify the repair during steady, moderate acceleration after the engine has reached normal operating temperature.
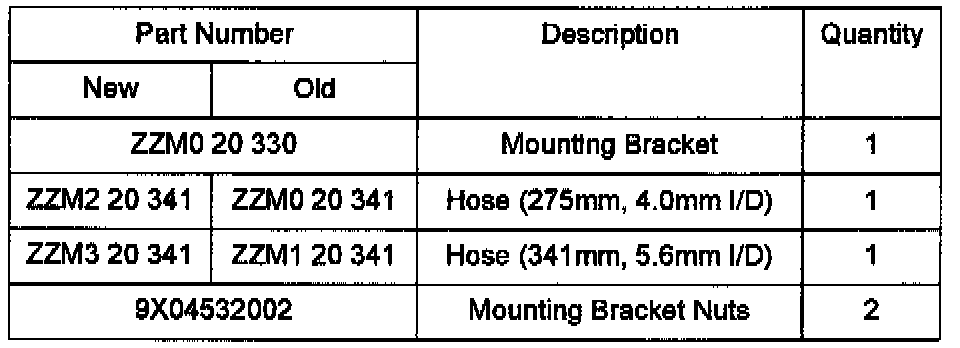
PARTS INFORMATION
WARRANTY INFORMATION
(Applies To Verified Customer Complaints On Vehicles Covered Under Normal Warranty. Refer To The SRT Microfiche For Warranty Term Information.)
Warranty Type: A
Symptom Code: 80
Damage Code: 9H
Part Number Main Cause: ZZM0 20 330
Quantity: 1
Related Parts: ZZM2 20 341
ZZM3 20 341
Operation Number: YY0177RX
Labor Hours: 1.2Hrs.