Repair Procedure
REPAIR PROCEDURE1. Verify customer concern.
2. Obtain Wiring Harness Repair kit and confirm kit contents.
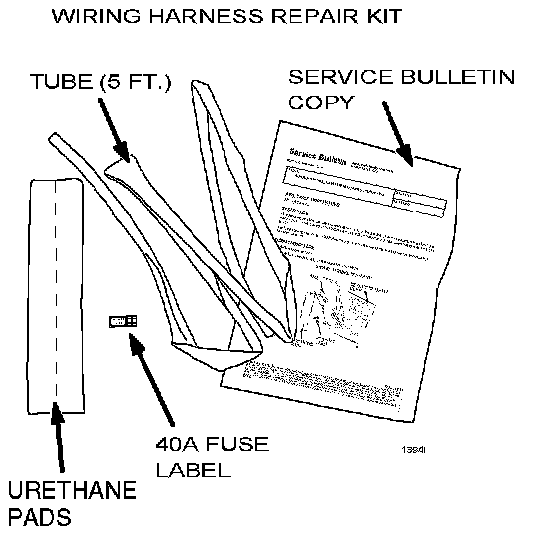
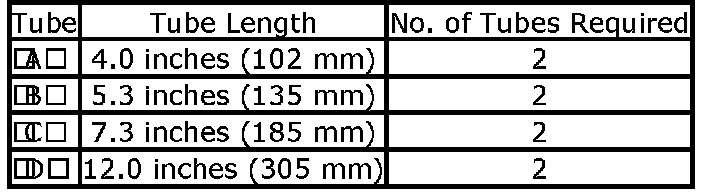
3. Take black tubing from kit and cut (A, B, C, & D) into tube lengths shown.
NOTE:
Each rear door requires one (1) set (A, B, C, & D) of tubes.
4. Take urethane pad from kit and cut it length-wise along the perforation into two (2) equal length pieces (one per door).
5. Ensure both rear sliding door windows are closed.
6. Write down customers pre-set radio stations.
7. Disconnect negative battery cable.
8. Remove fuse panel cover from driver side kick panel.
9. Remove 30A power window fuse from fuse panel and replace it with a 40A fuse (not supplied).
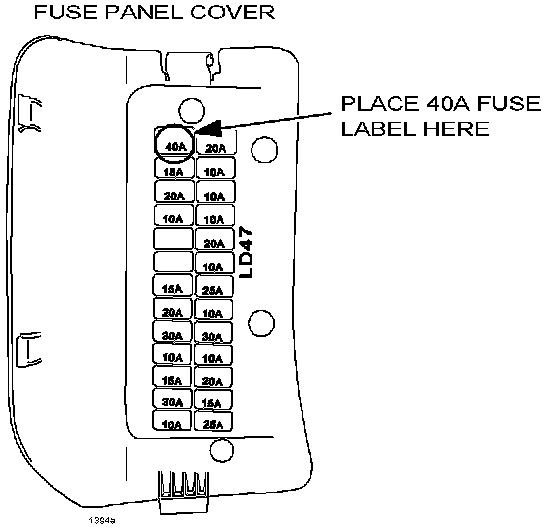
10. Place new 40A fuse rating label from kit over previous 30A fuse location inside fuse panel cover.
11. Reinstall fuse panel cover.
B-PILLAR - REAR SLIDING DOOR CONTACTS REPLACEMENT
1. Open one rear sliding door.
2. Remove B-pillar lower trim:
NOTE:
If equipped with side seat air bags, the side air bag sensor is located in the B-pillar.
WARNING:
Handling the side air bag sensor improperly can accidentally deploy the side air bag module, which may seriously injure you. Read AIR BAG SYSTEM SERVICE WARNINGS before working around the B-pillar areas. (See Section 08-10 for AIR BAG SERVICE WARNINGS, and AIR BAG SERVICE CAUTIONS.)
a. Remove assist handle (if equipped).
b. Remove front scuff plate.
c. Remove rear scuff plate.
d. Remove rear power sliding door rear switch (if equipped with power sliding doors).
e. Roll seaming welt over.
f. Remove bottom fastener.
g. Disengage clips using a fastener remover tool.
h. Remove B-pillar lower trim.
3. Remove seat belt retractor to gain access to rear sliding door connector.
4. Disconnect connector from rear sliding door contacts.
5. Remove rear sliding door contacts from B-pillar.
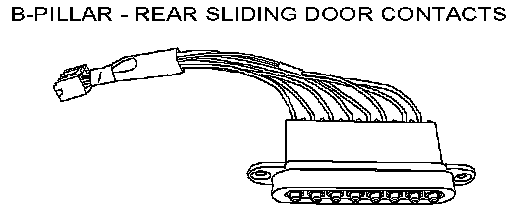
6. Replace rear sliding door contacts with modified part.
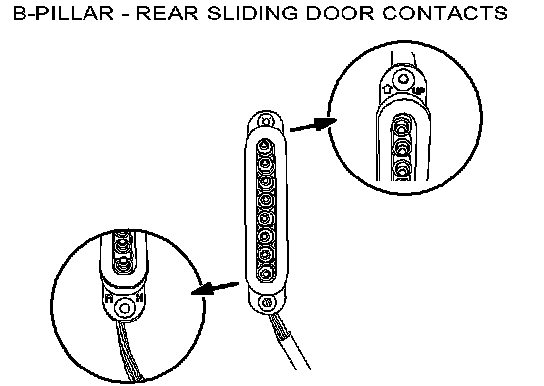
NOTE:
^ Be sure to install contacts with "UP" arrow pointing upward.
^ Check part for "LH" (Left Hand) or "RH" (Right Hand) marking and install on correct side.
7. Reconnect negative battery cable.
8. Confirm rear sliding door and power window operates properly.
9. Disconnect negative battery cable again.
10. Reinstall seat belt retractor.
11. Reinstall B-pillar lower trim components in reverse order of Step 2.
12. Repeat Steps 1-11 on other side B-pillar.
REAR DOOR - REAR SLIDING DOOR CONTACTS REPLACEMENT
1. Remove door trim from rear sliding door according to the Workshop Manual (Section 09-17 SLIDING DOOR TRIM REMOVAL/INSTALLATION).
2. Completely remove inner moisture screen from rear sliding door (do not cut screen).
NOTE:
Refer to March/April 2005 M-Tips Newsletter for "Butyl Adhesive Handling Tip".
3. Remove rear sliding door contacts from rear sliding door.
4. Replace with modified rear sliding door contacts.
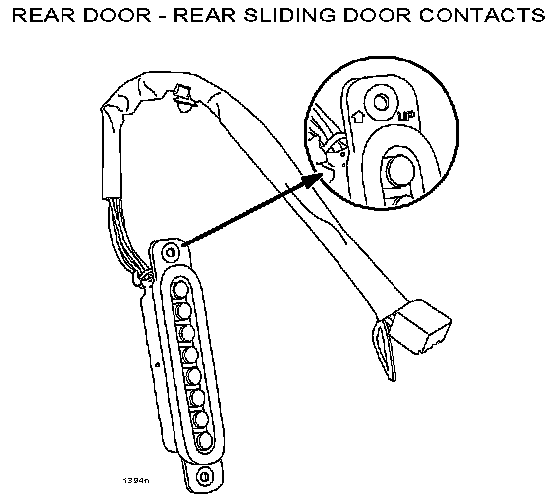
NOTE:
Be sure to install contacts with "UP" arrow pointing upward.
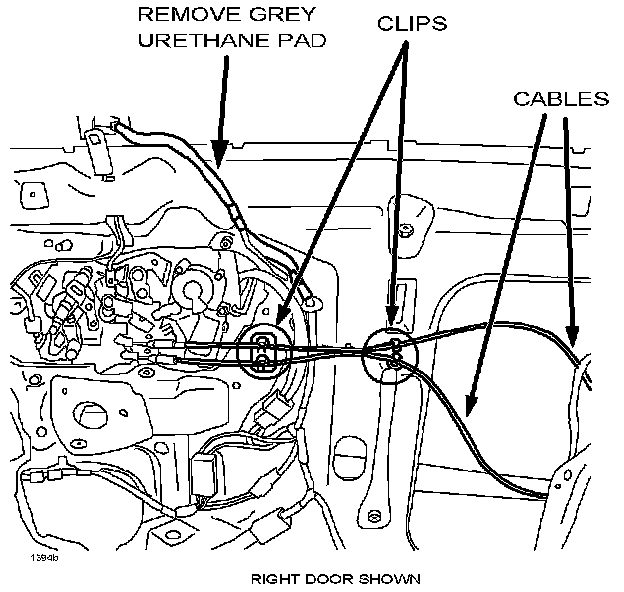
5. Disconnect cables from clips ("00-01" MPV = 2 clips, "02-06" MPV = 4 clips) on rear sliding door.
6. Remove grey urethane pad from upper door harness (remove as much material as possible).

7. Place harness protective tubes (A, B, C, & D) around each harness location shown.
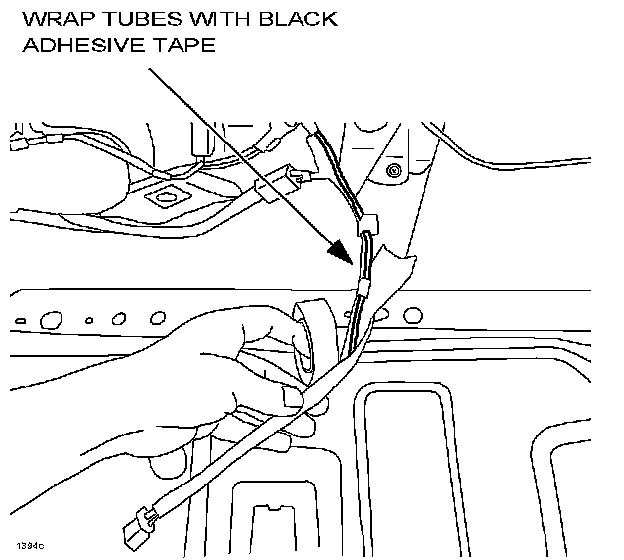
8. Wrap electrical tape around the entire length of each tube (A, B, C, & D).
NOTE:
Be sure to wrap tape around the junction points to prevent separation.

9. Install new grey urethane pad from kit around section "D" of door harness.
10. Snap previously removed cables back into clips.
11. Reconnect negative battery cable.
12. Confirm rear sliding door and power window operates properly.
13. Disconnect negative battery cable again.
14. Reinstall inner moisture screen onto rear sliding door.
15. Reinstall rear sliding door trim.
16. Repeat Steps 1-15 on other rear sliding door.
17. Reconnect negative battery cable.
18. Re-enter customers pre-set radio stations.