Initial Inspection and Diagnostic Overview
Inspection and VerificationNote:
^ If a new anti-lock brake system (ABS) module is installed, it must be configured. Follow the diagnostic tool directions.
1. Verify the customer concern.
2. Verify the stoplamps operate correctly by applying and releasing the brake pedal with the ignition switch in the OFF position. If the stoplamps do not operate correctly, see STOPLAMPS. If the stoplamps operate correctly, proceed to the next step.
3. Verify that the PRNDL operates correctly on the instrument cluster. If the PRNDL does not operate correctly, see INSTRUMENT CLUSTER. If the PRNDL operates correctly, proceed to the next step.
4. Visually inspect for obvious signs of mechanical and electrical damage.
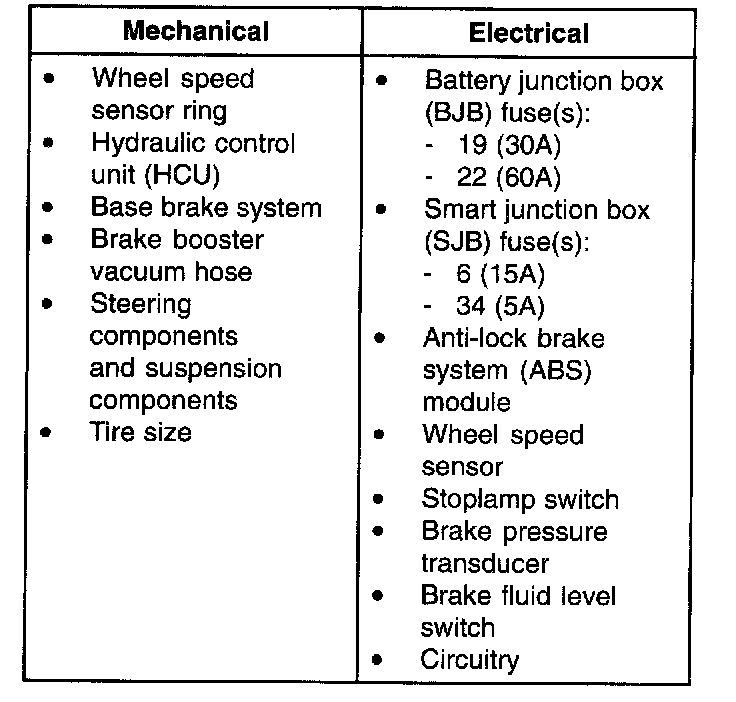
Visual Inspection Chart
5. If the cause is not visually evident, connect the diagnostic tool to the data link connector and select the vehicle to be tested from the diagnostic tool menu. If the diagnostic tool does not communicate with the vehicle:
^ check that the program card is correctly in stalled.
^ check the connections to the vehicle.
^ check the ignition switch position.
6. If the diagnostic tool still does not communicate with the vehicle, see the diagnostic tool operating manual.
7. Carry out the diagnostic tool data link test. If the diagnostic tool responds with:
^ CAN circuit fault; all electronic control units no response/not equipped, see COMMUNICATIONS NETWORK.
^ No response/not equipped for the ABS module, see PINPOINT TEST 1: NO COMMUNICATION WITH THE MODULE - ANTI-LOCK BRAKE CONTROL MODULE. Pinpoint Test 1
^ System passed, retrieve and record the continuous diagnostic trouble codes (DTCs), erase the continuous DTCs and carry out self-test diagnostics for the SJB.
8. If the DTCs retrieved are related to the concern, go to the Anti-Lock Brake System (ABS) Module Diagnostic Trouble Code (DTC) Index to continue diagnostics.
9. If no DTCs related to the concern are retrieved, see SYMPTOM TROUBLESHOOTING CHART - ABS. Symptom Index (Symptom Charts)