Clockspring Assembly / Spiral Cable: Service and Repair
AIR BAG SLIDING CONTACTRemoval
WARNING: Carry a live air bag module with the air bag and trim cover pointed away from your body. This will reduce the risk of injury in the event of an accidental deployment.
WARNING: Do not set a live air bag module down with the trim cover face down. This will reduce the risk of injury in the event of an accidental deployment.
WARNING: Air bag modules with discolored or damaged trim covers must be installed new, not repainted. Failure to follow these instructions may result in personal injury.
WARNING: Vehicle sensor orientation is critical for proper system operation. It a vehicle equipped with an air bag supplemental restraint system (SRS) is involved in a collision, inspect the sensor mounting bracket and wiring pigtail for deformation. Replace and properly position the sensor or any other damaged supplemental restraint system (SRS) components whether or not the air bag is deployed. Failure to follow these instructions may result in personal injury.
WARNING: The restraint system diagnostic tool is for restraint system repair only. Remove from vehicle prior to road use. Failure to remove could result in injury and possible violation of vehicle safety standards.
NOTE: Diagnostics or repairs are not to be performed on a side air bag system and/or a safety belt pretensioner (if equipped) system with the seats in the vehicle. Prior to attempting to diagnose/repair the side air bag system and/or a safety belt pre-tensioner (if equipped) system the seats must be removed from the vehicle and the restraint system diagnostic tools must be installed in the side air bag and the safety belt pretensioner (if equipped) connectors at the floor connectors. The restraint system diagnostic tools must be removed prior to operating the vehicle over the road.
NOTE: Diagnostics may be performed on seat systems other than the side air bag or the safety belt pretensioner (if equipped) system (lumbar, climate controlled, heated, power seat track) with the seat installed in the vehicle as long as the restraint system diagnostic tools are installed under the seats in the side air bag and safety belt pretensioner to floor connectors.
NOTE: After diagnosing/repairing a seat system the restraint system diagnostic tools must be removed before operating the vehicle over the road.
NOTE: Repair is made by installing a new part only. If the new part does not correct the condition, install the original part and perform the diagnostic procedure again.
All vehicles
1. Make sure the wheels are in the straight-ahead position.
2. Depower the system. See SUPPLEMENTAL RESTRAINT SYSTEM (SRS) DEPOWERING AND REPOWERING.
NOTE: Make sure to follow all steps and instructions in the steering wheel removal procedure.
3. Remove the steering wheel. See STEERING WHEEL.
Vehicles with tilt column
4. Position the steering column completely downward.
All vehicles
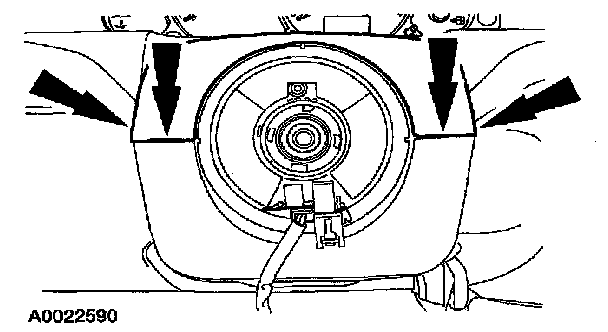
5. Push in where indicated, releasing the retaining tabs, and remove the upper steering column shroud.
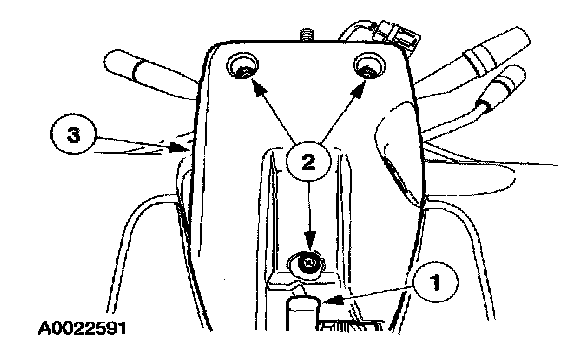
6. Remove the lower steering column shroud.
1. Release the tilt column locking lever, if equipped.
2. Remove the three screws.
NOTE: The steering column must be in the raised position, with the tilt column lever released (if equipped), to remove the lower steering column shroud.
3. Remove the lower steering column shroud.
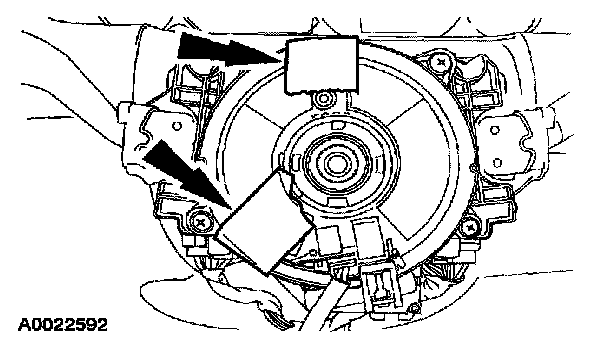
7. Apply two strips of masking tape across the air bag sliding contact to prevent accidental rotation when the air bag sliding contact is removed.
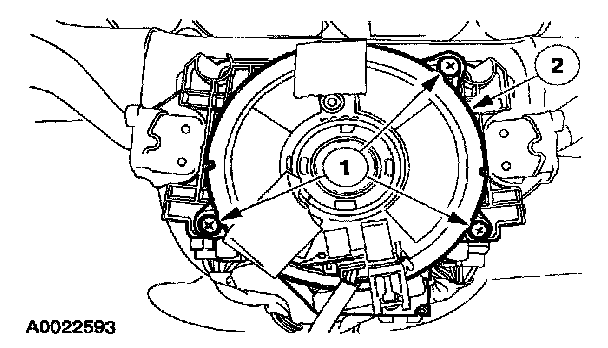
8. Separate the air bag sliding contact from the steering column.
1. Remove the screws.
2. Pull out and separate the air bag sliding contact from the steering column.
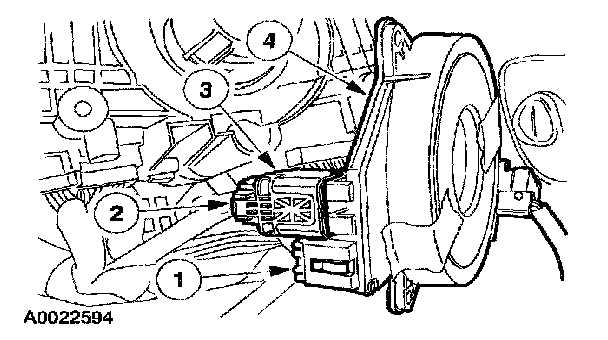
9. Remove the air bag sliding contact.
1. Disconnect the accessory electrical connector.
2. Push to release the air bag sliding contact electrical connector locking clip.
3. With the air bag sliding contact electrical connector locking clip in the released position, pull and disconnect the air bag sliding contact electrical connector.
4. Remove the air bag sliding contact.
Installation
WARNING: Carry a live air bag module with the air bag and trim cover pointed away from your body. This will reduce the risk of injury in the event of an accidental deployment.
WARNING: Do not set a live air bag module down with the trim cover face down. This will reduce the risk of injury in the event of an accidental deployment.
WARNING: Air bag modules with discolored or damaged trim covers must be installed new, not repainted. Failure to follow these instructions may result in personal injury.
WARNING: Vehicle sensor orientation is critical for proper system operation. If a vehicle equipped with an air bag supplemental restraint system (SRS) is involved in a collision, inspect the sensor mounting bracket and wiring pigtail for deformation. Replace and properly position the sensor or any other damaged supplemental restraint system (SRS) components whether or not the air bag is deployed. Failure to follow these instructions may result in personal injury.
WARNING: The restraint system diagnostic tool is for restraint system repair only. Remove from vehicle prior to road use. Failure to remove could result in injury and possible violation of vehicle safety standards.
NOTE: Diagnostics or repairs are not to be performed on a side air bag system and/or a safety belt pretensioner (if equipped) system with the seats in the vehicle. Prior to attempting to diagnose/repair the side air bag system and/or a safety belt pre-tensioner (if equipped) system the seats must be removed from the vehicle and the restraint system diagnostic tools must be installed in the side air bag and the safety belt pretensioner (if equipped) connectors at the floor connectors. The restraint system diagnostic tools must be removed prior to operating the vehicle over the road.
NOTE: Diagnostics may be performed on seat systems other than the side air bag or the safety belt pretensioner (if equipped) system (lumbar, climate controlled, heated, power seat track) with the seat installed in the vehicle as long as the restraint system diagnostic tools are installed under the seats in the side air bag and safety belt pretensioner to floor connectors.
NOTE: After diagnosing/repairing a seat system the restraint system diagnostic tools must be removed before operating the vehicle over the road.
NOTE: Repair is made by installing a new part only. If the new part does not correct the condition, install the original part and perform the diagnostic procedure again.
All vehicles
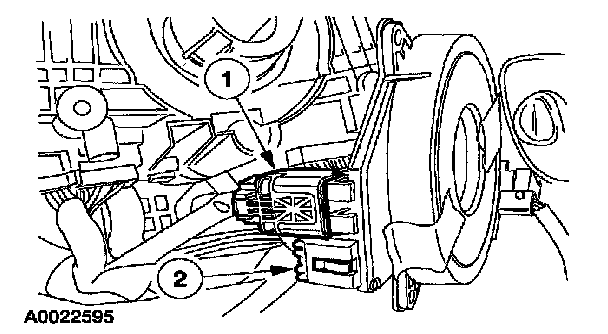
1. Connect the air bag sliding contact electrical connector.
1. Connect the air bag sliding contact electrical connector.
2. Connect the accessory electrical connector.
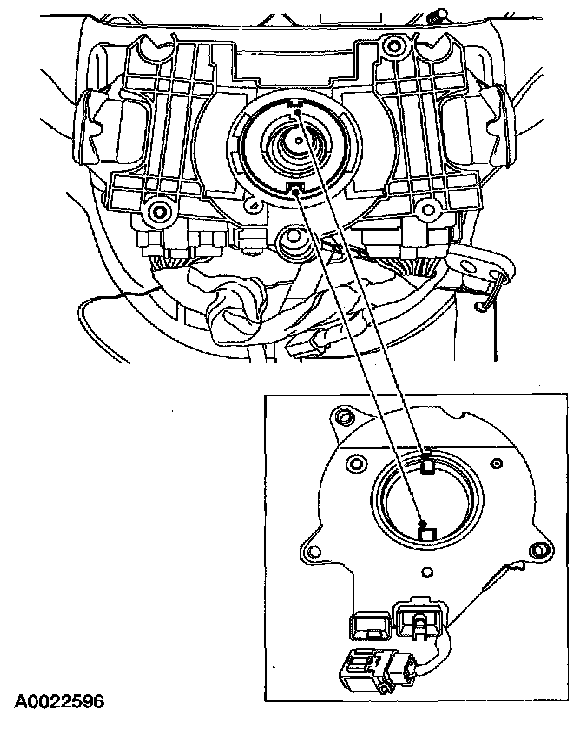
NOTE: The air bag sliding contact is shown from the back for clarity.
2. Align the air bag sliding contact for installation.
1. Align the large slot to the large tab in the air bag sliding contact.
2. Align the small slot to the small tab in the air bag sliding contact.
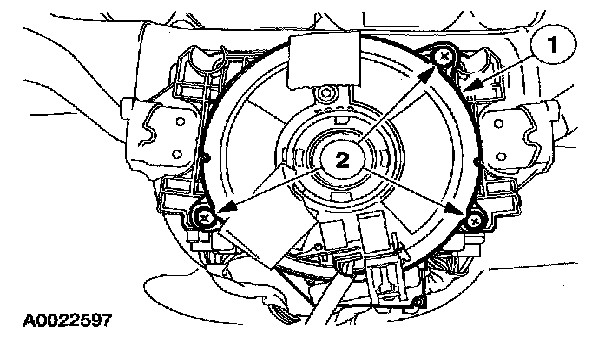
3. Install the air bag sliding contact.
1. With the slots and tabs aligned, slide the air bag sliding contact over the steering column.
2. With the air bag sliding contact sitting flush against the multi-function switch, install the screws.
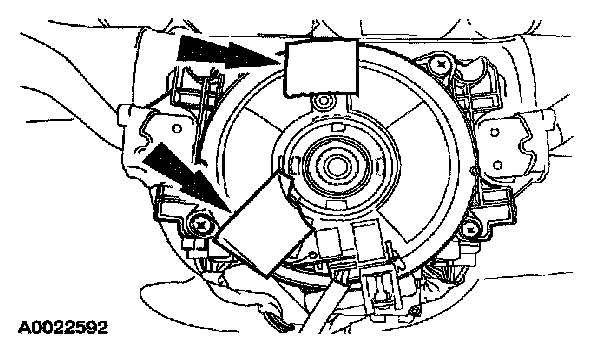
4. If reusing the same air bag sliding contact, remove the masking tape.
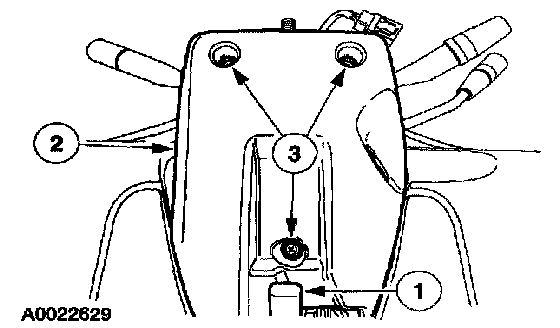
5. Install the lower steering column shroud.
1. Release the tilt column locking lever, if equipped.
NOTE: The steering column must be in the raised position, with the tilt column lever released (if equipped), to install the lower steering column shroud.
2. Position the lower steering column shroud to the steering column.
3. Install the three screws.
Vehicles with tilt column
6. Position the steering column completely downward.
All vehicles
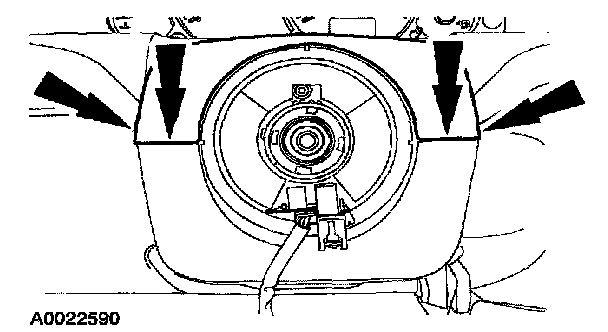
7. Position the upper steering column shroud to the steering column and completely engage the retaining tabs.
1. Make sure the upper steering column shroud is aligned correctly and the retaining tabs are completely engaged.
NOTE: Make sure to follow all steps and instructions in the installation of the steering wheel.
8. Install the steering wheel.
WARNING: The restraint system diagnostic tool is for restraint system repair only. Remove from vehicle prior to road use. Failure to remove could result in injury and possible violation of vehicle safety standards.
9. Depower the system. See SUPPLEMENTAL RESTRAINT SYSTEM (SRS) DEPOWERING AND REPOWERING.