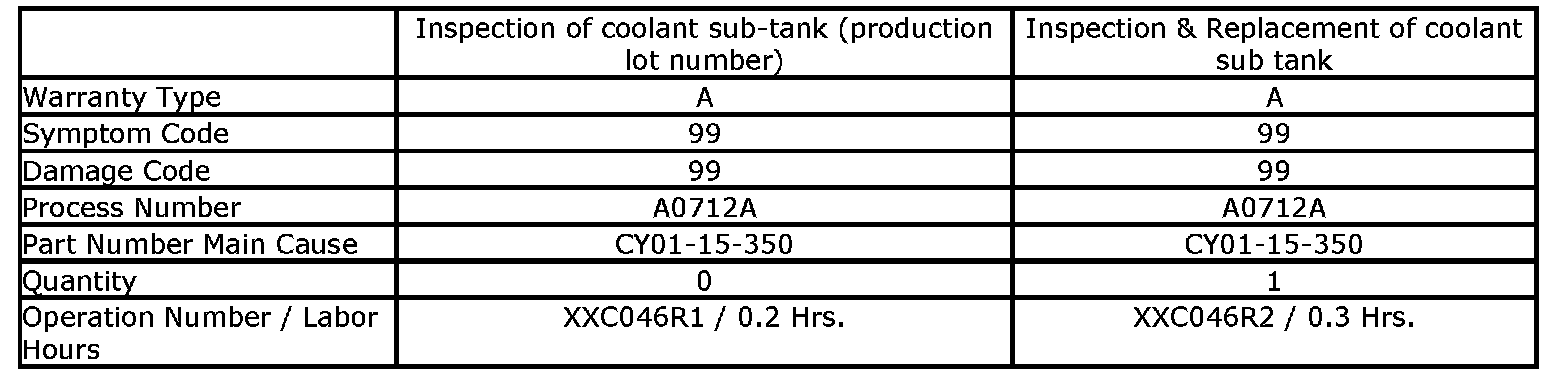
Campaign MSP15 - Coolant Sub-Tank Replacement
TSB: 01-036/072007 CX-9 - MAZDA SERVICE PROGRAM (MSP15) - COOLANT SUB-TANK REPLACEMENT
BULLETIN NOTE
This bulletin supersedes the previous bulletin 01-036/07, issued on 8/21/2007. The REPAIR PROCEDURE has been revised.
APPLICABLE MODEL(S)/VINS
2007 CX-9 vehicles with VIN JM3 TB**** 70 100670 111419
(built from November 22, 2006 through February 2, 2007)
DESCRIPTION
It is possible that coolant may leak from around the coolant sub-tank inlet pipe or sub-tank filler neck.
NOTE:
^ THIS PROGRAM WILL BE IN EFFECT UNTIL AUGUST 21, 2008 REGARDLESS OF MILEAGE.
^ UNDER THE MAZDA SERVICE PROGRAM (MSP15), ALL CURRENT DEALER INVENTORY AND RETAILED VEHICLES FOUND TO BE WITHIN THE ABOVE VIN RANGES, AND PRODUCED BETWEEN NOV. 22, 2006 THROUGH FEB. 2, 2007, MUST BE INSPECTED AND REPAIRED ACCORDING TO THE INSTRUCTIONS CONTAINED IN THIS SERVICE BULLETIN.
^ BEFORE PERFORMING ANY REPAIR, VALIDATE THAT THE VEHICLE IS APPLICABLE TO THIS PROGRAM BY PERFORMING AN "eMDCS WARRANTY VEHICLE INQUIRY" AND VERIFYING THE VEHICLE DISPLAYS CAMPAIGN "MSP15" AND ITS CAMPAIGN STATUS DISPLAYS "OPEN". THIS IS IMPORTANT, AS SOME VEHICLES HAVE ALREADY BEEN REPAIRED AT THE PORTS. SEE "VEHICLE INSPECTION PROCEDURE" BELOW.
NOTE:
^ The coolant sub-tank may also be referred to as the reserve tank or sub-radiator tank.
DEALER INVENTORY:
Inspect and repair if necessary, all applicable vehicles currently in dealer inventory according to the procedures contained in this service bulletin.
RETAIL VEHICLES:
When an applicable retail vehicle is brought into the dealer for any type of repair or scheduled maintenance, perform an eMDCS Warranty Vehicle Inspection and check the status of MSP15. If the status of MSP15 is "OPEN" inspect and repair if necessary, the vehicle according to the procedures contained in this service bulletin.
VEHICLE INSPECTION PROCEDURE
1. Verify that the vehicle is within the following ranges:
^ 2007 CX-9 VIN Range: (JM3 TB**** 70 100670 - 111419)
^ If the vehicle is within the above range, proceed to step 2.
^ If the vehicle is not within the above range, return the vehicle to the customer or inventory.
2. Perform a Warranty Vehicle Inquiry using your eMDCS System and inspect vehicle for a Campaign Label MSP15 attached to the vehicle's hood or bulkhead. Refer to eMDCS System - Warranty Vehicle Inquiry Results table below. This is important, as some vehicles have already been repaired at the ports.
NOTE:
Verify MSP number as the vehicle may have multiple MSPs.
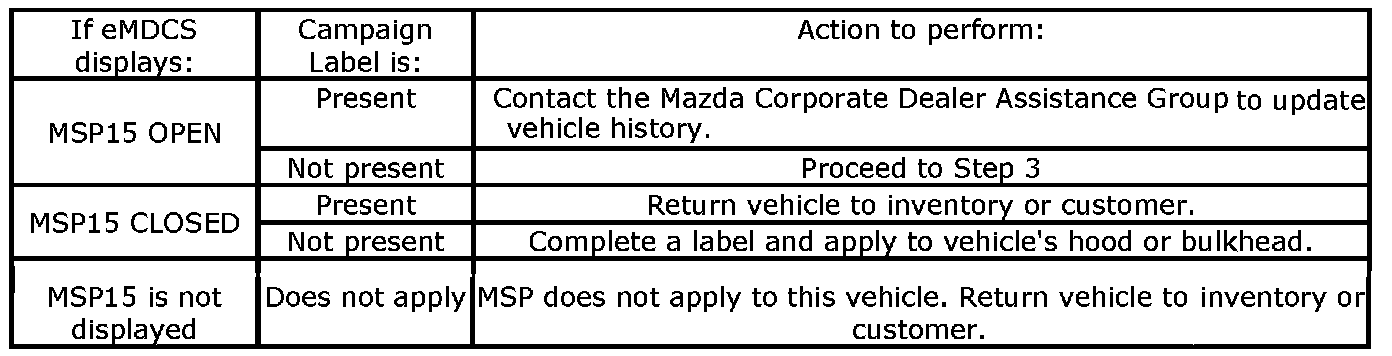
eMDCS System - Warranty Vehicle Inquiry Results
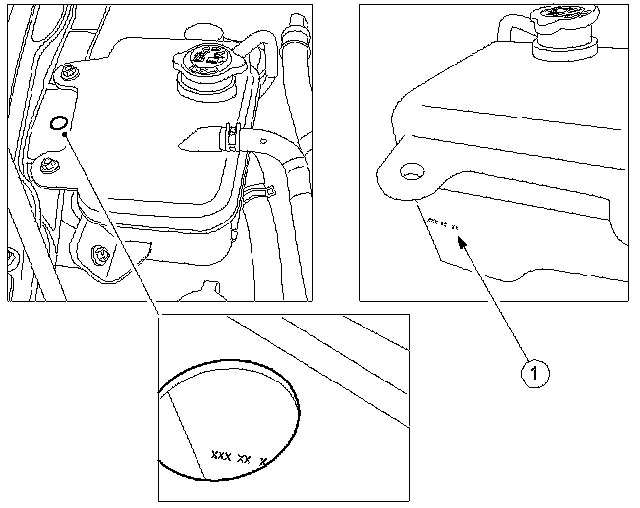
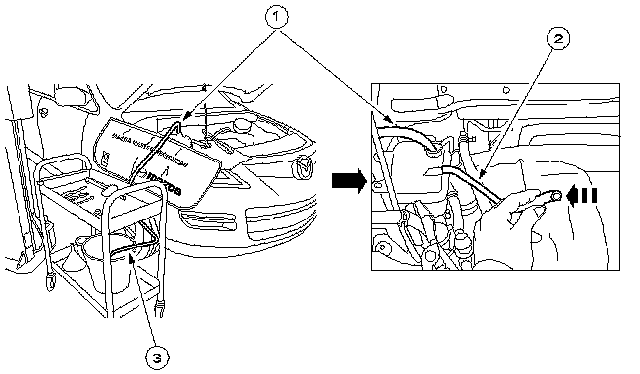
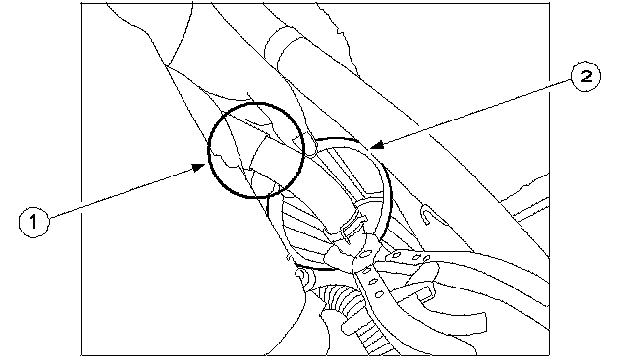
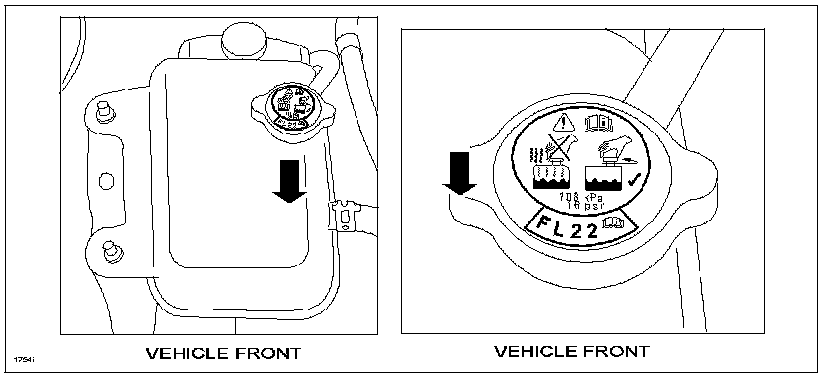
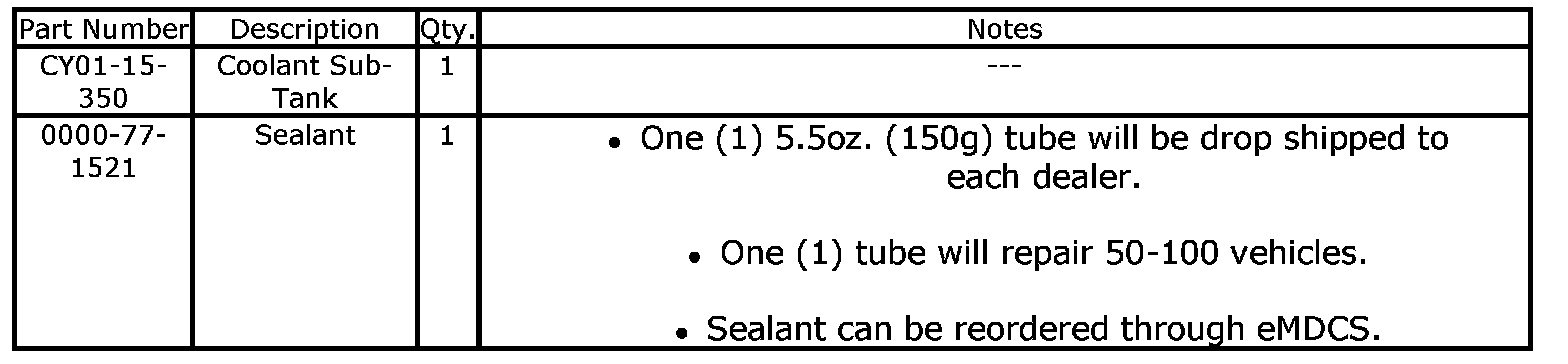
3. Identify the coolant sub-tank lot number (1).
^ Verify the lot number (1) of the coolant sub-tank by looking through the hole in the vehicle body in the proper direction as shown.
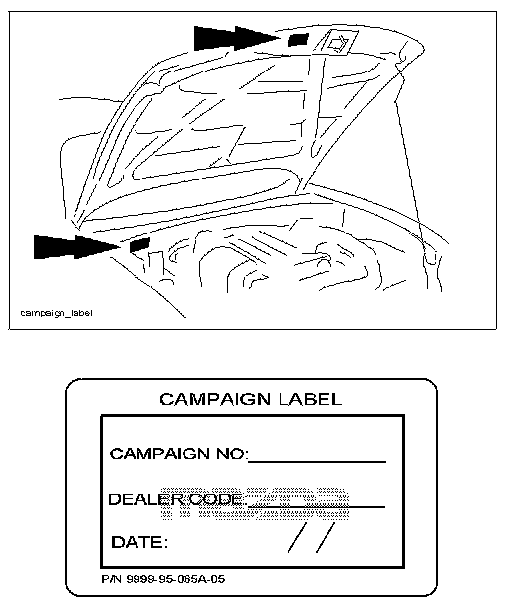
^ If the coolant sub-tank lot number is listed below, proceed to "REPAIR PROCEDURE".
^ If the coolant sub-tank lot number is not listed below, submit a warranty claim for "Inspection of coolant sub-tank" using the warranty information supplied. This will change the vehicle's MSP15 status to "CLOSED" in eMDCS. Complete a label and apply to vehicle's hood or bulkhead.
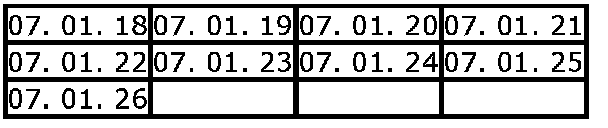
Coolant Sub-Tank Lot Numbers
REPAIR PROCEDURE
WARNING:
^ Ensure engine is cool before proceeding to prevent serious burn injuries.
NOTE:
^ Follow all EPA regulations for handling and disposal of coolant.
^ Place a fender cover on the passenger side fender to prevent damage.
1. With a marker pen, mark an "X" on original sub-tank (this indicates the part is original and will be scrapped).
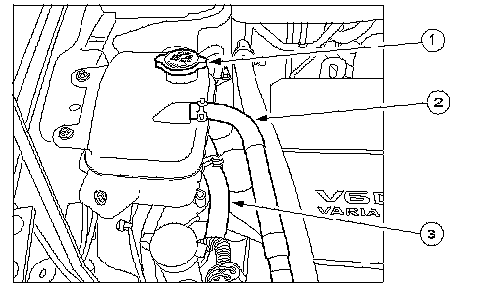
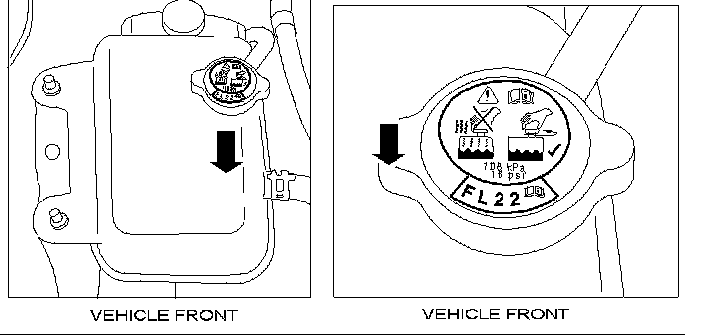
2. Loosen the cap (1) of the coolant sub-tank to release pressure in the tank. After pressure is released, remove the cap.
NOTE:
The cap has a double lock.
3. Using a hose pinch tool (or equivalent), pinch the return hose (2) to prevent coolant from leaking during repairs.

4. Remove the return hose clamp and return hose (2) from the coolant sub-tank.
5. Place a 1 ft. long hose onto the sub-tank return hose fitting (2).
6. Insert a 6 ft. long hose into sub-tank cap opening (1) at the lowest level in the sub-tank. Insert other end of hose into a drain bucket.
7. Place a cloth around the hose inserted into the sub-tank cap opening to form a seal at the top of the sub-tank.
8. Blow through the open end of the 1 ft. long hose to start a siphon (1). Once siphon starts, allow coolant in sub-tank to drain into as much as possible into the drain bucket.
9. After draining as much coolant as possible, remove both hoses installed in steps 5 and 6.
10. Using a hose pinch tool (or equivalent), pinch the inlet hose (3) to prevent coolant from leaking during repairs.
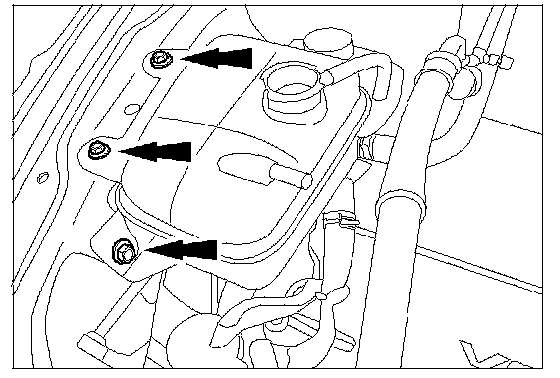
11. Remove the three 10 mm bolts attaching the coolant sub-tank to the vehicle.
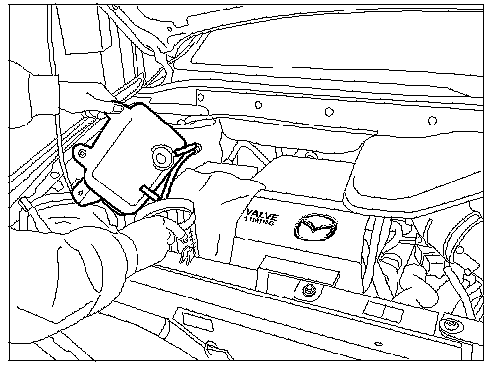
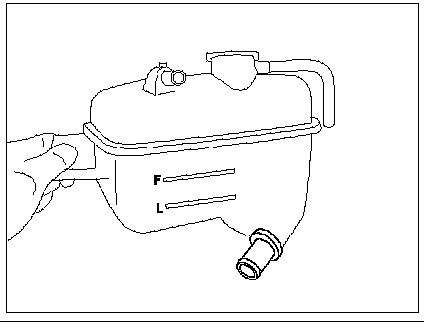
12. Raise the sub tank and drain the remaining coolant into a small container as shown.
13. Using a hose pinch tool (or equivalent), pinch the return hose to prevent coolant from leaking during repairs.
NOTE:
^ If coolant remains in the sub-tank, place the small container (2) under the inlet joint (1) as shown and proceed to next step.
14. Slowly remove the inlet hose from coolant sub-tank.
15. Remove the coolant sub-tank marked with an "X" from the vehicle and set aside. It WILL NOT be reused.
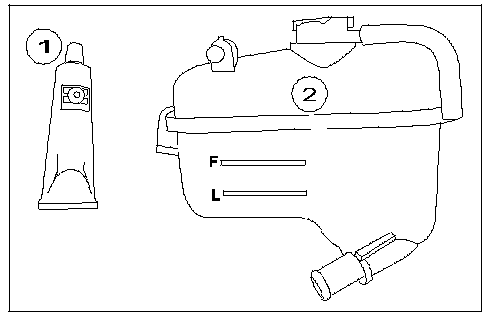
^ (1) - Sealant (Threebond Synthetic Adhesive - 0000-77-1521)
^ (2) - New Coolant Sub-Tank (CY01-15-350)
16. Wipe the inside of the inlet hose to remove any coolant.
17. On the NEW coolant sub-tank, find the parting lines (2, 3) on the pipe for the guide of sealer (1) application.
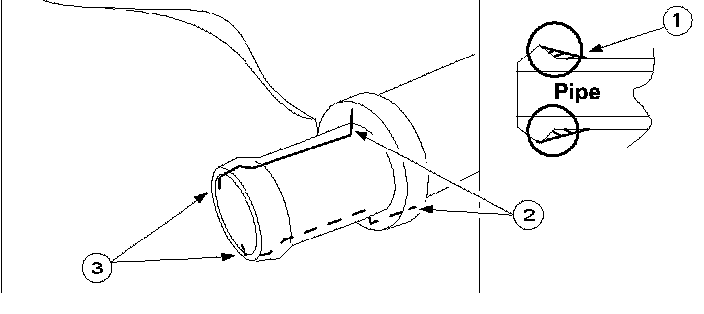
18. Apply the rubber sealer along the inner curve of the pipe.
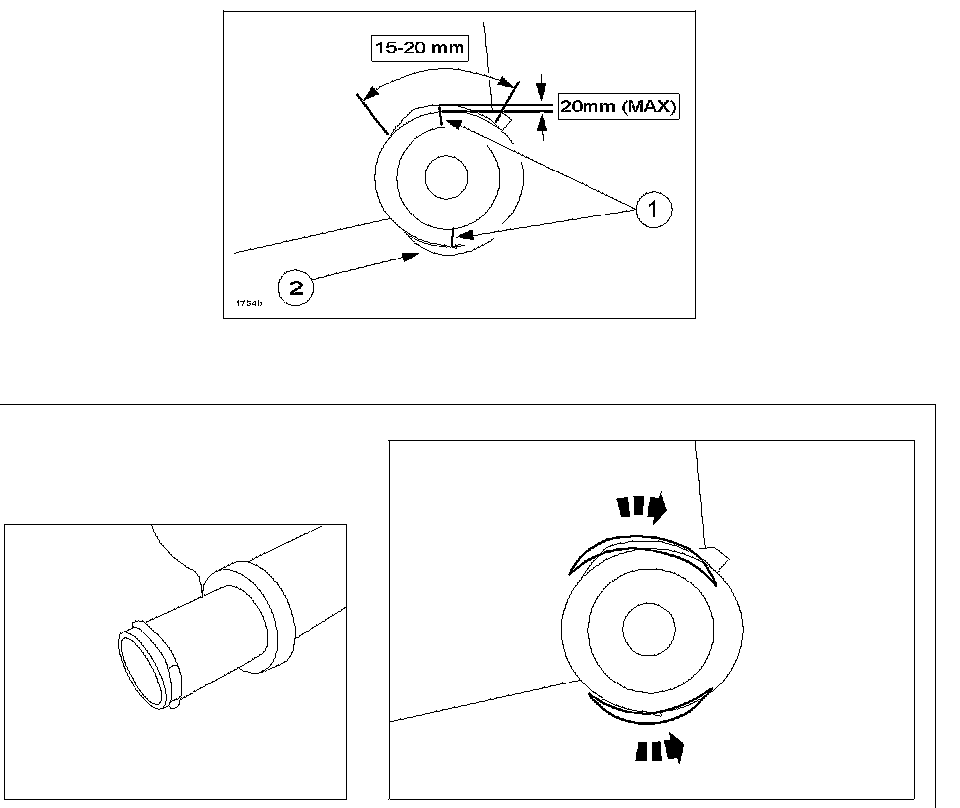
NOTE:
^ Identify the parting lines on the pipe (1).
^ Before applying the sealer, ensure the area for rubber sealer application is clean and dry and is not contaminated with coolant.
^ Apply the sealer to the pipe 1/2 - 3/4" (15-20 mm) long and approximately 3/16" (2 mm) thick along the circumference of the pipe (both upper and lower) in the direction indicated by the arrows.
19. Attach the inlet hose to the sub-tank pipe immediately after sealant application and install the NEW coolant sub-tank to the vehicle. Install the 3 bolts and tighten to specification.
Tightening Torque: 78-112 in-lb. (8.8-12.7 Nm)
20. Wipe off any excess sealant from the inlet hose pipe area.
21. Reconnect the return hose and remove both hose pinch tools from the inlet and return hoses.
22. Pour the drained coolant from the bucket back into the coolant sub-tank. Ensure sub-tank coolant level is slightly above the full mark. Install the coolant sub-tank cap.
23. Start and run the vehicle until operating temperature is reached. Check for coolant leaks from coolant sub-tank inlet hose and pipe connection.
24. Turn off vehicle after reaching operating temperature.
WARNING:
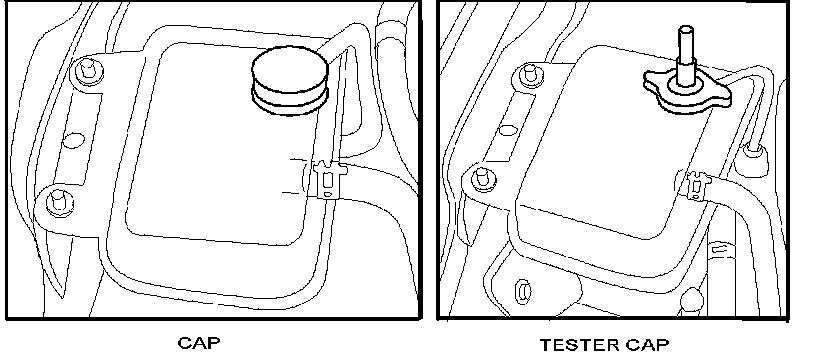
^ Allow engine to cool to prevent injury when removing the coolant sub-tank cap to prevent serious burn injuries.
25. Remove the coolant sub-tank cap and install the pressure tester cap.
NOTE:
^ Press down on the pressure tester cap while turning during installation.
26. Connect the pressure tester and apply approximately 120 kpa (17.4 psi) for 1 minute.
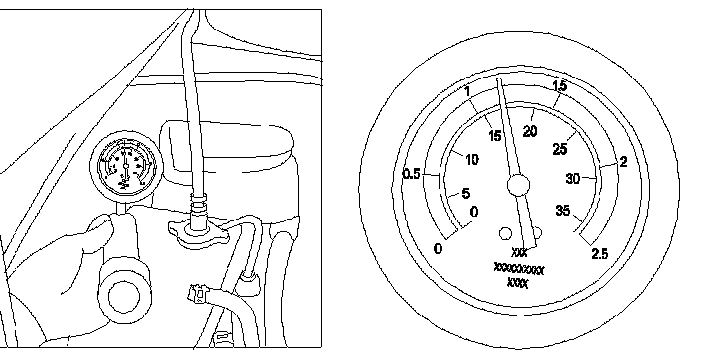
27. While holding pressure, check for coolant leaks at the inlet hose connection. Move the inlet hose around while checking for leaks.
^ If inlet hose is leaking at the coolant sub-tank pipe, carefully release pressure from the tester cap and remove tester from tank. Return to STEP 2 and apply more sealant to the pipe.
^ In no leaks are found, go to next step.
28. After checking for the leaks, loosen the tester cap to release pressure. After pressure is released, remove the tester cap.
29. Ensure sub-tank coolant level is slightly above the full mark. Install the coolant sub-tank cap.

30. Fill out a blue "Campaign Label" (9999-95-065A-05) with the Campaign No: "MSP15", your dealer code, today's date, and affix it to the vehicle's hood.
31. Return the vehicle to the customer.
PART(S) INFORMATION
WARRANTY INFORMATION
NOTE:
^ This warranty information applies only to vehicles where MSP15 status is "OPEN" in eMDCS Warranty Vehicle Inquiry.
^ Repairs performed outside the 36 month/36,000 mile New Vehicle Limited Warranty will require DCSM or DSA authorization.
^ Additional diagnostic time cannot be claimed for this repair.

Disclaimer