Oil Pan: Service and Repair
OIL PAN - 2.3L REMOVAL/INSTALLATIONRemoval
All Vehicles
1. With the vehicle in NEUTRAL, position it on a hoist.
2. Remove the air cleaner outlet pipe.
3. Loosen the 2 top bellhousing-to-engine bolts 5 mm (0.19 in).
Caution
^ To prevent damage to the transmission, do not loosen the transaxle-to-engine bolts more than 5 mm (0.19 in).
All Wheel Drive (AWD) Vehicles
4. Working from the top of the vehicle, loosen the 2 rear lower engine-to-bellhousing bolts 5 mm (0.19 in).
5. Working from under the vehicle, loosen the 2 upper engine bracket-to-power transfer unit (PTU) bolts 5 mm (0.19 in).
All Vehicles

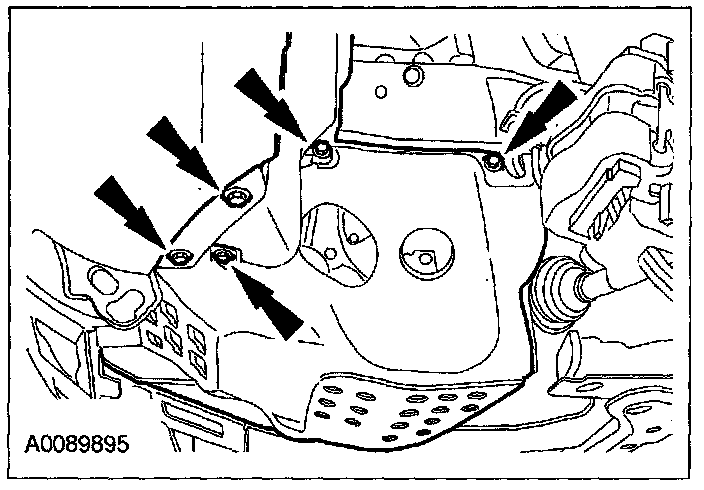
6. Remove the 7 retainers and the LH splash shield.
7. Remove the oil level indicator and tube.
8. Loosen the 2 front lower bellhousing-to-engine bolts 5 mm (0.19 in).
Front Wheel Drive (FWD) Vehicles
9. Loosen the 1 (manual transaxle) and 2 (automatic transaxle) rear lower engine-to-bellhousing bolt 5 mm (0.19 in).
All Vehicles
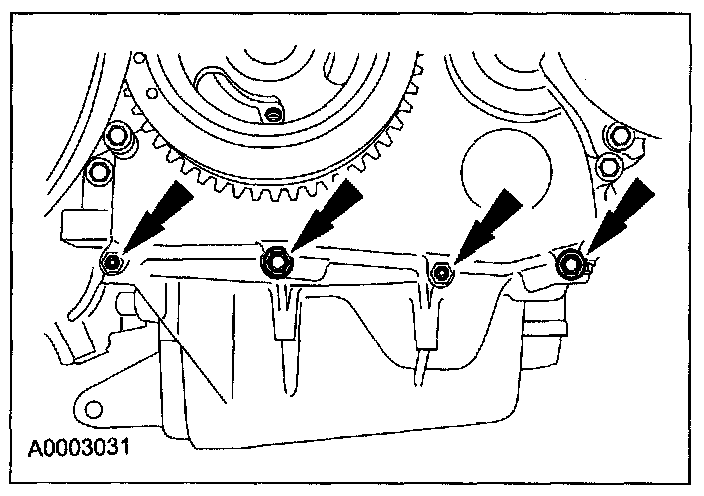
10. Remove the 2 oil pan-to-bellhousing bolts.
11. Remove the 2 bell housing-to-oil pan bolts.
12. Slide the transmission rearward 5 mm (0.19 in).
13. Drain the engine oil.
^ Install the drain plug.
^ To install, tighten to 28 N-m (2.8 kgf-m, 21 ft-lbf).
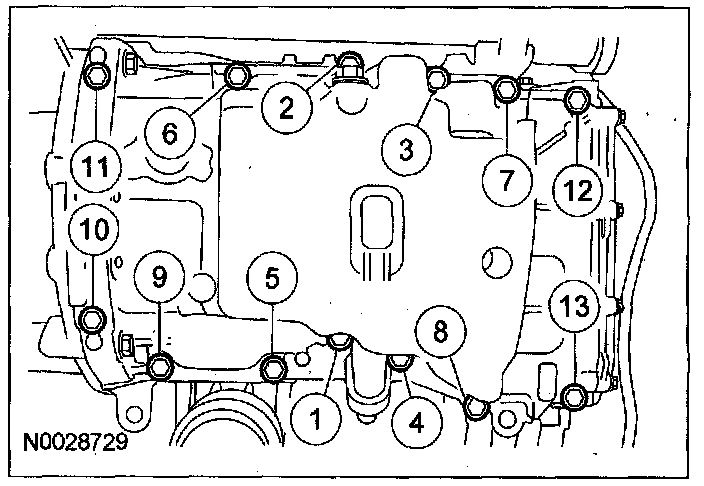
14. Remove the 13 bolts and the oil pan.
Installation
All Vehicles
1. Clean and inspect the mounting faces of both the oil pan and the cylinder block with Metal Surface Cleaner. Both surfaces must be flat, clean and dry.
Caution
^ Do not use metal scrapers, wire brushes or power abrasive discs or other abrasive means to clean the sealing surfaces. These tools cause scratches and gouges, which make leak paths. Use a plastic scraping tool to remove traces of sealant.
2. Apply a 2.5 mm (0.098 inch) bead of silicone gasket and sealant to the oil pan-to-engine block and to the oil pan-to-engine front cover mating surface.
Note
^ If the oil pan is not secured within 10 minutes of sealant application, the sealant must be removed and the sealant area cleaned with metal surface cleaner. Allow to dry until there is no sign of wetness, or 10 minutes, whichever is longer. Failure to follow this procedure can cause future oil leakage.
3. Position the oil pan onto the engine and install the oil pan bolts finger-tight.
4. Install the 4 engine front cover-to-oil pan bolts.
^ Tighten to 10 N-m (1.0 kgf-m, 89 in-lbf).
Caution
^ The engine front cover-to-oil pan bolts must be tightened first to align the front surface of the oil pan flush with the front surface of the engine block.
5. Tighten the oil pan bolts in the sequence shown.
^ Tighten to 10 N-m (1.0 kgf-m, 89 in-lbf).
FWD Vehicles
6. Alternate tightening the front and rear lower bolts to slide the transaxle and engine together.
^ Tighten to 48 N-m (4.9 kgf-m, 35 ft-lbf).
7. Tighten the remaining front lower bolt and rear lower bolt (automatic transaxle).
^ Tighten to 48 N-m (4.9 kgf-m, 35 ft-lbf).
AWD Vehicles
8. Alternate tightening the upper engine-to-PTU bracket bolt and the front lower bolts to slide the transaxle and engine together.
^ Tighten the PTU bracket bolt to 45 N-m (4.5 kgf-m, 33 ft-lbf).
^ Tighten the front lower bolt to 48 N-m (4.9 kgf-m, 35 ft-lbf).
9. Tighten the remaining upper engine-to-PTU bracket bolt.
^ Tighten to 45 N-m (4.5 kgf-m, 33 ft-lbf).
10. Tighten the remaining front lower bolt.
^ Tighten to 48 N-m (4.9 kgf-m, 35 ft-lbf).
All Vehicles
11. Install the 2 bellhousing-to-oil pan bolts.
^ Tighten to 48 N-m (4.9 kgf-m, 35 ft-lbf).
12. Install the 2 oil pan-to-bellhousing bolts.
^ Tighten to 48 N-m (4.9 kgf-m, 35 ft-lbf).
13. Install the oil level indicator and tube.
14. Install the LH splash shield and the 7 retainers.
^ Tighten to 9 N-m (0.9 kgf-m, 80 in-lbf).
AWD Vehicles
15. Working from the top of vehicle, tighten the 2 rear lower engine-to-bellhousing bolts.
^ Tighten to 48 N-m (4.9 kgf-m, 35 ft-lbf).
All Vehicles
16. Tighten the top 2 bellhousing-to-engine bolts.
^ Tighten to 48 N-m (4.9 kgf-m, 35 ft-lbf).
17. Install the air cleaner outlet pipe.
18. Fill the engine with clean oil.