 |
absggw00001784
SEAT BELT REMOVAL/INSTALLATION
id081100804500
Regular Cab (Driver-side and passenger-side)
1. Turn the engine switch to the LOCK position. (vehicle with pre-tensioner seat belt)
2. Disconnect the negative battery cable and wait for 1 min or more. (vehicle with pre-tensioner seat belt) (See BATTERY REMOVAL/INSTALLATION [WLT-1, WLT-2, WL-3, WL-C, WE-C].)
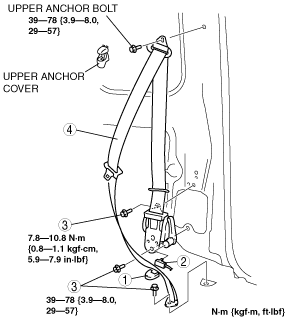
3. Remove the anchor cover.
absggw00001784
|
|
1
|
Connector (vehicle with pre-tensioner seat belt)
(See Connector removal note.)
|
|
2
|
Bolt
|
|
3
|
Seat belt
|
4. Remove the upper anchor bolt.
5. Remove the B-pillar trim. (See B-PILLAR TRIM REMOVAL/INSTALLATION.)
6. Remove in the order indicated in the table.
7. Install in the reverse order of removal.
8. Turn the engine switch to the ON position. (vehicle with pre-tensioner seat belt)
9. Verify that the air bag system warning light illuminates for approx. 6 s and goes out. (vehicle with pre-tensioner seat belt)
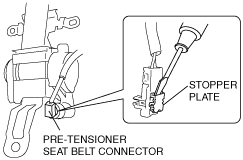
Connector removal note
1. Using a screwdriver, pry out the pre-tensioner seat belt connector stopper plate.
absggw00001785
|
Regular Cab (center)
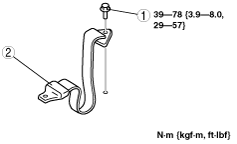
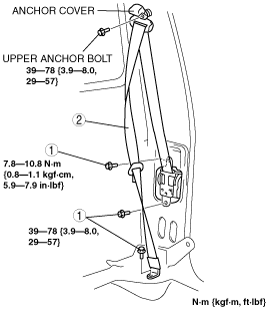
1. Remove in the order indicated in the table.
absggw00001786
|
|
1
|
Bolt
|
|
2
|
Center seat belt
|
2. Install in the reverse order of removal.
Freestyle Cab
1. Turn the engine switch to the LOCK position. (vehicle with pre-tensioner seat belt)
2. Disconnect the negative battery cable and wait for 1 min or more. (vehicle with pre-tensioner seat belt) (See BATTERY REMOVAL/INSTALLATION [WLT-1, WLT-2, WL-3, WL-C, WE-C].)
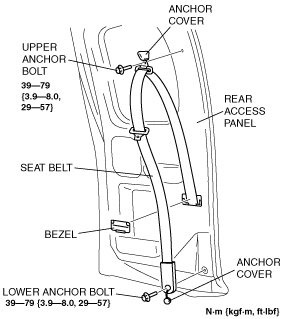
3. Remove the bezel.
absggw00001787
|
4. Remove the anchor cover.
5. Remove the upper anchor bolt and lower anchor bolt.
6. Remove the rear access panel trim. (See REAR ACCESS PANEL TRIM REMOVAL/INSTALLATION.)
7. Remove the seat belt through the seat belt hole.
8. Using a screwdriver, pry out the pre-tensioner seat belt connector stopper plate. (vehicle with pre-tensioner seat belt)
absggw00001785
|
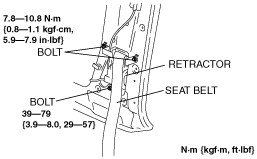
9. Remove the bolts from the retractor.
10. Remove the retractor.
absggw00001788
|
11. Install in the reverse order of removal.
Double Cab
Front
1. Turn the engine switch to the LOCK position. (vehicle with pre-tensioner seat belt)
2. Disconnect the negative battery cable and wait for 1 min or more. (vehicle with pre-tensioner seat belt) (See BATTERY REMOVAL/INSTALLATION [WLT-1, WLT-2, WL-3, WL-C, WE-C].)
3. Remove the following parts:
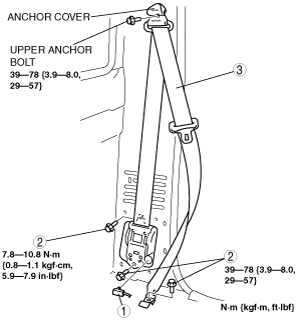
4. Remove in the order indicated in the table.
absggw00001789
|
|
1
|
Lower anchor cover
|
|
2
|
Connector (vehicle with pre-tensioner seat belt)
(See Connector removal note.)
|
|
3
|
Bolt
|
|
4
|
Seat belt
|
5. Install in the reverse order of removal.
6. Turn the engine switch to the ON position. (vehicle with pre-tensioner seat belt)
7. Verify that the air bag system warning light illuminates for approx. 6 s and goes out. (vehicle with pre-tensioner seat belt)
Connector removal note
1. Using a screwdriver, pry out the pre-tensioner seat belt connector stopper plate.
absggw00001785
|
Rear
1. Remove the following parts:
2. Remove in the order indicated in the table.
absggw00001790
|
|
1
|
Bolt
|
|
2
|
Seat belt
|
3. Install in the reverse order of removal.