1. Component views
Hydraulic power steering unit
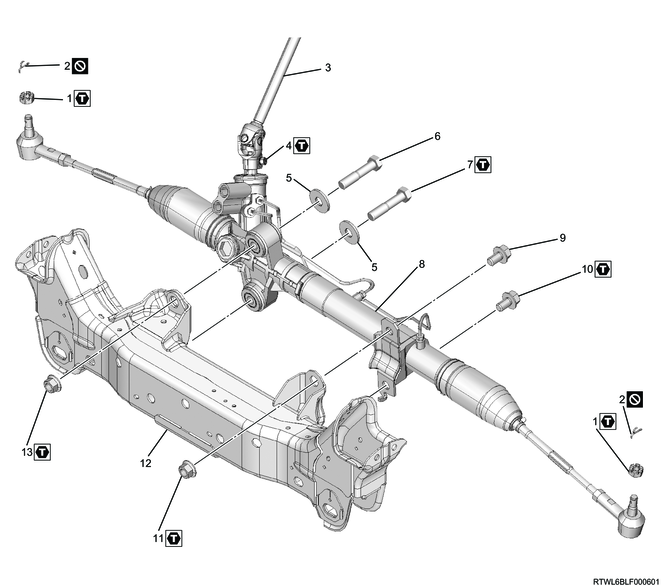
Part name
- Castle nut
- Cotter pin
- Steering shaft
- Bolt
- Washer
- Bolt
- Bolt
- Power steering unit
- Bolt
- Bolt
- Nut
- Cross member
- Nut
Tightening torque
1: 98 N・m { 10.0 kgf・m / 72 lb・ft }
4: 31 N・m { 3.2 kgf・m / 23 lb・ft }
7: 220 N・m { 22.4 kgf・m / 162 lb・ft }
10: 220 N・m { 22.4 kgf・m / 162 lb・ft }
11: 220 N・m { 22.4 kgf・m / 162 lb・ft }
13: 220 N・m { 22.4 kgf・m / 162 lb・ft }
Electric power steering unit
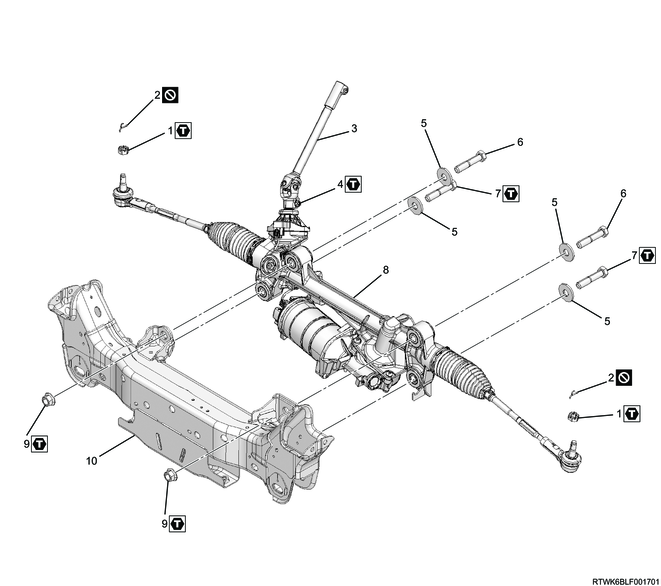
Part name
- Castle nut
- Cotter pin
- Steering shaft
- Bolt
- Washer
- Bolt
- Bolt
- Power steering unit
- Nut
- Cross member
Tightening torque
1: 98 N・m { 10.0 kgf・m / 72 lb・ft }
4: 31 N・m { 3.2 kgf・m / 23 lb・ft }
7: 220 N・m { 22.4 kgf・m / 162 lb・ft }
9: 220 N・m { 22.4 kgf・m / 162 lb・ft }
2. Power steering unit installation
1) Install the power steering unit to the cross member.
2) Temporarily tighten the mounting bolt.
Note
- Tighten in the order shown in the diagram.

3) Final tighten the mounting bolt.
Tightening torque: 220 N・m { 22.4 kgf・m / 162 lb・ft }
Note
- Tighten in the order shown in the diagram.
4) For models with electric power steering, connect the connector to the electric power steering.
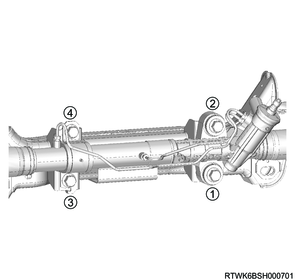
3. Steering shaft installation
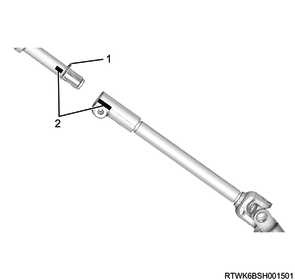
1) Install the lower second steering shaft to the second steering shaft according to the alignment marks placed during removal.
Tightening torque: 31 N・m { 3.2 kgf・m / 23 lb・ft }
Caution
- Install while it makes contact with the yoke.
- Tighten the bolt by hand until seated and final tighten.
- Tighten the tire while it is in contact with the ground.
Legend
- Yoke
- Alignment mark
2) Connect the universal joint to the power steering unit according to the alignment marks placed during removal.
Tightening torque: 31 N・m { 3.2 kgf・m / 23 lb・ft }
4. Power steering unit connect
1) Connect the tie rod end to the knuckle.
2) Install the castle nut to the ball joint.
Tightening torque: 98 N・m { 10.0 kgf・m / 72 lb・ft }
3) Install the cotter pin to the ball joint.
Caution
- Do not reuse the cotter pin.
5. Power steering fluid filling
1. Models with hydraulic power steering units
1) Referring to the following, add the power steering fluid.
Refer to "6.Steering 6B.Power Assisted System power steering fluid replacement".
6. Underguard installation
1. Models with front and rear underguards (long type)
1) Install the front underguard to the frame.
Tightening torque: 42 N・m { 4.3 kgf・m / 31 lb・ft }
2) Install the rear underguard (long type) to the frame.
Tightening torque: 42 N・m { 4.3 kgf・m / 31 lb・ft }
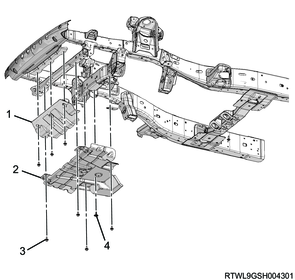
Legend
- Front underguard
- Rear underguard (long type)
- Bolt
- Clip
2. Models with front and rear underguards (short type)
1) Install the front underguard to the frame.
Tightening torque: 42 N・m { 4.3 kgf・m / 31 lb・ft }
2) Install the rear underguard (short type) to the frame.
Tightening torque: 42 N・m { 4.3 kgf・m / 31 lb・ft }
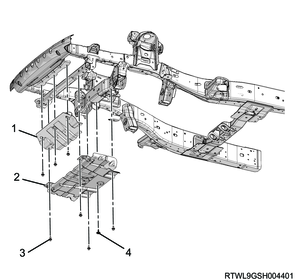
Legend
- Front underguard
- Rear underguard (short type)
- Bolt
- Clip
3. Models with front and rear underguards and oil pan guard.
1) Install the front underguard to the frame.
Tightening torque: 42 N・m { 4.3 kgf・m / 31 lb・ft }
2) Install the rear underguard to the frame.
Tightening torque: 42 N・m { 4.3 kgf・m / 31 lb・ft }
3) Install the oil pan guard to the frame.
Tightening torque: 42 N・m { 4.3 kgf・m / 31 lb・ft }
Models with hydraulic power steering
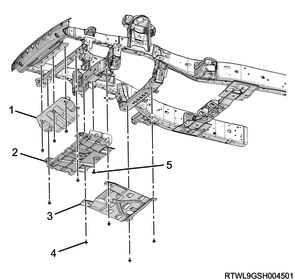
Legend
- Front underguard
- Rear underguard
- Oil pan guard
- Bolt
- Clip
Models with electric power steering
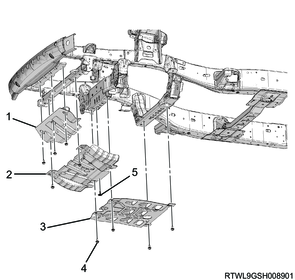
Legend
- Front underguard
- Rear underguard
- Oil pan guard
- Bolt
- Clip
7. Preliminary and post procedures
1. Post procedures
1) Lower the vehicle.
2) Connect the battery cable to the battery negative terminal.
3) Referring to the following, perform the setting of the front door power window switch with AUTO UP/AUTO DOWN function.
Refer to "9.Body, Cab, Accessories 9T.Glass, Windows, Mirrors front door power window switch setting".
4) Close the engine hood.
8. Power steering unit setting
1. Models with electric power steering
1) Referring to the following, perform setting of the power steering unit.
Refer to "6.Steering 6B.Power Assisted System power steering unit setting".