49 L018 001
O2 sensor wrench

NOx SENSOR REMOVAL/INSTALLATION [SKYACTIV-D 2.2]
id0140z7824900
Special Service Tool (SST)
|
49 L018 001
O2 sensor wrench
|
|
Replacement Part
|
Band
Quantity: 4
Location of use: NOx sensor No.1
|
Wiring harness clip band
Quantity: 1
Location of use: NOx sensor No.1
|
tape
Quantity: 1
Location of use: NOx sensor No.1
|
|
Band
Quantity: 7
Location of use: NOx sensor No.2 (2WD)
|
Band
Quantity: 6
Location of use: NOx sensor No.2 (4WD)
|
-
|
NOx sensor No.1
1. Disconnect the negative battery terminal. (See NEGATIVE BATTERY TERMINAL DISCONNECTION/CONNECTION.)
2. Remove the floor under cover (LH). (AWD) (See FLOOR UNDER COVER REMOVAL/INSTALLATION.)
3. Remove the floor under cover. (2WD) (See FLOOR UNDER COVER REMOVAL/INSTALLATION.)
4. Remove the insulator and brace bar. (2WD) (See EXHAUST SYSTEM REMOVAL/INSTALLATION [SKYACTIV-D 2.2].)
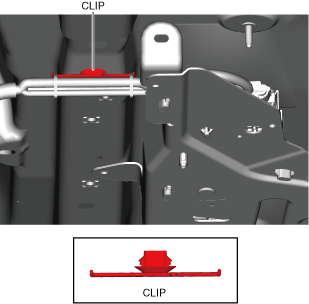
5. Remove the clip.
ac5uuw00008594
|
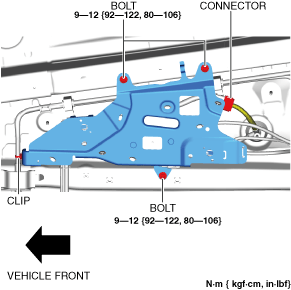
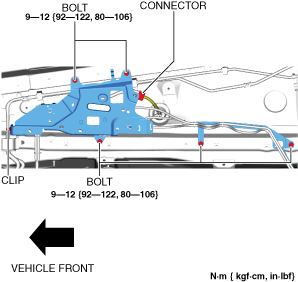
6. Remove the bolts.
7. Disconnect the connector.
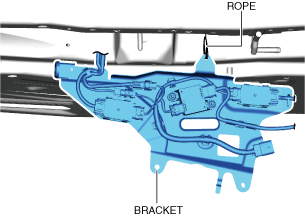
8. Suspend module bracket using a rope as shown in the figure.
ac5uuw00008595
|
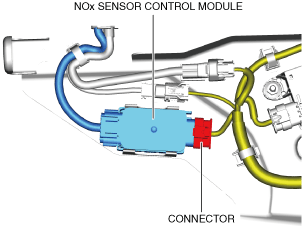
9. Disconnect the connectors.
ac5uuw00008596
|
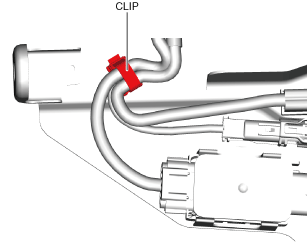
10. Remove the clips.
11. Disconnect the connector.
ac5uuw00008597
|
12. Remove the NOx sensor control module. (seeNOx sensor control module removal note.)
13. Remove the clip.
ac5uuw00008598
|
14. Remove the clip.
ac5uuw00008599
|
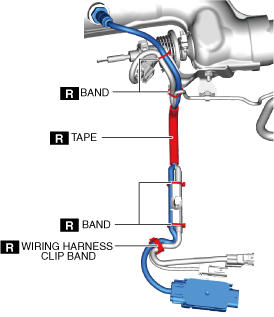
15. Cut the bands. (SeeBand installation note.)
ac5uuw00008600
|
16. Cut the wiring harness clip band.
17. Remove the NOx sensor No.1.
ac5uuw00008601
|
18. Install in the reverse order of removal.
19. Perform compulsory diesel particulate filter regeneration. (See COMPULSORY DIESEL PARTICULATE FILTER REGENERATION [SKYACTIV-D 2.2].)
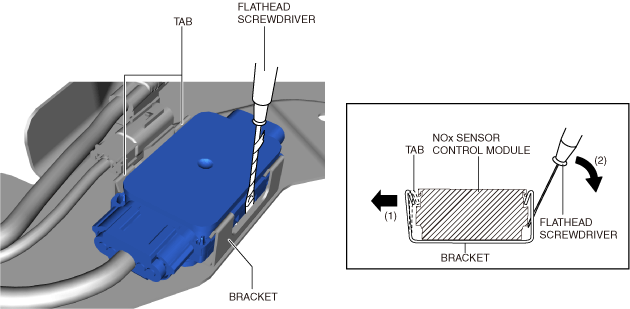
NOx sensor control module removal note
1. Insert a tape-wrapped flathead screwdriver into the position shown in the figure.
ac5uuw00008602
|
2. While moving the tab of the bracket in the direction of arrow (1), move the flathead screwdriver in the direction of arrow (2) and detach the bracket tabs from the NOx sensor control module.
3. Remove the NOx sensor control module.
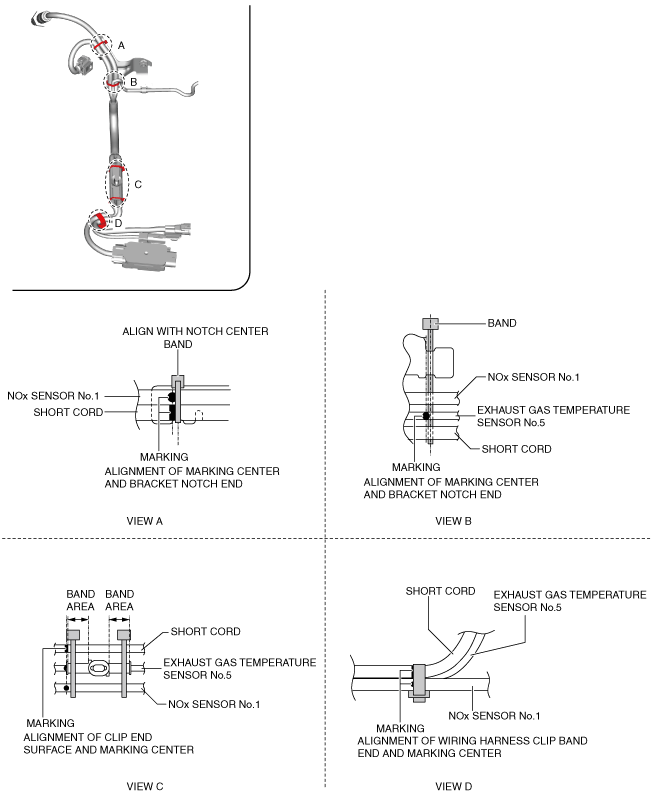
Band installation note
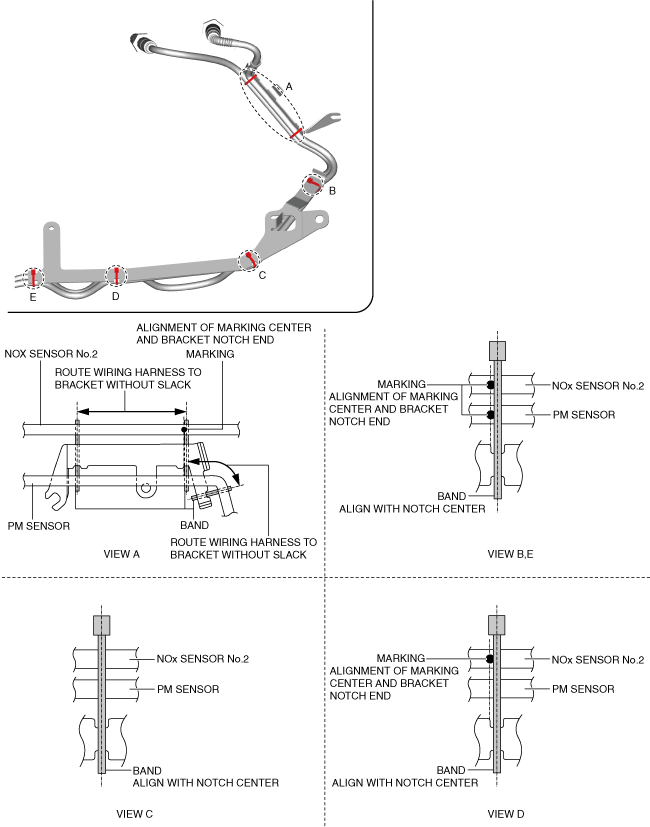
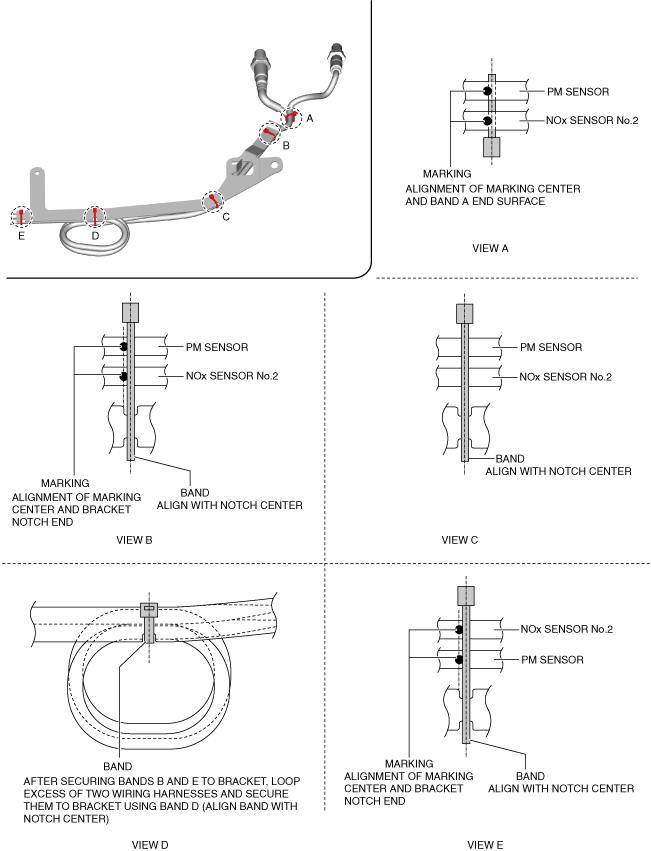
1. Install bands as shown in the figure.
2WD
ac5uuw00008605
|
AWD
ac5uuw00008606
|
NOx sensor No.2
Removal
1. Disconnect the negative battery terminal. (See NEGATIVE BATTERY TERMINAL DISCONNECTION/CONNECTION.)
2. Remove the floor under cover (LH). (See FLOOR UNDER COVER REMOVAL/INSTALLATION.)
3. Remove the floor under cover No.2 (RH). (2WD) (See FLOOR UNDER COVER REMOVAL/INSTALLATION.)
4. Remove the tunnel member. (2WD) (See EXHAUST SYSTEM REMOVAL/INSTALLATION [SKYACTIV-D 2.2].)
5. Remove the clip.
ac5uuw00008607
|
6. Remove the bolts.
7. Disconnect the connector.
8. Suspend module bracket using a rope as shown in the figure.
ac5uuw00008595
|
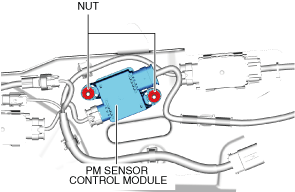
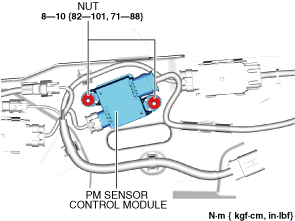
9. Remove the nuts.
ac5uuw00008608
|
10. Set the PM sensor control module out of the way.
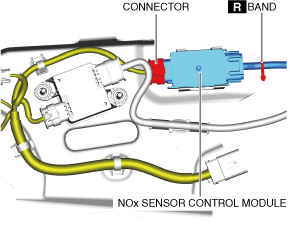
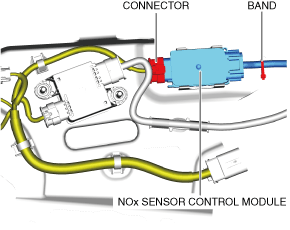
11. Disconnect the connector.
ac5uuw00008609
|
12. Cut the band.
13. Remove the NOx sensor control module. (seeNOx sensor control module removal note.)
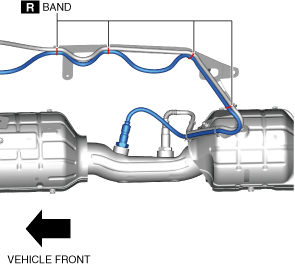
14. Cut the bands.
2WD
ac5uuw00008610
|
AWD
ac5uuw00008611
|
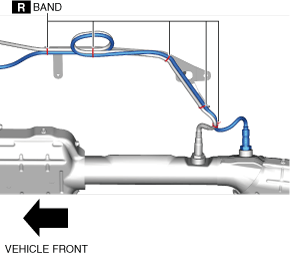
15. Remove the nuts, and remove the bracket from the SCR converter.(2WD)
ac5uuw00008612
|
16. Cut the bands. (2WD)
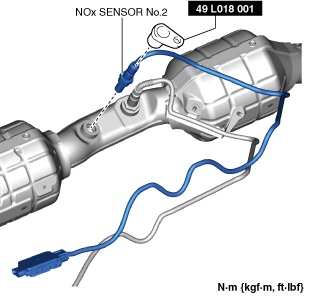
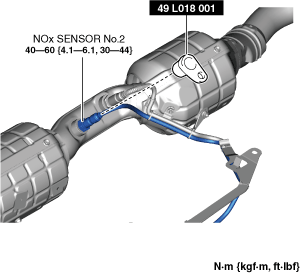
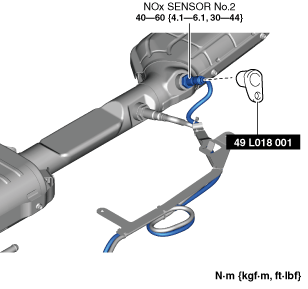
17. Remove the NOx sensor No.2 using the SST.
2WD
ac5uuw00008613
|
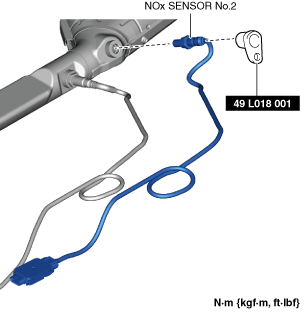
AWD
ac5uuw00008795
|
Installation
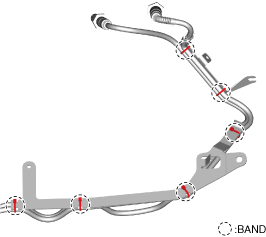
1. Install the bands. (seeBand installation note.)
2WD
ac5uuw00008615
|
AWD
ac5uuw00008616
|
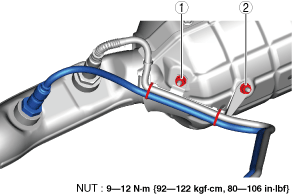
2. Tighten the nuts in the order shown in the figure. (2WD)
ac5uuw00008617
|
3. Install the NOx sensor No.2 using the SST.
2WD
ac5uuw00008618
|
AWD
ac5uuw00008619
|
4. Install the band.
ac5uuw00008620
|
5. Connect the connector.
6. Install the NOx sensor control module.
7. Install the PM sensor control module.
ac5uuw00008621
|
8. Install the nuts.
9. Connect the connector.
ac5uuw00008622
|
10. Install the bolts.
11. Install the clip.
12. Install the tunnel member. (2WD) (See EXHAUST SYSTEM REMOVAL/INSTALLATION [SKYACTIV-D 2.2].)
13. Install the floor under cover No.2 (RH). (2WD) (See FLOOR UNDER COVER REMOVAL/INSTALLATION.)
14. Install the floor under cover (LH). (AWD) (See FLOOR UNDER COVER REMOVAL/INSTALLATION.)
15. Connect the negative battery terminal. (See NEGATIVE BATTERY TERMINAL DISCONNECTION/CONNECTION.)
16. Perform compulsory diesel particulate filter regeneration. (See COMPULSORY DIESEL PARTICULATE FILTER REGENERATION [SKYACTIV-D 2.2].)
NOx sensor control module removal note
1. Insert a tape-wrapped flathead screwdriver into the position shown in the figure.
ac5uuw00009136
|
2. While moving the tab of the bracket in the direction of arrow (1), move the flathead screwdriver in the direction of arrow (2) and detach the bracket tabs from the NOx sensor control module.
3. Remove the NOx sensor control module.
Band installation note
1. Install bands as shown in the figure.
2WD
ac5uuw00008623
|
AWD
ac5uuw00008624
|