49 U027 003
Oil Seal Installer

49 G030 797
Handle
(Part of 49 G030 795)

49 B025 001
Body
[GW6AX-EL]

OIL SEAL (DIFFERENTIAL) REPLACEMENT [GW6A-EL, GW6AX-EL]
id0517i2118800
Special Service Tool (SST)
|
49 U027 003
Oil Seal Installer
|
|
49 G030 797
Handle
(Part of 49 G030 795)
|
|
49 B025 001
Body
[GW6AX-EL]
|
|
Replacement Part
|
Oil seal
Quantity: 1
Location of use: Automatic transaxle (Transaxle case side [GW6A-EL, GW6AX-EL])
|
Oil seal
Quantity: 1
Location of use: Automatic transaxle (Converter housing side [GW6A-EL])
|
Oil seal
Quantity: 1
Location of use: Automatic transaxle (Converter housing side [GW6AX-EL])
|
Transaxle Case Side (GW6A-EL, GW6AX-EL)
1. Remove the front under cover No.2. (See FRONT UNDER COVER No.2 REMOVAL/INSTALLATION.)
2. Drain the ATF. (See AUTOMATIC TRANSAXLE FLUID (ATF) REPLACEMENT [GW6A-EL, GW6AX-EL].)
3. Disconnect the front drive shaft (LH) from the transaxle. (See FRONT DRIVE SHAFT REMOVAL/INSTALLATION.)
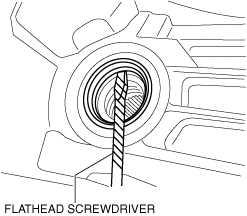
4. Remove the oil seal using a flathead screwdriver.
ac5wzw00009262
|
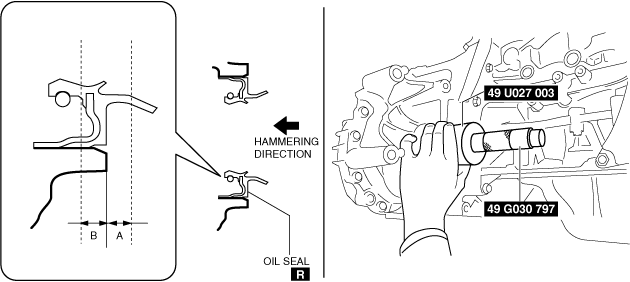
5. Using the SSTs and a hammer, install a new oil seal.
ac5wzw00009263
|
6. Coat the lip of the oil seal with ATF.
7. Connect the front drive shaft (LH) to the transaxle. (See FRONT DRIVE SHAFT REMOVAL/INSTALLATION.)
8. Add the ATF. (See AUTOMATIC TRANSAXLE FLUID (ATF) REPLACEMENT [GW6A-EL, GW6AX-EL].)
9. Install the under cover No.2. (See FRONT UNDER COVER No.2 REMOVAL/INSTALLATION.)
10. Perform the “Mechanical System Test”. (See MECHANICAL SYSTEM TEST [GW6A-EL, GW6AX-EL].)
Converter Housing Side (GW6A-EL)
1. Remove the front under cover No.2. (See FRONT UNDER COVER No.2 REMOVAL/INSTALLATION.)
2. Drain the ATF. (See AUTOMATIC TRANSAXLE FLUID (ATF) REPLACEMENT [GW6A-EL, GW6AX-EL].)
3. Disconnect the front drive shaft (RH) from the transaxle. (See FRONT DRIVE SHAFT REMOVAL/INSTALLATION.)
4. Remove the oil seal using a flathead screwdriver.
ac5wzw00009264
|
5. Using the SSTs and a hammer, install a new oil seal.
ac5wzw00009265
|
6. Coat the lip of the oil seal with ATF.
7. Connect the front drive shaft (RH) to the transaxle. (See FRONT DRIVE SHAFT REMOVAL/INSTALLATION.)
8. Add the ATF. (See AUTOMATIC TRANSAXLE FLUID (ATF) REPLACEMENT [GW6A-EL, GW6AX-EL].)
9. Install the front under cover No.2. (See FRONT UNDER COVER No.2 REMOVAL/INSTALLATION.)
10. Perform the “Mechanical System Test”. (See MECHANICAL SYSTEM TEST [GW6A-EL, GW6AX-EL].)
Converter Housing Side (GW6AX-EL)
1. Remove the front under cover No.2. (See FRONT UNDER COVER No.2 REMOVAL/INSTALLATION.)
2. Drain the ATF. (See AUTOMATIC TRANSAXLE FLUID (ATF) REPLACEMENT [GW6A-EL, GW6AX-EL].)
3. Remove the transfer. (See TRANSFER REMOVAL/INSTALLATION [GW6AX-EL (SKYACTIV-G 2.5T)].) (See TRANSFER REMOVAL/INSTALLATION [GW6AX-EL (SKYACTIV-D 2.2)].)
4. Remove the oil seal using a flathead screwdriver.
ac5wzw00009264
|
5. Using the SSTs and a hammer, install a new oil seal.
ac5wzw00009266
|
6. Coat the lip of the oil seal with ATF.
7. Install the transfer. (See TRANSFER REMOVAL/INSTALLATION [GW6AX-EL (SKYACTIV-G 2.5T)].) (See TRANSFER REMOVAL/INSTALLATION [GW6AX-EL (SKYACTIV-D 2.2)].)
8. Add the ATF. (See AUTOMATIC TRANSAXLE FLUID (ATF) REPLACEMENT [GW6A-EL, GW6AX-EL].)
9. Install the front under cover No.2. (See FRONT UNDER COVER No.2 REMOVAL/INSTALLATION.)
10. Perform the “Mechanical System Test”. (See MECHANICAL SYSTEM TEST [GW6A-EL, GW6AX-EL].)