 |
acxuuw00002305
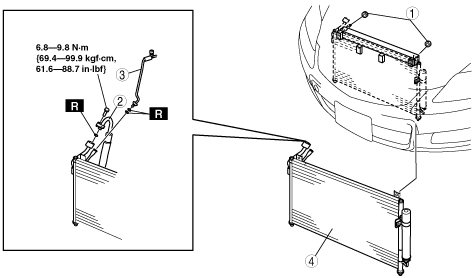
CONDENSER REMOVAL/INSTALLATION [FULL-AUTO AIR CONDITIONER]
id0711a1801200
1. Disconnect the negative battery cable.
2. Discharge the refrigerant from the system. (See REFRIGERANT RECOVERY.) (See REFRIGERANT CHARGING.)
3. Remove the air cleaner. (See INTAKE-AIR SYSTEM REMOVAL/INSTALLATION [L3 Turbo].)
4. Remove the splash shield.
5. Drain the engine coolant. (See ENGINE COOLANT REPLACEMENT [L3 Turbo].)
6. Remove the following parts:
7. Remove the radiator. (See RADIATOR REMOVAL/INSTALLATION [L3 Turbo].)
8. Remove in the order indicated in the table. Do not allow compressor oil to spill.
9. Install in the reverse order of removal.
acxuuw00002305
|
|
1
|
Nut
|
|
2
|
Cooler hose (HI)
|
|
3
|
Cooler pipe No.1
|
|
4
|
Condenser
(See Condenser Installation Note.)
|
10. Perform the refrigerant system performance test. (See REFRIGERANT SYSTEM PERFORMANCE TEST.)
Condenser Installation Note
1. After replacing the condenser, add compressor oil to the refrigeration cycle.