 |
acxaaw00000628
SIDE AIR BAG SENSOR NO. 2 REMOVAL/INSTALLATION
id081000800700
1. Turn the ignition switch to the LOCK position.
2. Disconnect the negative battery cable and wait for 1 min or more.
3. Remove the following parts:
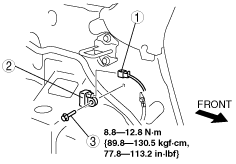
4. Remove in the order indicated in the table.
acxaaw00000628
|
|
1
|
Connector
(SeeConnector Removal Note .)
|
|
2
|
Side air bag sensor No. 2
|
|
3
|
Bolt
|
5. Install in the reverse order of removal.
6. Turn the ignition switch to the ON position and hold for 10 s or more.
7. Verify that the air bag system warning light illuminates for approx. 6 s and goes out.
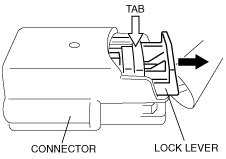
Connector Removal Note
1. Disconnect the connector from the side air bag sensor No.2 by pressing the connector tab and pulling out the lock lever in the direction of the arrow.
acxuuw00000643
|