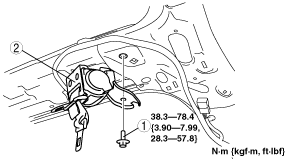
REAR CENTER SEAT BELT REMOVAL/INSTALLATION


id081100800900

Caution
•  The ELR (emergency locking retractor) has a spring that will unwind if the retractor cover is removed. The spring cannot be rewound by hand. If this occurs, the ELR will not work properly. Therefore, do not disassemble the retractor.

1.  Remove the following parts:

(1)  A‐pillar lower trim (See A-PILLAR LOWER TRIM REMOVAL/INSTALLATION.)
(2)  A‐pillar trim (See A-PILLAR TRIM REMOVAL/INSTALLATION.)
(3)  Front scuff plate inner (See FRONT SCUFF PLATE REMOVAL/INSTALLATION.)
(4)  Rear scuff plate inner (See REAR SCUFF PLATE REMOVAL/INSTALLATION.)
(5)  B-pillar lower trim (See B-PILLAR LOWER TRIM REMOVAL/INSTALLATION.)
(6)  Front seat belt upper anchor installation bolt (See FRONT SEAT BELT REMOVAL/INSTALLATION.)
(7)  B‐pillar upper trim (See B-PILLAR UPPER TRIM REMOVAL/INSTALLATION.)
(8)  Rear seat (See REAR SEAT REMOVAL/INSTALLATION.)
(9)  Sub trunk box (See SUB TRUNK BOX REMOVAL/INSTALLATION.)
(10)  Trunk end trim (See TRUNK END TRIM REMOVAL/INSTALLATION.)
(11)  Trunk side trim (See TRUNK SIDE TRIM REMOVAL/INSTALLATION.)
(12)  C‐pillar trim (See C-PILLAR TRIM REMOVAL/INSTALLATION.)
(13)  D‐pillar trim (See D-PILLAR TRIM REMOVAL/INSTALLATION.)
(14)  Map light (See MAP LIGHT REMOVAL/INSTALLATION.)
(15)  Sunvisor (See SUNVISOR REMOVAL/INSTALLATION.)
(16)  Assist handle (See ASSIST HANDLE REMOVAL/INSTALLATION.)
(17)  Headliner (See HEADLINER REMOVAL/INSTALLATION.)

2.  Remove in the order indicated in the table.

acxuuw00001031

1
Bolt
2
Rear center seat belt

3.  Install in the reverse order of removal.