|
am6xuw00004378
OIL COOLER REMOVAL/INSTALLATION [AY6A-EL, AY6AX-EL]
id0517k3331600
1. Disconnect the negative battery cable.
2. Drain the ATF. (See AUTOMATIC TRANSAXLE FLUID (ATF) REPLACEMENT [AY6A-EL, AY6AX-EL].)
3. Drain the engine coolant. (See ENGINE COOLANT REPLACEMENT [MZI-3.7].)
4. Remove in the order indicated in the table.
5. Install in the reverse order of removal.
6. Add engine coolant. (See ENGINE COOLANT REPLACEMENT [MZI-3.7].)
7. Add ATF. (See AUTOMATIC TRANSAXLE FLUID (ATF) LEVEL ADJUSTMENT [AY6A-EL, AY6AX-EL].)
8. Adjust the ATF level. (See AUTOMATIC TRANSAXLE FLUID (ATF) LEVEL ADJUSTMENT [AY6A-EL, AY6AX-EL].)
9. Perform the “MECHANICAL SYSTEM TEST“. (See MECHANICAL SYSTEM TEST [AY6A-EL, AY6AX-EL].)
am6xuw00004378
|
|
1
|
Hose clamp
|
|
2
|
Oil hose
(See Oil Hose Installation Note.)
|
|
3
|
Water hose (thermostat)
|
|
4
|
Water hose (heater)
|
|
5
|
Oil pipe component (radiator side)
|
|
6
|
Oil cooler
|
|
7
|
Oil pipe component (transaxle side)
|
|
8
|
O-ring
|
|
9
|
Radiator (in tank oil cooler)
|
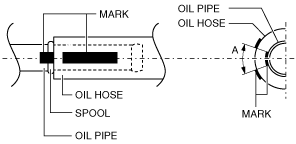
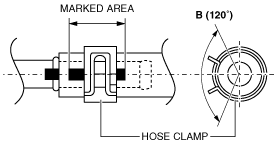
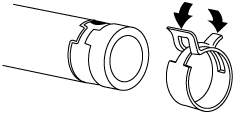
Oil Hose Installation Note
1. Install the oil hose to the oil pipe while being careful of the following:
am6xuw00004375
|
ac9wzw00003049
|
am6xuw00004377
|
2. Verify that the hose clamp does not interfere with surrounding the accessories.