 |
ac9wzw00001487
DTC 31 [HEADLIGHT AUTO LEVELING SYSTEM]
id0902i7404100
Description
Detection Condition
Possible Cause
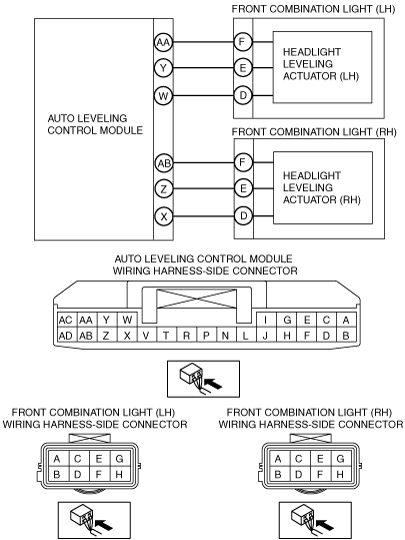
System Wiring Diagram
ac9wzw00001487
|
Diagnostic Procedure
|
Step |
Inspection |
Action |
|
|---|---|---|---|
|
1
|
VERIFY CONNECTOR CONNECTION CONDITION
• Are the auto leveling control module and the front combination light connectors connected securely?
|
Yes
|
Go to the next step.
|
|
No
|
Connect the connector securely.
|
||
|
2
|
INSPECT AUTO LEVELING CONTROL MODULE
• Measure the voltage for auto leveling control module terminals AA and AB.
• Is the voltage B+?
|
Yes
|
Go to the next step.
|
|
No
|
Replace the auto leveling control module.
|
||
|
3
|
INSPECT POWER SUPPLY VOLTAGE OF HEADLIGHT LEVELING ACTUATOR
• Measure the voltage at front combination light terminal E.
• Is the voltage B+?
|
Yes
|
Go to the next step.
|
|
No
|
Repair or replace the wiring harness between the front combination light and the auto leveling control module.
After repair or replacement, perform the auto leveling system initial setting, and re-perform the DTC inspection.
• If the malfunction recurs, go to the next step.
|
||
|
4
|
INSPECT GROUND WIRING HARNESS BETWEEN AUTO LEVELING CONTROL MODULE AND HEADLIGHT LEVELING ACTUATOR
• Turn the ignition switch to the LOCK position.
• Disconnect the negative battery cable.
• Disconnect the front combination light connector.
• Disconnect the auto leveling control module connector.
• Inspect the wiring harness between auto leveling control module terminal X and front combination light (RH) terminal D, and auto leveling control module terminal W and front combination light (LH) terminal D for the following:
• Is the wiring harness normal?
|
Yes
|
Go to the next step.
|
|
No
|
Repair or replace the wiring harness between the front combination light and the auto leveling control module.
After repair or replacement, perform the auto leveling system initial setting, and re-perform the DTC inspection.
• If the malfunction recurs, go to the next step.
|
||
|
5
|
INSPECT WIRING HARNESS BETWEEN AUTO LEVELING CONTROL MODULE AND HEADLIGHT LEVELING ACTUATOR
• Inspect the wiring harness between auto leveling control module terminal Z and front combination light (RH) terminal E, and auto leveling control module terminal Y and front combination light (LH) terminal E for the following:
• Is the wiring harness normal?
|
Yes
|
Go to the next step.
|
|
No
|
Repair or replace the wiring harness between the front combination light and the auto leveling control module.
After repair or replacement, perform the auto leveling system initial setting, and re-perform the DTC inspection.
• If the malfunction recurs, go to the next step.
|
||
|
6
|
PERFORM HEADLIGHT LEVELING ACTUATOR OPERATION INSPECTION
• Connect the auto leveling control module connector.
• Connect the front combination light connector.
• Connect the negative battery cable.
• Perform the auto leveling system inspection.
• Does the headlight leveling actuator operate?
|
Yes
|
Go to the next step.
|
|
No
|
Replace the front combination light, then go to the next step.
|
||
|
7
|
PERFORM DTC INSPECTION
• Perform the auto leveling system initial setting.
• Perform the auto leveling system DTC inspection.
• Is DTC 31 displayed?
|
Yes
|
Replace the auto leveling control module. (See AUTO LEVELING CONTROL MODULE REMOVAL/INSTALLATION.)
|
|
No
|
DTC troubleshooting completed.
|
||