 |
ac9uuw00000471
REAR HEATED OXYGEN SENSOR (HO2S) REMOVAL/INSTALLATION [MZI-3.7]
id0140c3805000
Rear HO2S (LH) Removal/Installation
1. Disconnect the negative battery cable.
2. Disconnect the rear HO2S (LH) connector.
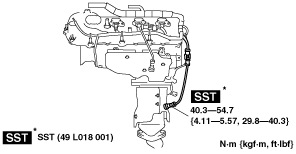
3. Remove the rear HO2S (LH) using the SST.
ac9uuw00000471
|
4. Install in the reverse order of removal.
Rear HO2S (RH) Removal/Installation (L.H.D.)
1. Disconnect the negative battery cable.
2. Remove the following part for easier access.
3. Disconnect the rear HO2S (RH) connector.
4. Remove the rear HO2S (RH) using the SST.
ac9wzw00000158
|
5. Install in the reverse order of removal.
Rear HO2S (RH) Removal/Installation (R.H.D.)
1. Disconnect the negative battery cable.
2. Remove the following part for easier access.
3. Disconnect the rear HO2S (RH) connector.
4. Remove the front wheel and tire (RH). (See GENERAL PROCEDURES (SUSPENSION).)
5. Remove the splash shield (RH).
6. Disconnect the front drive shaft (RH) from the transaxle side. (See FRONT DRIVE SHAFT REMOVAL/INSTALLATION.)
7. Remove the rear HO2S (RH) using the SST.
ac9wzw00000158
|
8. Install in the reverse order of removal.
