 |
OIL SEAL (DIFFERENTIAL) REPLACEMENT [AW6AX-EL]
id0517j6800100
Transaxle Case Side
1. Disconnect the negative battery cable.
2. Drain the ATF. (See AUTOMATIC TRANSAXLE FLUID (ATF) REPLACEMENT [AW6AX-EL].)
3. Remove the drive shaft (left side). (See FRONT DRIVE SHAFT REMOVAL/INSTALLATION.)
4. Remove the oil seal lip using a razor.
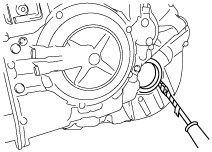
5. Remove and discard the oil seal using a tape-wrapped flathead screwdriver.
ac9uuw00001679
|
6. Using the SST and a hammer, tap a new oil seal so that the specified oil seal position is obtained.
ac9uuw00001680
|
7. Install the drive shaft (left side). (See FRONT DRIVE SHAFT REMOVAL/INSTALLATION.)
8. Add ATF to the specified level. (See AUTOMATIC TRANSAXLE FLUID (ATF) REPLACEMENT [AW6AX-EL].)
9. Connect the negative cable.
10. Perform the mechanical system test. (See MECHANICAL SYSTEM TEST [AW6AX-EL].)
Converter Housing Side
1. Disconnect the negative battery cable.
2. Drain the ATF. (See AUTOMATIC TRANSAXLE FLUID (ATF) REPLACEMENT [AW6AX-EL].)
3. Remove the transaxle. (See AUTOMATIC TRANSAXLE REMOVAL/INSTALLATION [AW6AX-EL].)
4. Remove the converter housing from the transaxle case. (See Automatic Transaxle Workshop Manual [AW6A-EL, AW6AX-EL].)
5. Remove and discard the oil seal using a tape-wrapped flathead screwdriver.
ac9uuw00001802
|
6. Using the SST and a hammer, tap a new oil seal so that the specified oil seal position is obtained.
ac9uuw00001803
|
7. Install the converter housing to the transaxle case. (See Automatic Transaxle Workshop Manual [AW6A-EL, AW6AX-EL].)
8. Install the transaxle (See AUTOMATIC TRANSAXLE REMOVAL/INSTALLATION [AW6AX-EL].)
9. Add ATF to the specified level. (See AUTOMATIC TRANSAXLE FLUID (ATF) REPLACEMENT [AW6AX-EL].)
10. Connect the negative cable.
11. Perform the mechanical system test. (See MECHANICAL SYSTEM TEST [AW6AX-EL].)